How Can We Help?
5.21.05.21.0
Highlights of this release
![]() New reporting home page
New reporting home page
With Pure's new reporting home page, it's now easier that ever to start reporting, organise your workspaces, and access the insights your institution needs.
You can now create and later use templates as pre-made starting points for workspaces. You can also easily browse and favourite workspaces, and see related data stories: with that, your institution's research narratives are always available right at your fingertips.
![]() Propagate keywords between content types
Propagate keywords between content types
Keywords can now be freely propagated between content types with a high degree of control. Keywords can be added either automatically or provided as suggestions for your users to add or remove as they see fit. SDG keyword propagation control is linked to the SDG tagging job, giving administrators more control on how the tagging job functions, but also how results are displayed across your Pure.
![]() CERIF import and export of content
CERIF import and export of content
It's now easier than ever to support your new researchers and Open Access and data portability at the same time. Pure now allows users to export public research output from their personal user overview/content list, and import similar lists to add content to Pure, saving researchers time in getting their content into Pure and making sure institutions have the most up to date information possible.
 Portal Accessibility
Pure are committed to making our Portals as accessible as possible to everyone, including those w/ visual, hearing, cognitive and motor impairments.
Find out more about our enhancements to align with WCAG 2.1 AA requirements below...
Watch the 5.21 New & Noteworthy seminar
Advance notice
The new personal user overview (PUX) has been the standard person profile for all non-UK customers since 5.20.0. With the release of 5.22.0, all our UK customers will also be on the new person profile.
The new personal user overview was introduced in 5.14.0 and is a significant improvement to how personal users access, work, explore and add content within Pure.
The new overview is tightly integrated with the personal user’s Pure and PlumX data at the research output, project and researcher level. This includes coverage of content added by the user and institution, and PlumX mentions, usage, captures, social media and citation data for each research output where available. The new overview is aimed at encouraging productive and meaningful engagement between the personal user and their content in Pure.
For more information and help with preparation for the personal user overview:
- consult the 5.14.0 release notes
- make use of the detailed user guide - written from the perspective of an administrator for their personal users
Integration configurations lost on restart of Pure
As a part of the 5.21 release of Pure we have fixed a bug which caused the following integrations to lose their configurations upon restart of Pure.
- Jisc
-
PlumX
- Funding Institutional
- WoS Metrics
If you made use of the integrations prior to 5.21, it is recommended you revisit them and configure them again. This way you ensure they are correctly set up and going forward the configurations are persisted correctly in Pure.
Old Scival and Scopus metrics integrations deprecated
As a part of the 5.21 release of Pure we have deprecated the old Scival and Scopus metrics integrations. This means that they are no longer available in Pure.
If you are still interested in continously importing these metrics you will have to set up the new integrations that have been made available in this release. See the following sections:
Version 5.21.0 (4.40.0) of Pure is now released.
Always read through the details of the release - including the Upgrade Notes - before installing or upgrading to a new version of Pure.
Release date: 8 June 2021
Hosted customers:
- Staging environments (including hosted Pure Portal) will be updated 16 June 2021( APAC + Europe) and 17 June 2021 (North/South America).
- Production environments (including hosted Pure Portal) will be updated 30 June 2021 (APAC + Europe) and 1 July 2021 (North/South America). Please note that this deployment will be 5.21.1 (5.21.0 with minor updates)
Download the 5.21 Release Notes
last updated 18 June 2021
1. Web accessibility
We continue to work towards being fully WCAG 2.1 AA compliant by ensuring accessible design in new features.
In addition to this we implemented the following improvements to existing features:
1.1. Pure Portal accessibility updates
We have improved many existing features to now align with the WCAG 2.1 AA standards. The main improvements focus on:
- Introducing semantic HTML: semantic HTML allows screen readers to better signpost our pages for better navigation. It also improves SEO (Search engine optimization).
- Keyboard accessibility: using the portal with keyboards only has been improved significantly and keyboard traps have been removed.
- Screen reader accessibility: information is now conveyed more correctly as we revised some WAI-ARIA labels and removed others, letting the browser handle these elements with its native behavior.
- Visual contrast: enhancements to links and buttons make it much easier to distinguish between normal text and links thanks to underlines, hover/focus color changes, and other styling methods.
We expect to update the Pure Portal Voluntary Product Accessibility Template (VPAT) within the next month. This will reflect our latest changes. The current VPAT can be found via the 'Accessibility Statement' page of your Portal, via the link in the footer.
Here is a more detailed list of the improvements introduced in this release.
General accessibility:
- 'Similar profile' popup is now accessible.
- Default focus is set on search input.
- All dropdowns have received a major overhaul, including keyboard navigation, roles and improved WAI-ARIA.
- All navigations have also received an overhaul regarding WAI-ARIA and keyboard navigation.
- Tooltips are labelled as such in accordance with WCAG standards.
- Search filter inputs are now categorized with 'fieldset' and 'legend' tags.
- 'Fingerprint' headline on content pages now only contains the 'Fingerprint' text and not the description underneath.
- Collaboration map for Community Portals now has the 'Select country from list' button.
- The 'scope' attribute that identifies whether a cell is a header for the row, column, or group of rows/columns, is now added to tables.
Keyboard accessibility:
- Graphs on profile pages can now be accessed with keyboard.
- 'Cite this' keyboard trap has been resolved: it is now possible to SHIFT + TAB outside of the box.
- 'Scroll to top' button now works with pressing ENTER.
- Search filter check boxes can now be activated with pressing SPACE.
Screen reader accessibility:
- The count in the main navigation (e.g. Research output 127) is now conveyed to screen readers.
- Fingerprint percentage is now communicated to screen readers.
2. Privacy and personal data
The protection of privacy and personal data is extremely important to Pure. Based on guidance provided by GDPR (and similar frameworks), we continually add improvements to how Pure handles sensitive data, and we continually provide tools for users to manage their own and others' data in Pure.
This release does not introduce any new updates related to privacy and personal data.
3. Pure Core: Administration
3.1. Match Scopus IDs for Persons: a cleanup job for author IDs
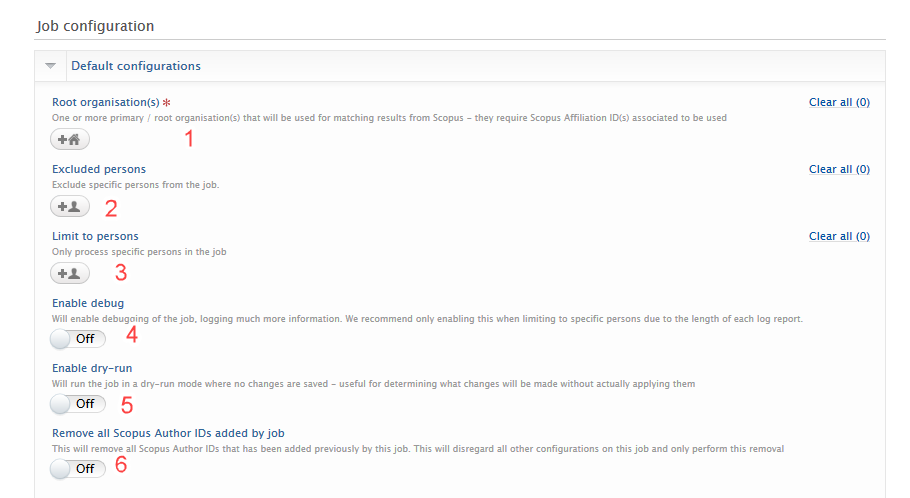
Want to improve the accuracy and completeness of Scopus Author IDs on person profiles? We have introduced a cron job that uses Scopus to check author IDs in Pure and provides options to add or remove IDs if necessary. The job can also use a combination of a person's name variants and research outputs to determine if IDs should be added and verified, or removed. The job can be configured to exclude or limit persons. There is even a dry-run mode to verify results before adding or removing IDs: this shows you what would happen but does not change the data.
Click here for more details…
How the job works
The job works by identifying persons in Pure that have a Scopus Author ID (this includes active and former persons). The job will then query Scopus with that ID and check if:
- Scopus has a record of that Author ID (regardless of whether the person is active or former)
- The ID is current (or has been taken over by another ID)
- The spelling (including variants) of the name in Pure matches that of the author profile in Scopus
- There is an overlap between the publications related to the author in Scopus, and the publications related to the person in Pure.
- Has an ORCID (regardless of whether the person is active or former)
- If "Enable ORCID check" configuration is enabled
- Is an Active Academic
- If "Enable name check" configuration is enabled
Based on the above steps, the job will determine if the Scopus Author ID found in Pure should be kept, or suggest it be removed. The job can be configured to also use name(s) and ORCID. In the case where only an ORCID is found on the person in Pure, the job will attempt to find the relevant Scopus Author ID and add it as a suggestion on the person.
If the job finds that a Scopus Author ID on a person is a perfect match, i.e. the name and root organisation match and there is an overlap of research outputs, it will convert the Scopus Author ID to a verified ID, signified with a distinct badge on the ID.
The job will verify and suggest removing IDs on all persons (active and former), but will only add IDs to active persons.
To configure the job
The job can be found at Administrator > Job > Cron job scheduling > Match Scopus IDs for Persons. The job can be scheduled to run at pre-selected times. For Pure Portal customers, we highly recommend running this job during off-peak hours as any changes to Person data will trigger portal updates.
|
Default configurations The Default configurations section of the job provides context for how the job should run in terms of adding or removing Scopus author IDs.
|
 |
|
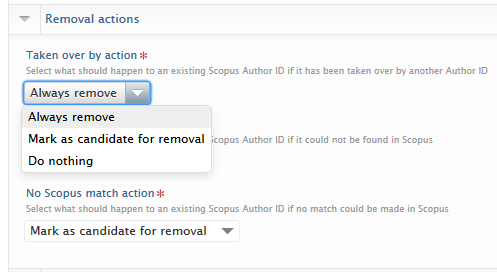
Scopus ID removal actions Coupled with the default configurations, options provided here will determine what should be done to Scopus Author IDs if found to be taken over by another author ID, not found in Scopus, or if the ID is found, but the name and organisation do not match and there are no overlapping research outputs i.e. the ID is incorrect. For each scenario, select what removal action the job should take:
If Always remove is selected, the ID will be immediately removed whereas if Mark as candidate for removal is selected, a distinct badge will be shown next to the relevant ID on the person editor. If Do nothing is selected, the ID will remain on the person and will not have a badge attached to it. |
Example of badge on Scopus ID when 'Mark as candidate for removal' is selected:
|
|
Scopus ID addition actions Options provided here allow the job to use the ORCID for searching and verifying in Scopus, and for a name search (within the root organisation - as defined in the general configuration). Based on the above input data, if the job finds a Scopus Author ID that matches the author name, organisation, and has overlapping research outputs but is not already present on the person, it will add the ID to the person with a distinct badge. |
|
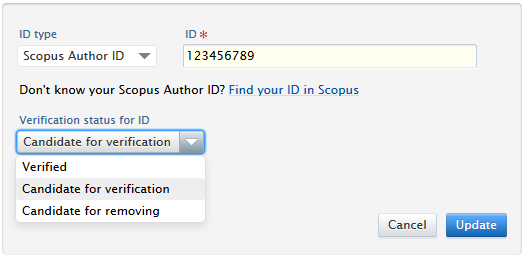
Editing Scopus Author IDs in the person editor
Users can edit the ID and can change the badge if necessary.
Synced IDs
Synced IDs will also be scanned but will never be removed or marked as verified. If the ID appears to be incorrect, no removal action will be taken but the ID will receive the Candidate for removing badge. The badge serves as a notification that the ID needs to be checked and, if necessary, updated in the sync source data.
Inspecting the job log
Whilst we will always recommend only enabling debug when limiting to specific persons, the debug log entries provide valuable information on problematic person data. After each run we suggest reviewing the job statistics. The summary includes the counts of IDs added, suggested for removal, verified etc. It also helpfully provides phrases to search the job log for inspecting specific persons under specific parameters.
Job statisticsINFO: Complete match (name & affiliation & related research output)----------------------------------------Added new Author Id as Verified (search: Adding new Author ID as verified): X
Marked existing Author Id as Verified (search: Marking existing Author ID as verified): XPartial match (name or affiliation or related research output)----------------------------------------Marked existing Author Id as Candidate for Verification(search: Marking existing Author ID as candidate for adding): X
Marked existing Author Id as Candidate for Removing (search: Marking existing Author ID as candidate for removing): X
Added new Author Id as Candidate for Verification (search: Adding new Author ID as candidate for adding): X
Not good enough match for adding new Author Id (search: Not good enough match for adding new Author ID - skipping): X
No match----------------------------------------Removed existing Author Id (search: Removing existing Author ID): XMarked existing Author Id as Candidate for Removing (search: Marking existing Author ID as candidate for removing): X
Not good enough match for adding new Author Id (search: Not good enough match for adding new Author ID - skipping): X
Author Id taken over by another Author Id in Scopus----------------------------------------------------------Total (search: Author ID taken over by other Author ID): XAdded taken over by Author Id with prior status (search: Adding taken over by Author ID as): XMarked existing taken over by Author Id as verified (search: Marking taken over by Author ID as Verified): XRemoved existing Author Id (search: Removing old taken over by Author ID): XMarked existing Author Id as Candidate for Removing (search: Marking old taken over by Author ID as candidate for removal): X
ORCID-----------Added new Author Id as Verified (search: Adding Author ID): X
Marked existing Author Id as Verified (search: Author ID already exists): XNo Author Id found in Scopus for ORCID: X
Author Id not found in Scopus--------------------------------------Removed existing Author Id (search: No result found in Scopus - removing Author ID): XMarked existing Author Id as Candidate for Removing (search: No result found in Scopus - marking Author ID as candidate for removing): X
Skipped--------------------------------------Skipped re-adding previously removed Author Id (search: Skipped re-adding previously removed Author Id): XJob timingsINFO: Related Research Output: totalTime=243ms, invocations=1, minTime=243ms, maxTime=243, ms/invocation=243, ops/sec=4.1152263 Scopus Author ID Details: totalTime=611ms, invocations=1, minTime=611ms, maxTime=611, ms/invocation=611, ops/sec=1.6366612
|
Problematic Scopus IDs
We suggest reviewing the warnings in the job log and searching for the phrase ‘WARN: Could not check Author ID in Scopus - please perform this check manually’. This is a general warning and requires close inspection of the person and any Scopus IDs associated with that person.
Examples of problems the job encounters to trigger this warning:
- Person has added a non-standard ID as a Scopus ID. Common examples include a URL instead of an ID.
- For a standard ID, Scopus returns multiple taken over IDs.
The job will always err on the side of caution regarding IDs and will not automatically remove any IDs unless specifically configured to do so. In many cases, the warning will only show when the specified root organisation does not have a Scopus Affiliation ID.
Effect on portal updates
Any modification, including the addition of tags on Scopus Author IDs, on Persons may have an effect on portal updates. We HIGHLY RECOMMEND that the job is scheduled to run during off-peak hours.
3.2. CERIF import and export (research output)
To support Open Access and data portability, Pure now allows users to export public research output from their personal user overview/content list, and to import similar lists to add content to Pure.
Click here for more details...
Exporting content to a CERIF XML file
Users can export to a CERIF XML format file by filtering the content they would like exported in their research output overview screen. At the bottom of the screen is a clearly labelled option to export in CERIF XML.
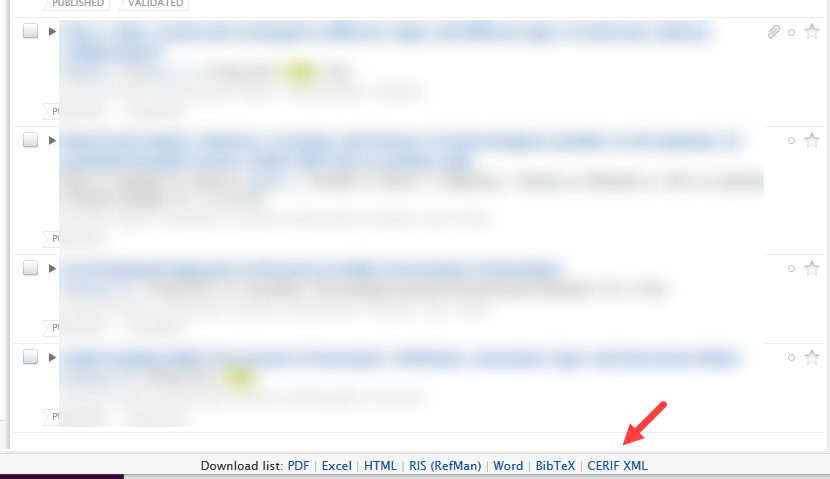
This file can then be downloaded and used elsewhere.
Importing from a CERIF XML file
Users can import content via a CERIF XML format file by utilizing the Import from file functionality in the submission flow. Users can either copy and paste the XML directly from the file, or upload the whole file. A duplicate record check is performed and users can import content as they choose.
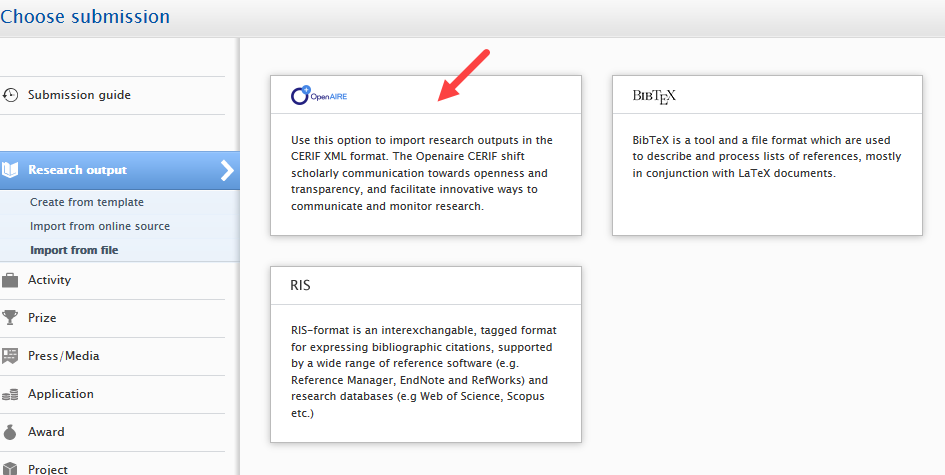
Expanding beyond research output content type
The ability to export more content types in CERIF XML format will soon be available in Pure.
3.3. Introducing the preprint sub-type
A user can now import, create and report on preprints in much the same way they can with other research outputs.
In support of Open Science and Open Access, preprints are now an integral part of Pure. This gives researchers more options to disseminate their research outputs and outcomes. A preprint is typically defined as a complete written description of a body of scientific work that has yet to be published in a journal. A preprint can also function as a commentary, a report of negative results, a large data set and its description, and more. It can also be a paper that has been peer-reviewed and is either awaiting formal publication by a journal, or was rejected but the authors are willing to make the content public. In short, a preprint is a research output that has not completed a typical publication pipeline but is of value to the community and deserving of being easily discovered and accessed.
Click here for more details...
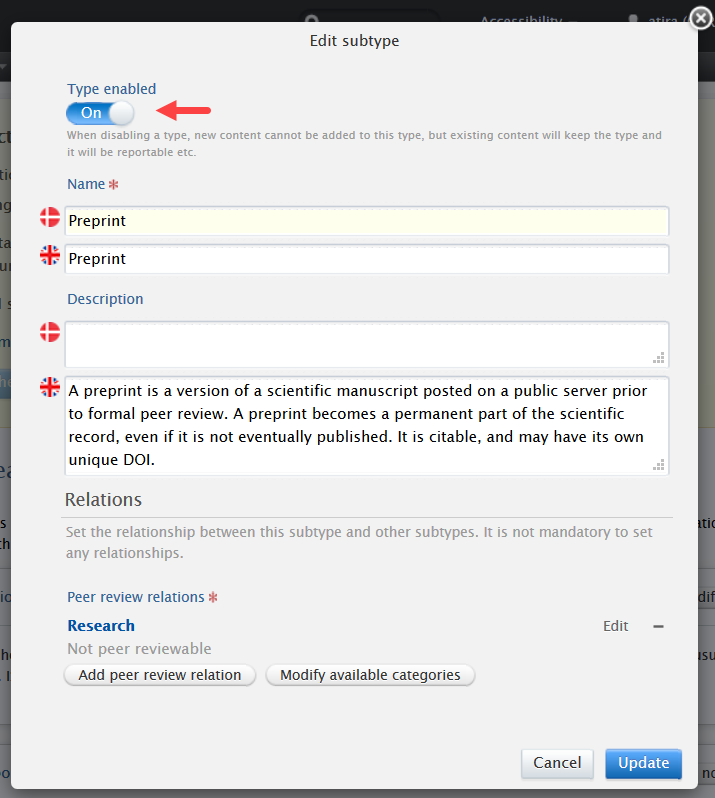
Enabling preprint sub-type
|
Administrators can enable the preprint sub-type in Administrator > Research outputs > Types:
|
|
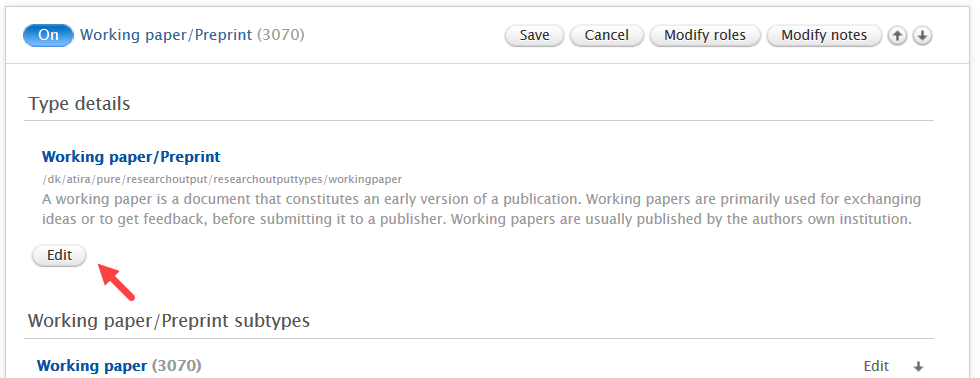
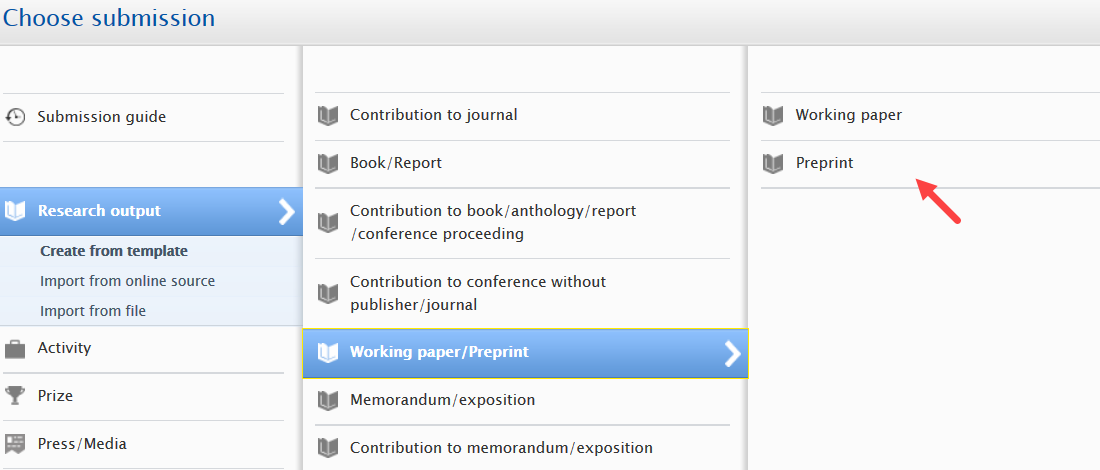
We suggest Administrators update the name of 'Working paper' template to 'Working paper/Preprint' so that users can find the Preprint sub-type more easily. To do so, edit the 'Working paper' template and update the name. We also recommend description updates if your institution has preferred terminologies for working papers and preprints. Always remember to click Update and Save after making any changes to a template. |
|
Selecting Preprint sub-type as a user
When enabled, Preprints are displayed as a sub-type of the working paper template. To manually create a preprint, users should select 'Research output' - 'Working paper/Preprint'template and then select the 'Preprint' sub-type.
Importing preprints
Specific import sources have been mapped to the preprint sub-type. When a user imports content from:
- ArXiv
- MedRxiv
- BioRxiv or
- SSRN
The import will appear by default as a preprint. Users will still be able to change templates if necessary.
When importing from other research output sources not listed above, if no journal data is found on the record, the imported content will also be mapped to the preprint sub-type.
The preprint editor
The fields available on the preprint editor are as comprehensive as possible to cater for different institutions needs and interpretations of what a preprint can be.
We highly recommend adding your users' most frequently used preprint servers as Publishers to help them maintain the best possible record.
Migrating content to the Preprint sub-type
If your Pure already has preprints (but defined under different research output templates/sub-types), you can bulk change these to use the preprints sub-type. However, please note that some fields (such as Journal data in a Journal Article) may not be mapped to the preprint sub-type. Any fields not mapped will be added in the history and comments tab of the specific content.
Preprints in Reporting and Web Service
As the new preprints sub-type is part of the working paper template, it is automatically available in reporting and the WS.
3.4. Propagate keywords between content types
You can now propagate keywords between content types that have been configured with the same keyword group.
Keywords on a source content type can now be propagated to appear on the target content type either as suggested or automatically accepted keywords. An example of general use includes ASJC Scopus subject areas added to a research output that can now be propagated to the organisation of the contributors either as suggested keywords or automatically accepted keywords. Whilst the general functionality allows for propagation across most content types, SDG keyword propagation is limited to research output propagating to persons, projects and/or organisations. Configuring the SDG keyword propagation is hosted within the SDG tagging job configuration.
Keyword propagation is currently limited to those customers with the Reporting module, but will be available to all customers in 5.22.0. It will only be available for Pure 5 customers.
Click here for more details...
Between which content types can you propagate keywords?
There are predefined directional flows between content types. Keywords can only be propagated from specific content types to other specific content types. These are shown in the table below:
From |
To |
|---|---|
| Organisation |
Activity Application Award Person Project Research output Impact (UK customers only) |
| Person |
Activity Application Award Project Research output Impact (UK customers only) |
| Journal | Research output |
| Publisher | Research output |
| Research output |
Organisation Person Project |
What's the difference between Suggested keywords and Automatically accepted keywords?
Suggested keywords need to be accepted by users themselves before they are available on content, while Automatically accepted keywords are immediately displayed on content. The ability to have automatically accepted keywords gives administrators more control over which keywords should be immediately displayed on content
Suggested keywords
These are displayed on the target content type within their own section called 'Suggested keywords'.
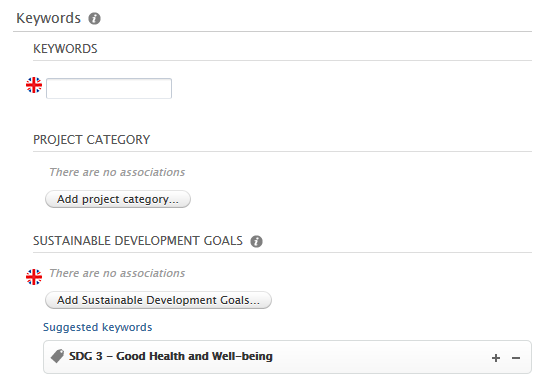
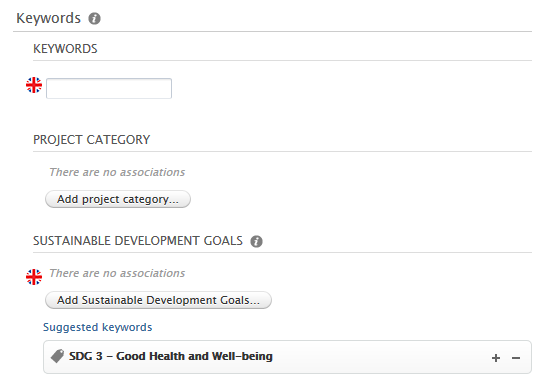
In the example below, we have previously configured the SDG job to propagate SDG keywords from research output to projects as suggested keywords. When a user manually adds an SDG keyword to a research output (source content type), or the SDG job automatically adds it to the research output, the same keyword is presented as a suggested keyword on any related projects (target content type). A user will need to manually accept (or reject) the keyword on the project.
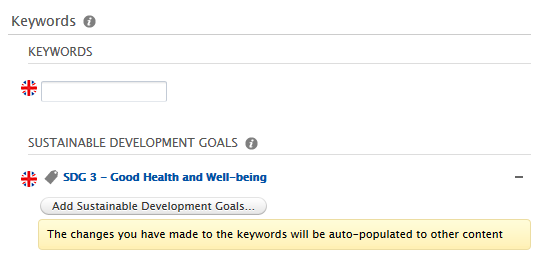
Source content type keyword display:
|
Target content type keyword display:
If a user then accepts (clicks the +) the keyword: 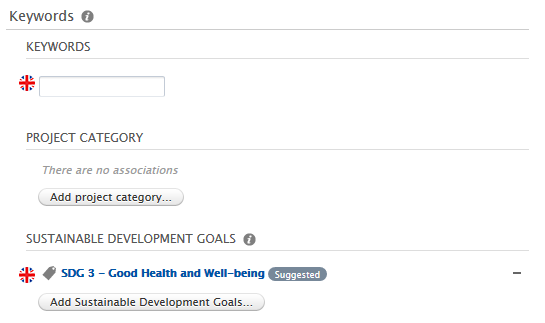 If a user rejects (clicks the - ) the keyword: 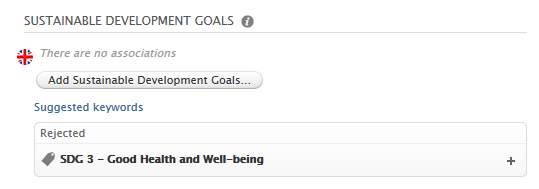
|
Automatically accepted keywords
These are displayed directly on the target content type as an accepted keyword.
In the next example below, we have previously configured the SDG job to propagate SDG keywords from research output to projects as auto-accepted keywords. As before, when a user manually adds an SDG keyword to a research output (source content type), or the SDG job automatically adds it to the research output, the same keyword is automatically added as an accepted keyword on any related projects (target content type). If a user then removes it, it is added to the rejected list on the target content type.
Source content type keyword display:
|
Target content type keyword display:
If a user removes (clicks the - ) the keyword:
|
Propagate keywords between content types: all keyword groups except SDG Keywords
Keywords can be propagated between content types when the same keyword group is present on each content type. Note: there are specific flows between content types, and not all content types can propagate to all other content types.
Instructions |
Screenshots |
|---|---|
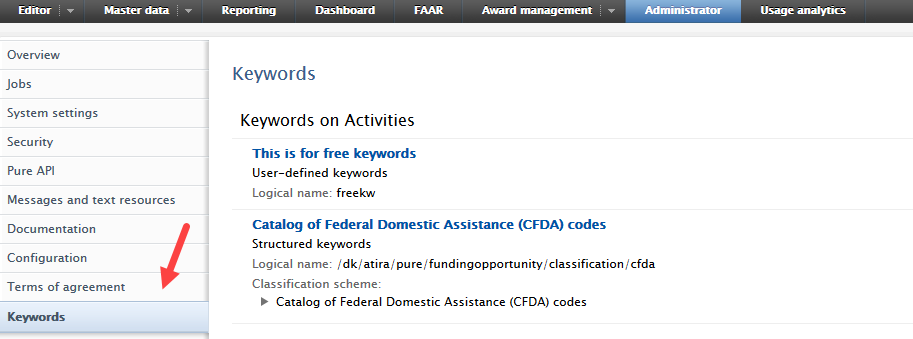
| To enable propagation between content types, navigate to Administrator > Keywords then select the content type you would like to propagate to, then edit the keyword group you would like to propagate. |
|
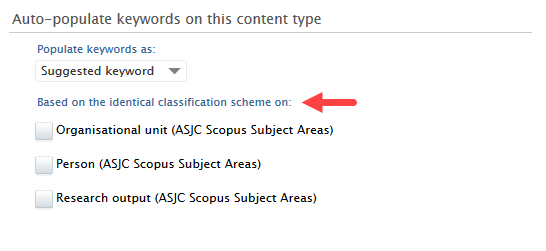
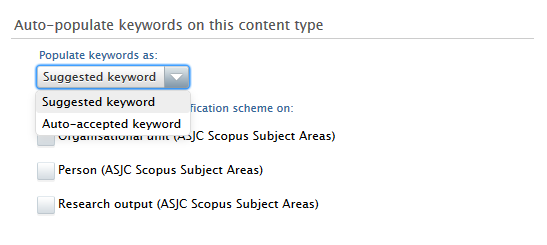
Within the keyword group editor, scroll to the Auto-populate keywords on this content type section and then check which content types you would like to propagate from. Choose from the drop down menu how these keywords should be propagated - as suggested keywords or as auto-accepted keywords. |
|
Propagate keywords between content types: SDG keywords
SDG keywords that are automatically added to research output and persons (via the Management Of Keywords Reflecting Sustainable Development Goals (SDGs) Job - the functionality and use of which is covered extensively in the 5.20.0 release notes) can now be propagated as suggested or automatically accepted keywords.
If, for example, the SDG job does not add any keywords to persons or organisations due to them having sparse or no descriptions, administrators can now propagate SDG keywords on research output to the contributing person and organisations directly. You can also propagate keywords from research output to projects.
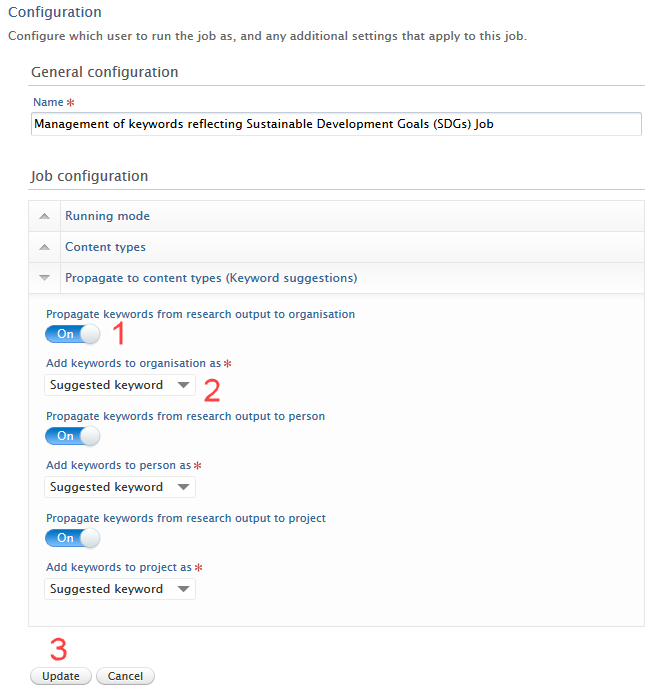
To configure the propagation method, Administrators will need to configure the SDG job and not the keyword group.
Instructions |
Screenshots |
|---|---|
|
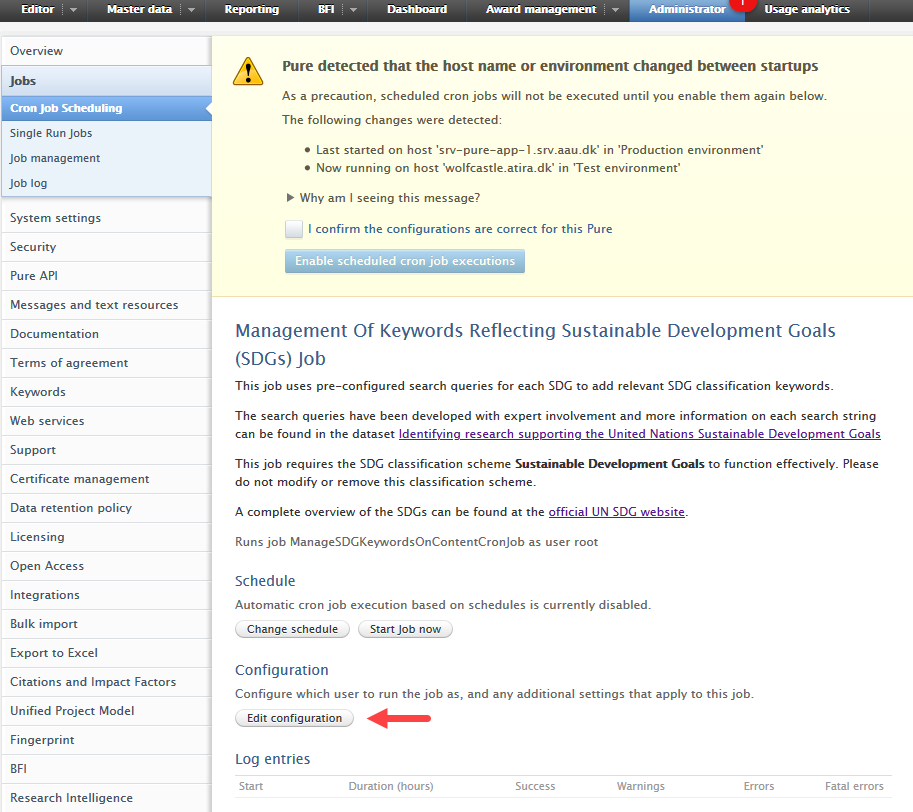
Navigate to the SDG keyword job: Administrator > Jobs > Cron jon scheduling > Open Management Of Keywords Reflecting Sustainable Development Goals (SDGs) Job > Edit configuration |
|
Enable propagation from research output to content type:
|
|
|
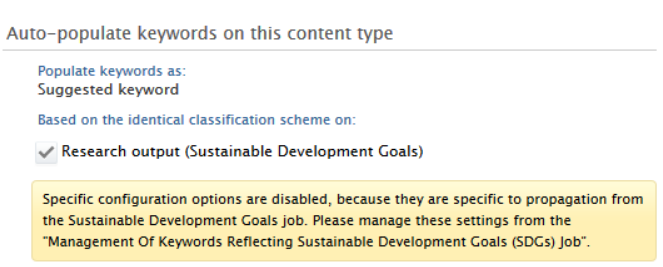
Control over SDG keyword propagation is on the job, not the keyword group. To reduce confusion, we have centralised propagation configuration in the SDG job. Any propagation changes made in the job will be reflected in the keyword group, with clear signs that this is controlled within the job configuration. |
|
NOTE: If you have previously enabled the propagation of SDG keywords between organisation and person (or vice versa) in the keyword group configuration, you will need to disable this option if you want to propagate SDG keywords from research output to persons/organisations/projects.
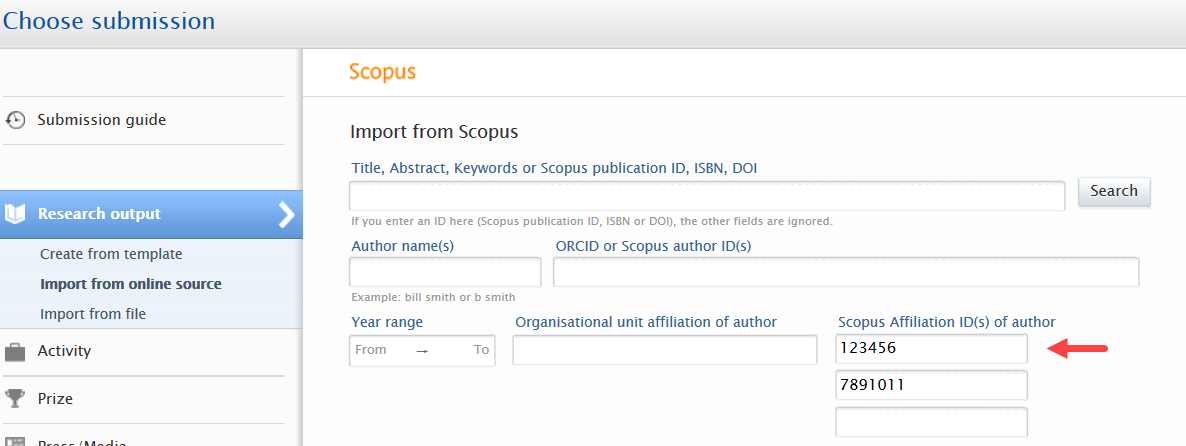
3.5. Import from online source - use Scopus Affiliation IDs as only search criteria
Users importing content from Scopus via the Import from online source functionality can now use Scopus Affiliation IDs as their only search term. This greatly simplifies bringing content from a specific institution and greatly improves the quality of results they receive in their search.
Click here for more details...
User can add multiple Scopus Affiliation IDs to be used as the only search input or in combination with other search terms.
4. Pure Core: Web Service
4.1. New Event type in change endpoint
New Event type in change endpoint in Web Service 5.21
A new event type, MetricValueChange, has been introduced to separate/distinguish between content values and metric value changes. Changes to metrics will no longer be masked as a contentChange, which greatly reduces the need to check content if using this endpoint.
Examples of the effects of this event type are shown below:
- If a user/job only modifies metrics of a content item, only the MetricValueChange will be listed.
- If a user/job edit both normal content fields, and modify metrics within the same session, both a contentChange and MetricValueChange will be listed.
Note: The existing Web Service versions (518/519/520), will keep the existing behavior. In these endpoints, the MetricValueChange event type does not exist. Any changes to metrics will still be listed as contentChange.
4.2. Filtering content: exclusion via type URIs
New filtering option added to existing endpoints in Web Service 5.21
It is now possible search for content of a specific type, or exclude content from the search result based on its type.
Example
This query will return Research outputs of the type 'Thesis document', when the end of the URI matches that of the input, and the query states to use the type URIs for exclusion.
<?xml version="1.0"?>
<researchOutputsQuery>
<excludeByTypeUri>true</excludeByTypeUri>
<typeUris>
<typeUri>%/thesis/doc</typeUri>
</typeUris>
</researchOutputsQuery>
5. Integrations
5.1. Scopus Metrics Integration
In order to improve our ingestion of Scopus metrics into Pure, we have deprecated the old import job called Scopus Citations Synchronisation and created a new integration for Scopus metrics based on the same concept as our PlumX and WoS metrics integrations.
Due to the amount of queries done across all Pure clients and the way the existing integration was built, we were making too many requests towards the Scopus API within short periods of time. This would result in various errors such as timeouts, connections resets, and throttling.
The new integration will, over the course of 7 days, look for metric updates through the Scopus API, ensuring we only query for a small subset of publications in batches. By the end of the 7 day cycle all publications with a Scopus ID or Scopus metrics will be checked and updated. The integration can be found and enabled in Administrator > Integrations > Scopus metrics.
Scopus subscription requirements
Click here for more details...
Enabling the integration requires a valid Scopus subscription, which needs to be configured in the Scopus import configuration. The integration will issue a warning if the Scopus subscription is not configured.

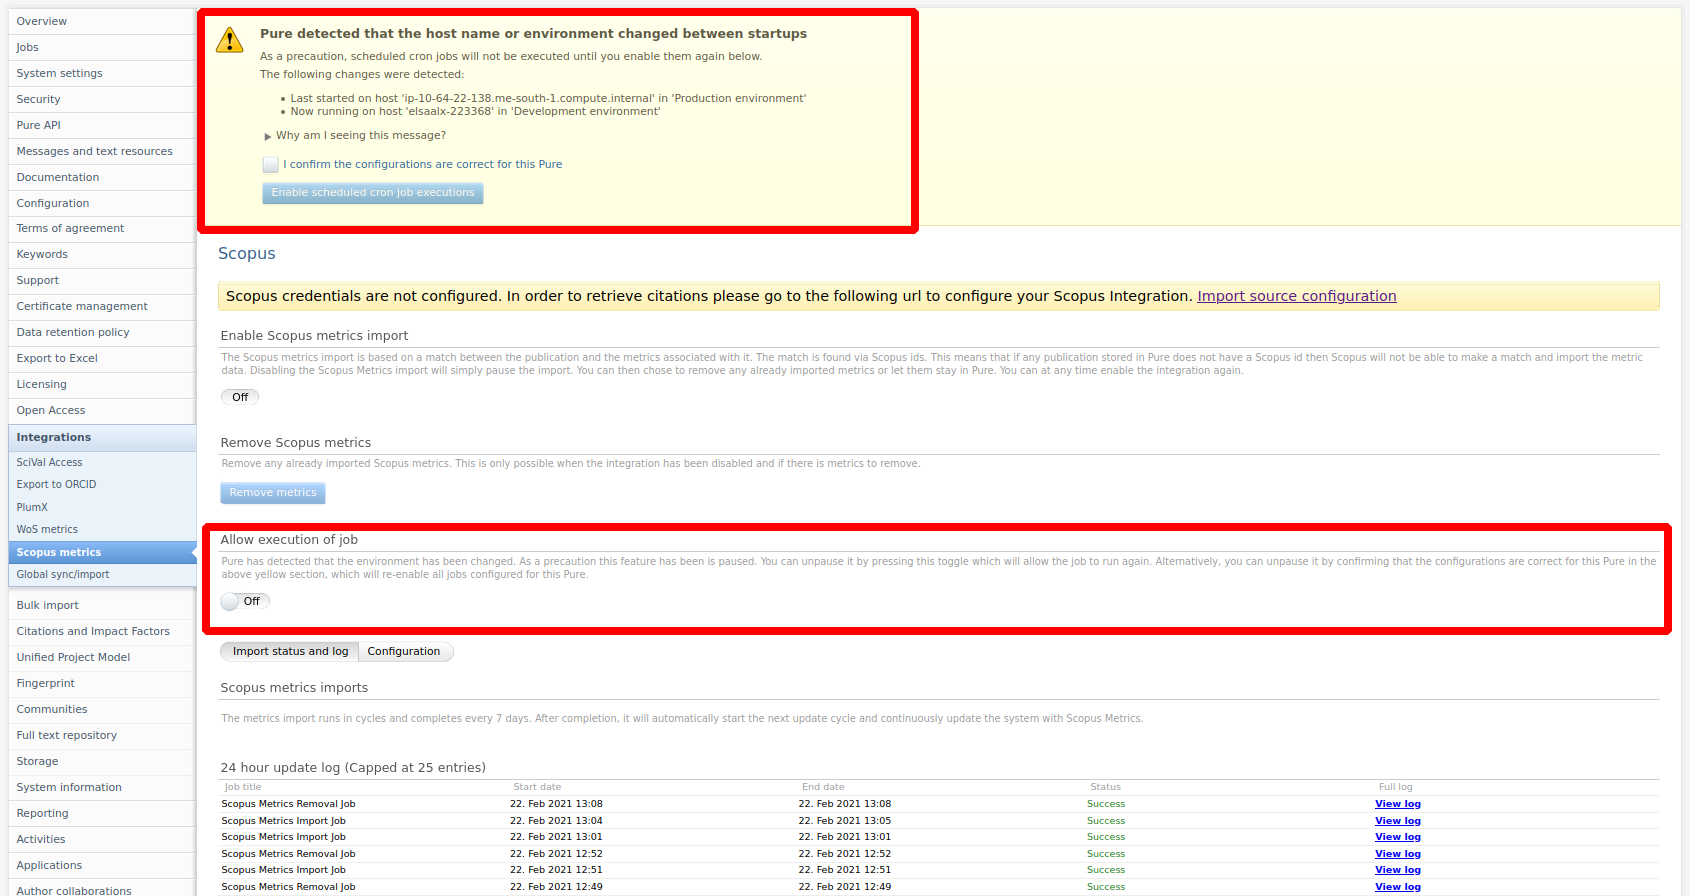
Reaction to Pure environment changes
Click here for more details...
The integration will be paused if Pure detects a change in the environment. This is to ensure that multiple client systems are not querying the Scopus API, potentially causing throttling issues. This can be circumvented by confirming the configuration of the system in the top dialogue box (note this might also effect other jobs) or explicitly allowing the integration to run using the toggle in the job configuration. It is recommended to not run the integration in test/staging systems unless you are testing that specific integration.
Enable the integration
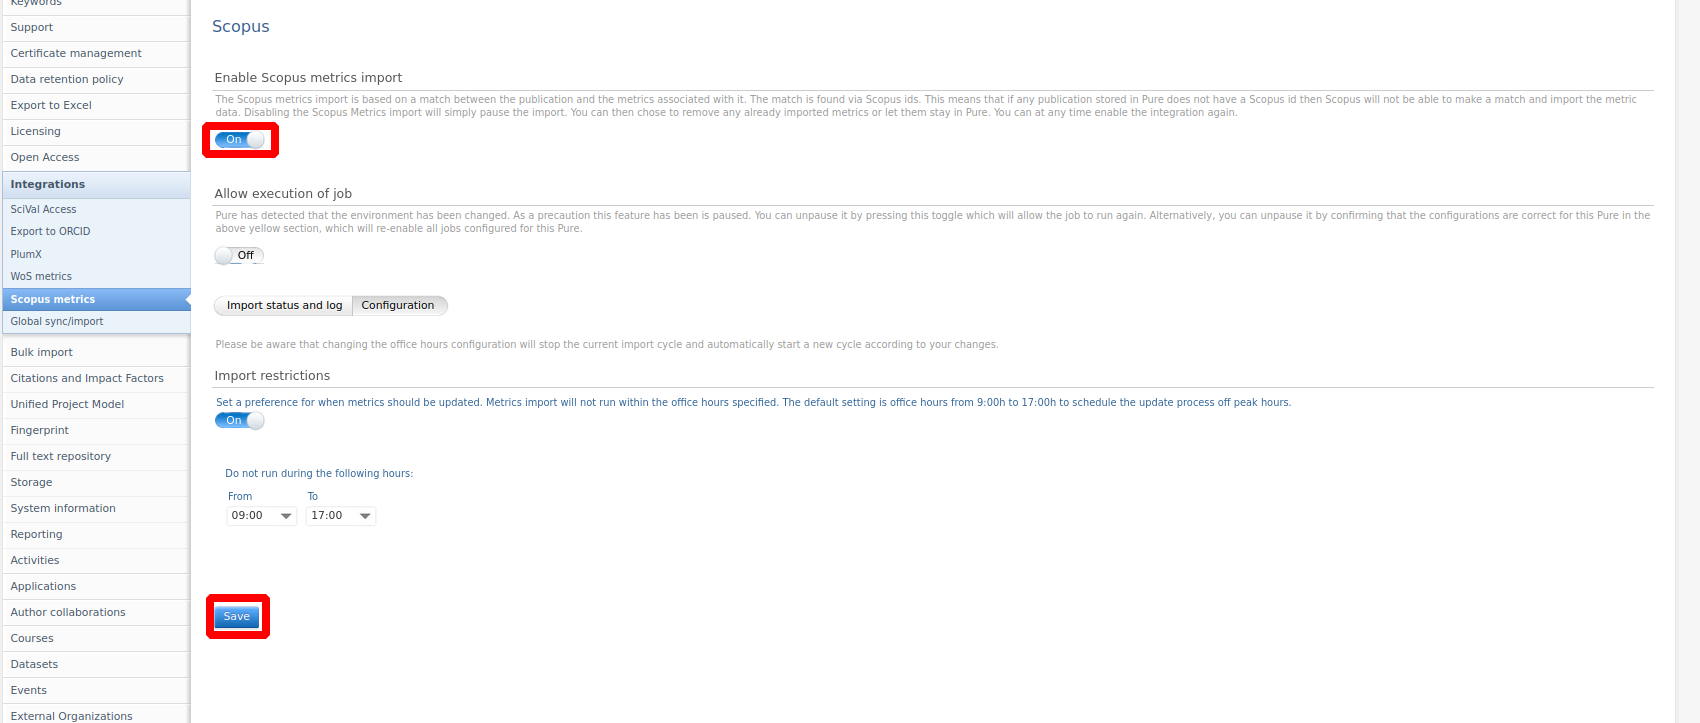
Click here for more details...
To enable the integration simply use the enable toggle and press save. By default, the job will not run within standard office hours (9AM to 5PM). This can be further configured or disabled in the configuration tab.
Check integration status
Click here for more details...
If the integration has been successfully enabled, its status can be tracked in the Import status and log tab. Here, you can see how much content it intends to update, when the next job will run, and view the last 25 job log entries.

Disable integration/remove metrics
Click here to expand...
To pause the integration:
- Toggle Enable Scopus metrics import to Off.
- Save the settings.
When paused, the integration will no longer update metrics, but you will retain the already imported metrics.
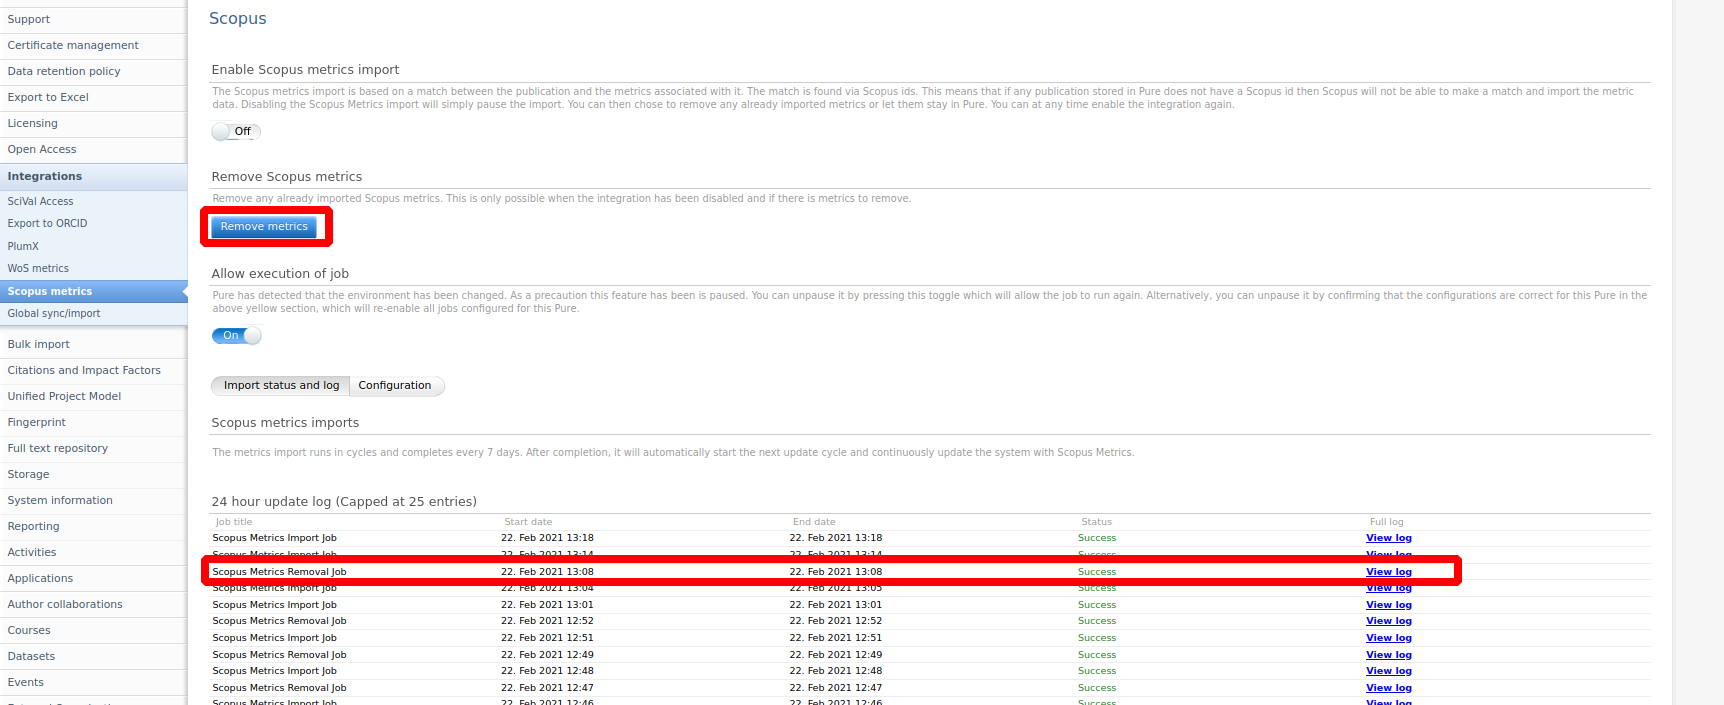
To remove all imported metrics:
- Pause the integration.
- Select the Remove metrics button.
Note: This button will only be visible after you have paused the job.
You can see the status of the removal job in the Import status and log tab.
5.2. SciVal Metrics Integration
In order to improve our ingestion of SciVal metrics into Pure, we have deprecated the old import job called SciVal Citations Synchronisation and created a new integration for SciVal metrics based on the same concept as our PlumX and WoS metrics integrations.
Due to the amount of queries done across all Pure clients and the way the existing integration was built, we were making too many requests towards the SciVal API within short periods of time. This would result in various errors such as timeouts, connections resets, and throttling.
The new integration will, over the course of 7 days, look for metric updates through the SciVal API, ensuring we only query for a small subset of publications in batches. By the end of the 7 day cycle all publications with a Scopus ID or SciVal metrics will be checked and updated. The integration can be found and enabled in Administrator > Integrations > SciVal metrics.
SciVal subscription requirements
Click here to expand...
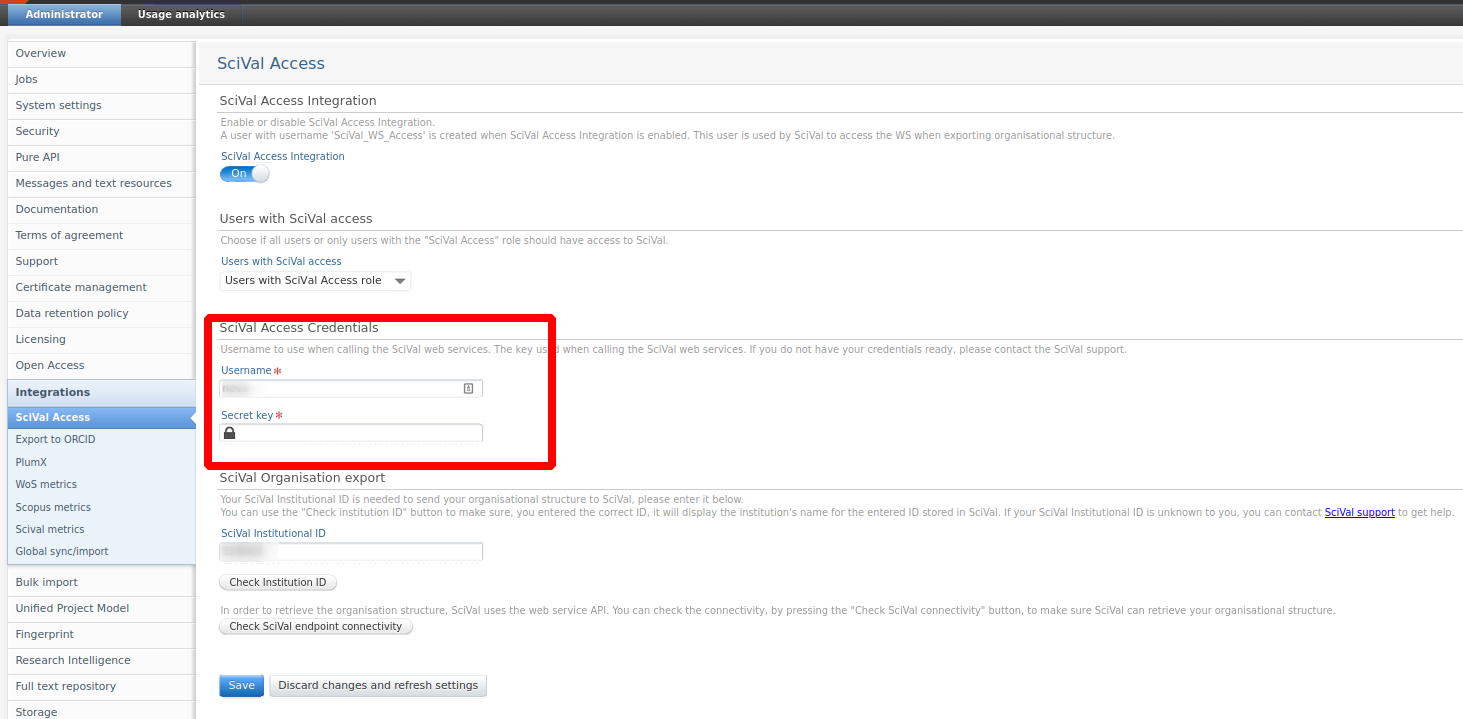
Enabling the integration does not require a valid SciVal subscription. If no valid credentials are entered, only FWCI codes will be imported. This works out of the box for all hosted clients, but for self hosted clients you need to contact Elsevier and provide your Pure IP address. We will then forward these to the Scival team for whitelisting.
Valid credentials are needed in order to import the full range of metrics from Scival. These do not require IP whitelisting and can be entered in Administrator > Scival Access as shown below:
Reaction to Pure environment changes
Click here to expand...
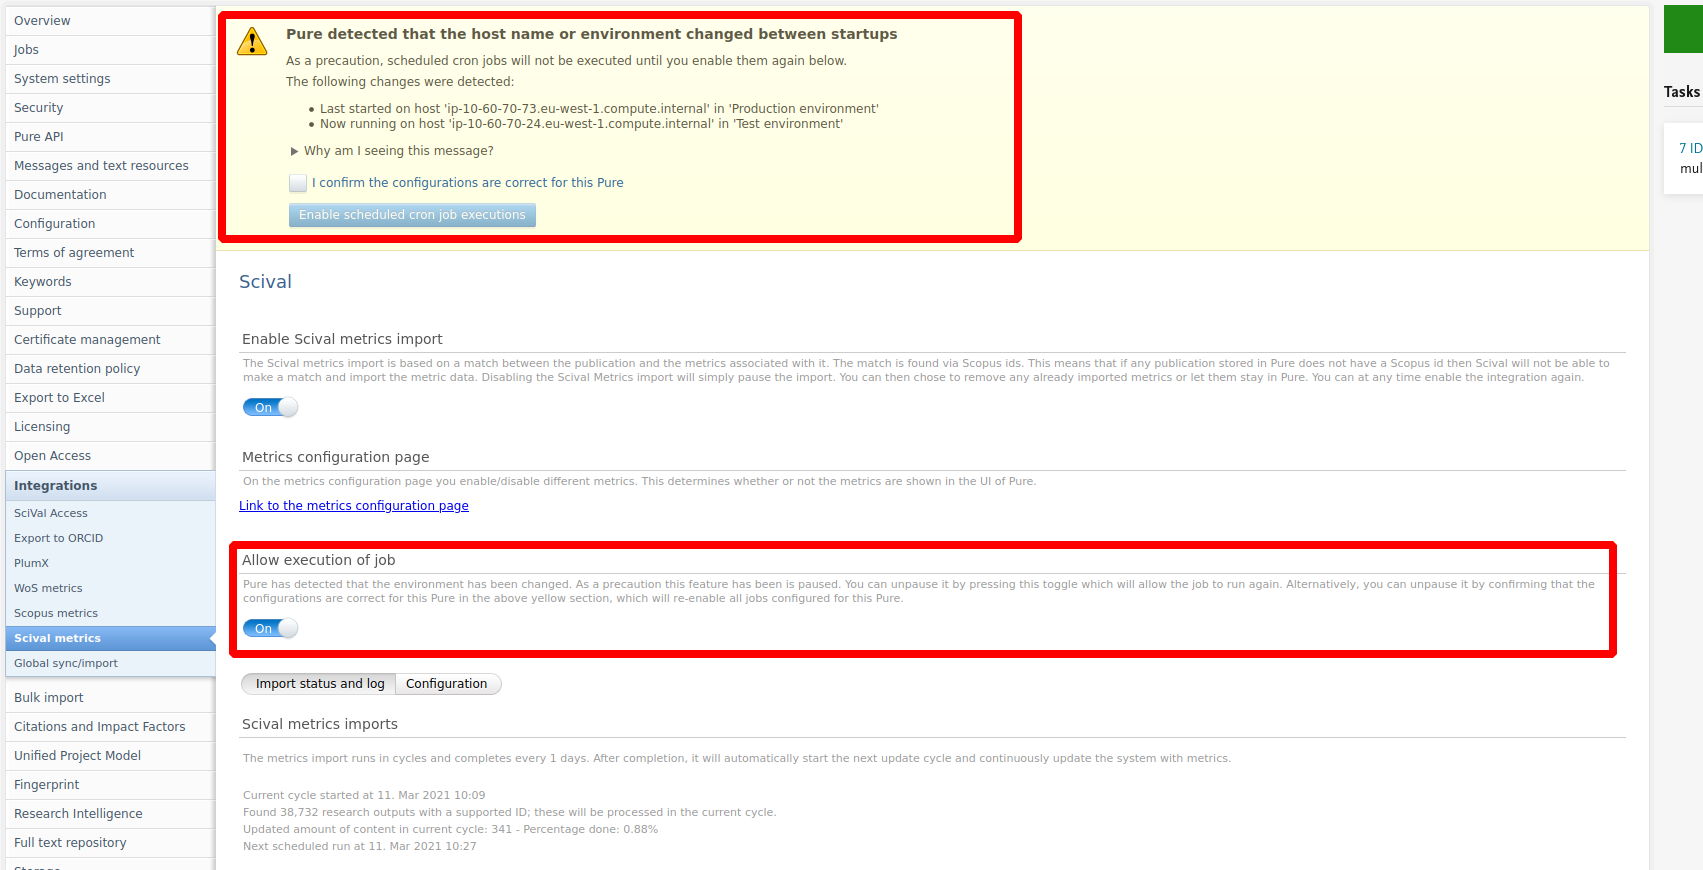
The integration will be paused if Pure detects a change in the environment. This is to ensure that multiple client systems are not querying the SciVal API, potentially causing throttling issues. This can be circumvented by confirming the configuration of the system in the top dialogue box (note this might also effect other jobs) or explicitly allowing the integration to run using the toggle in the job configuration. It is recommended to not run the integration in test/staging systems unless you are testing that specific integration.
Enable the integration
Click here to expand...
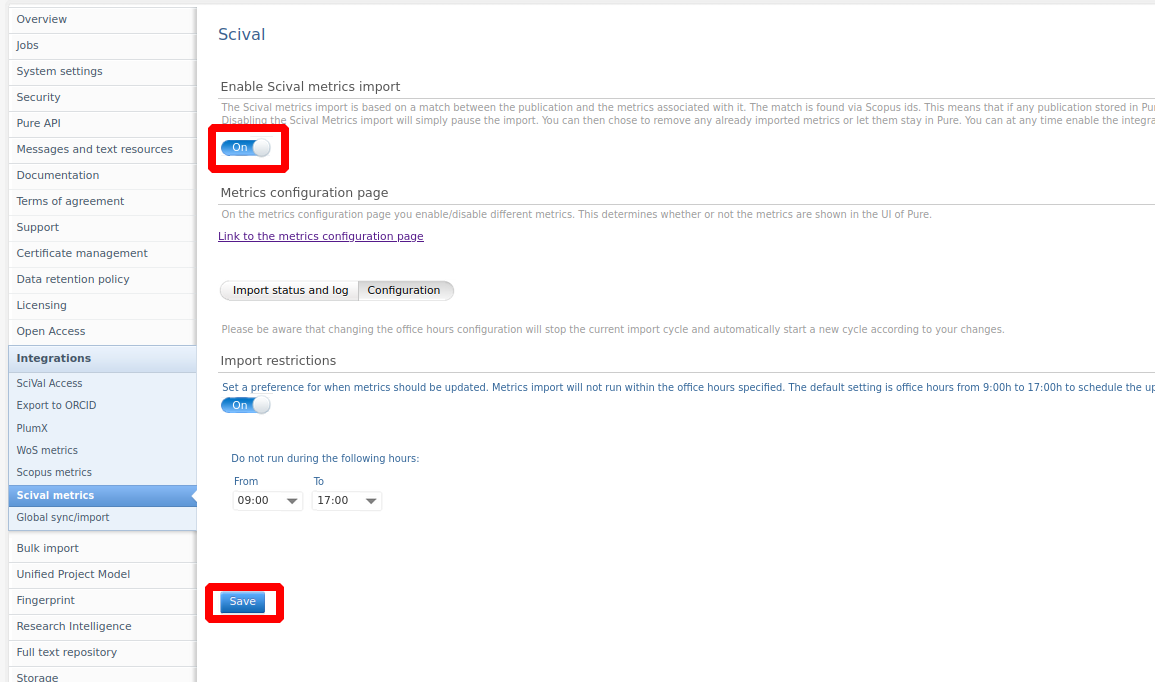
To enable the integration simply use the enable toggle and press save. By default, the job will not run within standard office hours (9AM to 5PM). This can be further configured or disabled in the configuration tab.
Check integration status
Click here to expand...
If the integration has been successfully enabled, its status can be tracked in the Import status and log tab. Here, you can see how much content it intends to update, when the next job will run, and view the last 25 job log entries.

Disable integration / remove metrics
Click here to expand...
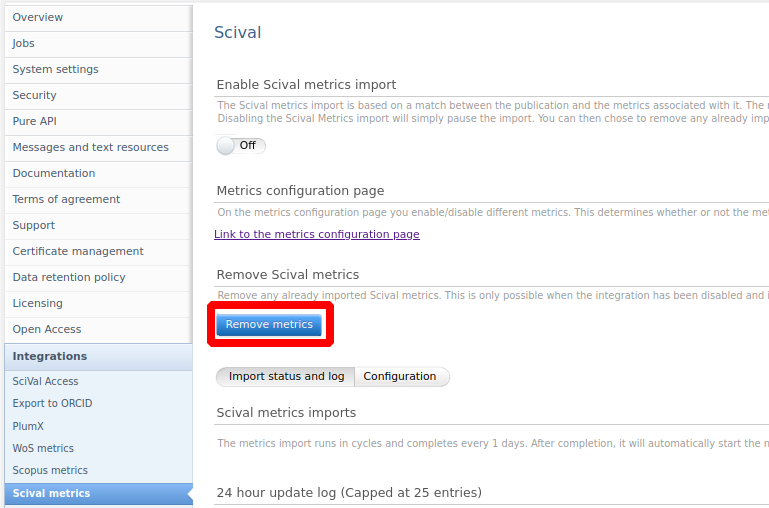
To pause the integration:
- Toggle Enable Scopus metrics import to Off.
- Save the settings.
When paused, the integration will no longer update metrics, but you will retain the already imported metrics.
To remove all imported metrics:
- Pause the integration.
- Select the Remove metrics button.
Note: This button will only be visible after you have paused the job.
You can see the status of the removal job in the Import status and log tab.
5.3. New import source: researchmap
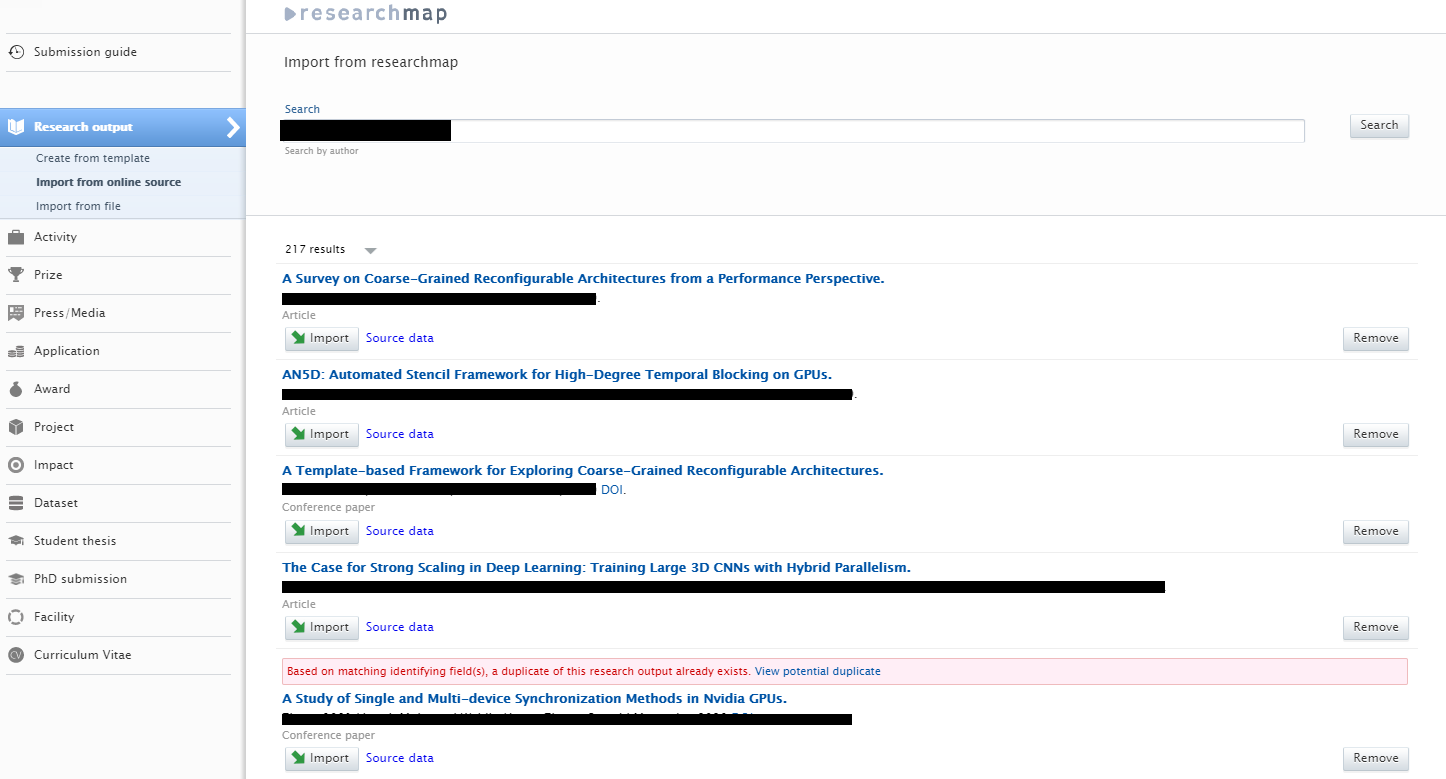
We have added researchmap as an import source to Pure, allowing researchers to import all research output associated to their profile in researchmap directly to Pure.
researchmap comprehensively collects and provides data on research institutions and researchers in Japan. It is regarded as the largest database of researcher information in Japan. It is operated by the [Japan Science and Technology Agency (JST) |http://www.jst.go.jp/] and includes information on more than 3,300 research institutes and over 256,000 researchers.
researchmap also supports researchers in the management of their profiles by providing different functionalities such as CV, dissertation list, and document creators.
Click here for more details…
Instructions on how to enable, add, and search for content from researchmap are shown below.
Instructions |
Screenshot |
|---|---|
| To enable researchmap as an import source, go to Administrator > Research Output > Import Sources. |
|
| To search for and import content, go to Editor > Research Output > Import from online sources and select researchmap. |
|
|
There is one option when searching for content:
Search results are presented as import candidates and can then be previewed and imported (or removed). Records that already exist in Pure are shown as duplicates. |
|
5.4. DSpace connector: support for datasets
We are happy to announce that as of release 5.21 it is possible for Pure customers to export datasets to DSpace.
Click here for more details…
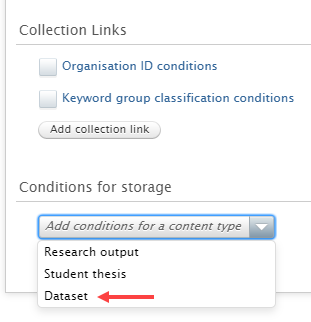
To configure the export to DSpace go to Administrator > Storage , select DSpace and Configure new store.

At the bottom of the configuration settings, in Conditions for storage, you can select Datasets as a content type from the dropdown.
5.5. Long term preservation (LTP) connectors: confidential content configuration added
It is now possible to specify whether confidential content should be transferred to external storage such as DSpace.
Previously, confidential content was transferred if the content visibility included Backend - Restricted to Pure users.
Now, an additional toggle for confidential content has been added and must be enabled in order to transfer confidential content.
By default, confidential content is not transferred.
Click here for more details...
To configure the confidential content export go to Administrator > Storage , select your external store and scroll down to the Conditions for storage part.
If you want to export confidential content, the confidential content toggle must be enabled and content visibility must include Backend, or not be limited at all.
5.6. FWCI Added to Web Service
In this release we have added the Field-Weighted Citation Impact to the webservice, making it possible for customers to export this metric from Pure. For more details on how to import the FWCI from Scival to Pure, see here.
6. Unified Project Model and Award Management
7. Pure Portal
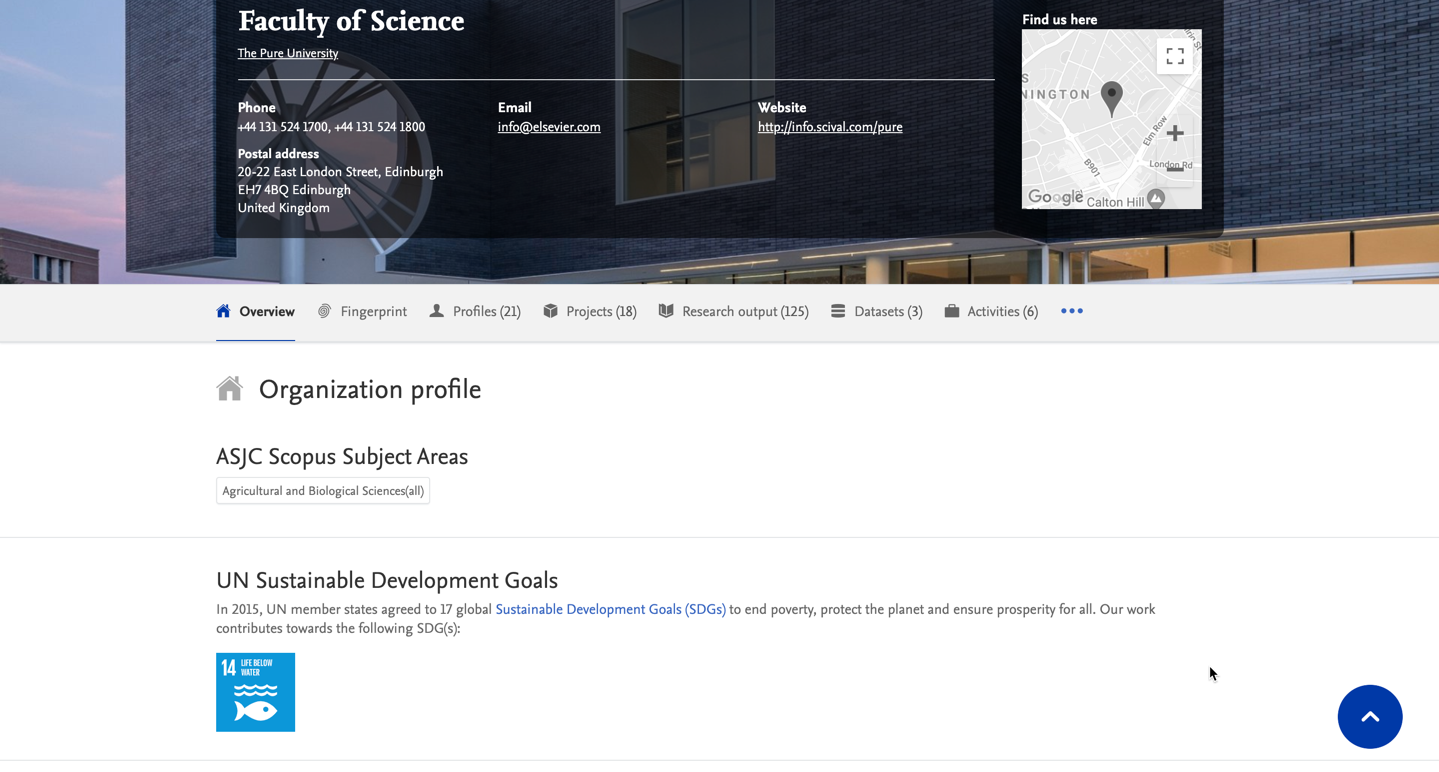
7.1. SDG badges on Portal Organization and Project pages
To coincide with this release's expansion to propagate fingerprints on Person, Organization and Project pages, we are also making it possible to display the United Nations' Sustainable Development Goals (SDGs) content badges on these pages in Portals, just like we already released for Persons and Research Output pages in the 5.20.0 release.
With these tags, you can highlight the important contribution your organizations and projects make towards helping achieve the UN Sustainability Goals. The tags can be automatically propagated, or added to content manually.
We have used the official SDG logos from the UN as the badge itself and users can hover over each tag to read the full name of the SDG.
7.2. Fingerprint Engine version update
We have upgraded the version of the Elsevier Fingerprint Engine we use for fingerprinting content in Pure and on the Pure Portal. Version 8.1 includes updates to multiple thesauri and one fully replaced thesaurus (Chemistry).
Our previous Chemistry thesaurus, composed of mix of terms from the Compendex & MeSH Chemistry thesauri, is now replaced by 'OmniScience Chemistry', which covers a wider range of terms in the domain.
Overall, while not a major change, this update should provide us with broader and deeper coverage so we can more accurately fingerprint content in the scientific fields covered by the updated thesauri.
Click here for more details...
Thesauri with updates:
- OmniScienceChemistry (Chemistry)
- Compendex (Engineering & Materials Science)
- Geobase (Earth & Environmental Sciences)
- MeSH (Medicine & Life Sciences)
- NAL (Agriculture & Biology)
Thesauri without updates (with regards to previous version 8.0):
- Humanities (Arts & Humanities)
- Economics (Vocabulary)
- Gesis (Social Sciences)
- Math (Mathematics)
- NASA (Physics & Astronomy)
Please note: The update to the new Fingerprint Engine version will not happen automatically upon the update to 5.21.0. Instead, the update will be scheduled at a random point in time, sometime within one week of your Pure being updated to 5.21.0. This applies for both Pure-hosted and self-hosted clients. It is done this way to spread the load the update causes on our servers.
We expect the update to take a maximum of 24 hours. During this period, the 'Copy/paste text - find expertise' search tool will be unavailable.
You can check when your update is scheduled by going to Administrator > Fingerprint > Configuration.
7.3. Incorporating Web of Science data into content Fingerprints
We are now incorporating data originating from Web of Science into our content fingerprinting. This change affects all content types which receive a fingerprint (Research outputs, Persons, Organizations, etc.)
This should be great news for any institutions working a lot with Web of Science data. It should notably increase fingerprint reliability in academic disciplines where Web of Science has a strong subject coverage.
7.4. Updates to configuring URLs on the Pure Portal - Selecting the primary URL on content (i.e. Persons) + Email address URLs
We often see requests from clients to change the primary URL for a particular a piece of content (most commonly Persons) in their Portal. The primary URL is the one that displays when you visit their Portal page, e.g. athenauni/portal/john-doe.
Clients most often want to change the primary URL either when there is a change in the Person name itself (i.e. a person changes the name they want to use), or when multiple versions of the record have been created, in which case link names are differentiated using a number suffix at the end, e.g. john-doe-1.
Click here for more details...
7.5.1 Selecting the primary URL on content
This applies to all content types, i.e. also Organizations and Research outputs, although we expect this feature to be most often used for Persons, and occasionally Organizations.
It is fairly common for a Person to also have one or more secondary URLs. These are usually created if the person record is at some point deleted and re-added to Pure. Such secondary URLs are usually suffixed with a number, e.g. athenauni/portal/john-doe-1. All secondary URLs will redirect in the browser to the primary URL.
Usually, as in the example above, there is no real issue, as the primary URL is the unsuffixed name, which usually makes for the cleaner URL. However, in some cases it can be that the 'wrong' URL is set as primary, and this needs resolving. We have now made it possible for you to do this on the Person record in Pure.
Find the record for which you want to change the URL, and select the Display tab. Here, you can see all the Perma-link IDs stored for this record. These are the names we use to identify this person in the URL. From this list, you can select which one you wish to use in the primary URL by selecting the Make primary option next to your desired name/ID.
Note: It is only possible to change the primary URL to one that is already in the list of assigned permalinks. If the name you want is not there, it might mean that another piece of content has already been assigned that name. For instance, if two researchers share the same first and last name. In such cases, you cannot reassign the permalink that is already taken.
If no primary URL is selected for a piece of content, the most recently added URL will be used as primary. For example, if a new URL is added as part of the Person email strategy configuration (see below), it will be the one used by default.
7.5.2 Email address as part of Person page URL
Back by popular demand: it is again possible to include a Person's institutional email address in their personal URL. This means that a Person URL could be set to e.g. 'athenauni/persons/jdoe@athena.edu' instead of 'athenauni/persons/jane-doe'.
This can be configured as part of the Pretty URL update job:
- Go to Administrator > Jobs > Pretty URL update.
- Select Edit configurations.
- In the Default configurations dropdown, toggle Person email strategy: enabled to On.
- Click Update to save the setting.
Note: The email address we use will be the first email from the primary organization association, if one is enabled. If no primary organization is enabled, the first active organization association with an associated email address will be used. As noted above, if no primary URL is selected for a piece of content, the most recently added URL will be used as primary. For example, if a new URL is added as part of the Person email strategy configuration, it will be the one used by default.
7.5. Added option to disable display of Scopus profile link on Portal Profiles
When a Person record has a Scopus ID associated with it, a link to their Scopus profile is automatically added to their Portal Profile. Linking from the Pure Profile to the Scopus Profile is usually helpful to profile visitors. For example, further information is available about the inbound citing documents and further research analysis is possible.
For some clients, however, this might not be ideal, due to limitations on the quality of their data in Scopus. We have now made it possible to disable the Pure Portal link to the Author Profile on Scopus.com across your Portal while retaining the Scopus ID in the system to support automated imports, reporting, etc.
Click here for more details...
To disable the display of the Scopus Profile links across your Portal:
- Go to Administrator > System Settings > Scopus.
- Toggle the option Scopus link on portal to Off.
- Click Save.
Note: A manual republish of Persons is required for the change to take effect on the Portal.
7.6. Configuring Google Map pins on locations
We have made a small update the logic of how we show the location of your organizations via Google Maps. By default we will now prioritise using the Visiting address, if one is provided. Otherwise, we will fall back to other addresses found, as previously.
7.7. Optimizing the Portal for display of right-to-left (RTL) languages
To help us further expand the languages and territories the Pure Portal can support in effectively showcasing research expertise, we have worked on optimising our platform for languages which use a right-to-left (RTL) script, such as Arabic, Hebrew, and Urdu.
Click here for more details...
By default, the Pure Portal is optimized for displaying languages which run from left to right, such as English. We have now added a configuration option which helps optimize the rendering of right-to-left languages in Pure.
When enabled, the metatags in the Portal which tell your internet browser which direction language should be rendered in will be changed to "auto" ("dir=auto"). This means that for any given string of text, the browser will detect whether it is an RTL or LTR language, and optimize display based on this. We use "dir-auto" in this case, instead of "dir=rtl", because even when a Portal is set up for an RTL language, there will almost always still be text strings that need to be rendered as LTR, for example publication names.
As the decision whether to optimize text strings for RTL or LTR is made algorithmically, we advise to only enable this configuration if your Portal should contain large quantities of RTL text. Enabling unnecessarily could interfere with the normal display of LTR languages in some small cases.
To enable RTL optimization in your Portal:
- Go to System Settings > Right-to-left languages.
- Toggle Enable RTL to On.
Note: A manual republish of all content types (each content type must be republished separately) is required for the change to take effect on the Portal.
7.8. Contact form footer link text change
We have made a small tweak updating the link text for contacting your institution via the Pure Portal footer.
What used to be '[ClientName]'s Research Portal contact form' has been changed to a more streamlined 'Contact us'. This has primarily been changed to improve readability, and also to reflect the fact that the link can also be configured to open an external site, and not necessarily a contact form.

8. Reporting
8.1. New reporting home page
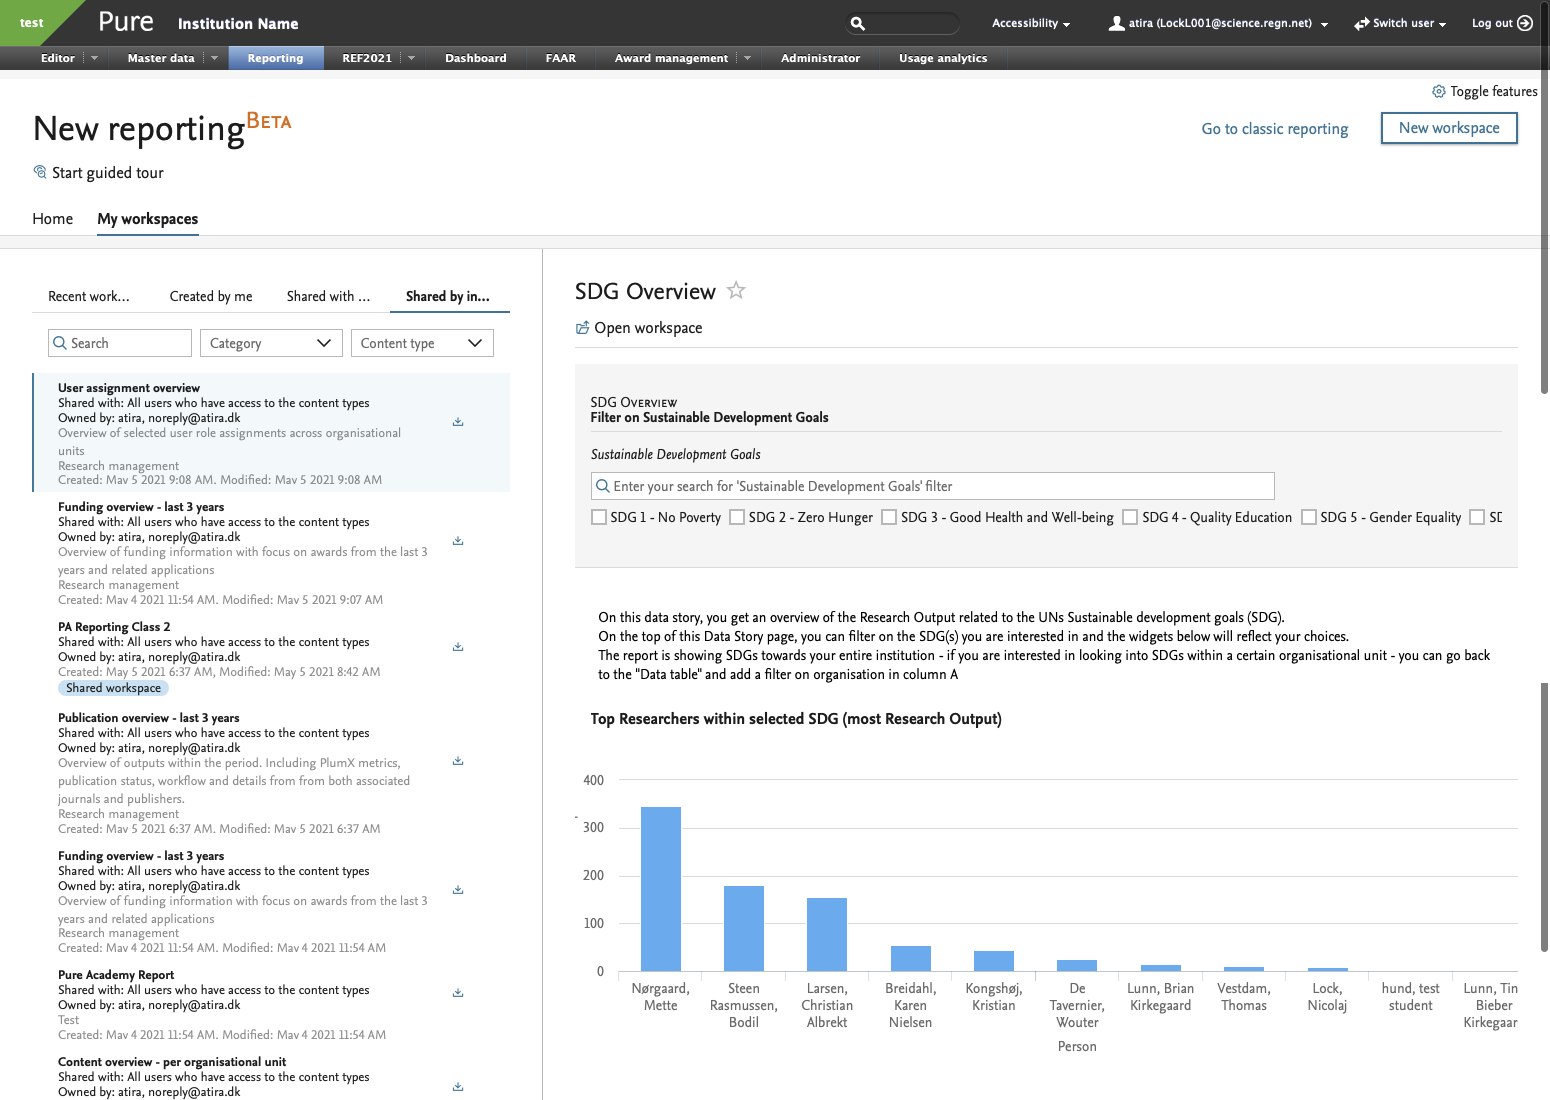
Pure 5.21.0 brings a new and exciting reporting home page. It is now easier that ever to start reporting, organise your workspaces, and get to the insights that the data stories provide.
You can now create and use templates to serve as pre-made starting points for workspaces. You can also easily browse and favourite workspaces, and see related data stories: with that, your institution's research narratives are always available right at your fingertips.
Click here for more details…
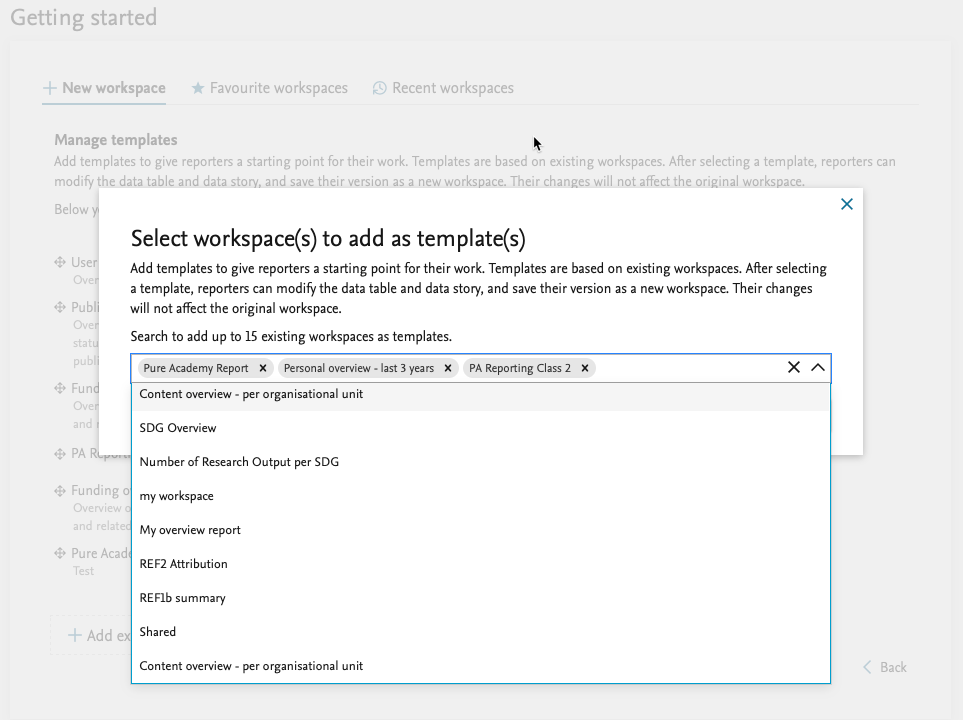
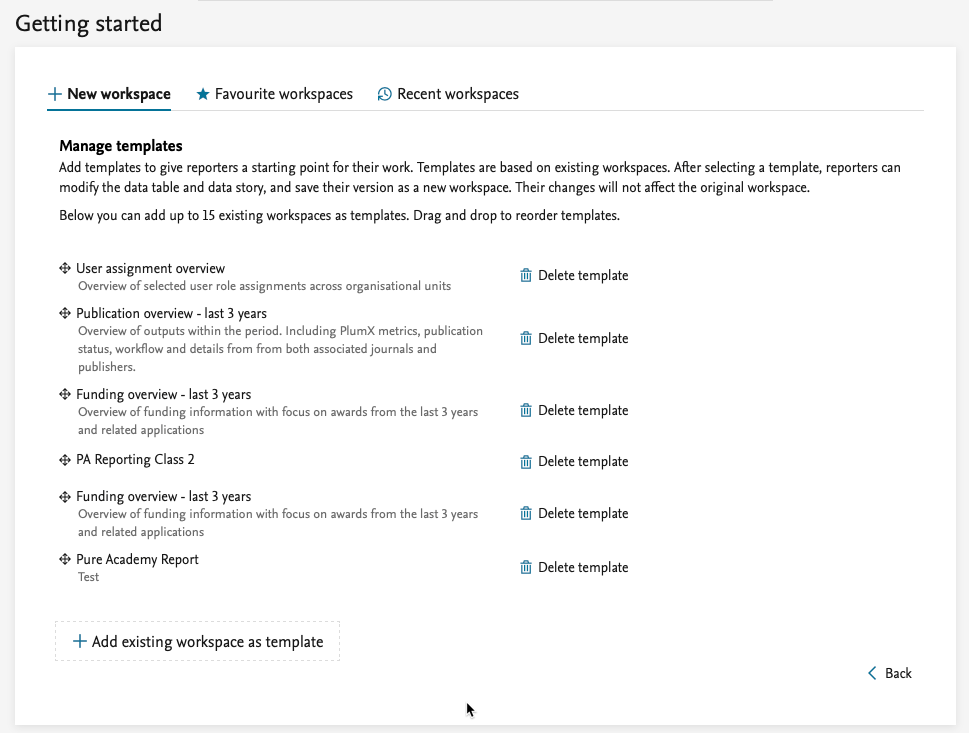
Tired of starting from scratch?
Use a workspace template instead. Administrators can select which workspaces should serve as templates. You will only see templates made for driver content types you have reporting rights for.
An Administrator can select the workspaces that should be created as templates. The templates are created as a copy of the selected workspaces, and will be available to all reporting users that have reporting permissions for the driver content type in the template.

Too many workspaces on your list?
Star the important ones (or the really good ones) as favourites to easily find them later: the starred workspaces will show up under your ‘Favourite Workspaces’.


Want to quickly explore your data?
See the data story without opening the workspace: when in ‘My workspaces’, click on a workspace name and its data story will show on the right.
Improved layout
The layout of the reporting home page has been updated with new tabs to better organise the content:
- Home
- My workspace
We will introduce more useful tabs (manage, download, and more) in the future releases.
8.2. FWCI in reporting
You can now report on the Field Weighted Citation Index (FWCI) in the reporting module. You can now easily find the research output with the highest FWCI: just add the FWCI to your research output workspace and you're good to go.
Click here for more details...
We have removed the two OA summary screens as they are no longer needed:
- OA Tracking
- OA Summary
We have not made any other changes to the REF OA (the logic remains unchanged).
This was released in Pure 5.20.3.
9. Country-specific features
9.1. UK: REF
9.1.1. REF Open Access section
Following requests from the user group, we are bringing back the REF Open Access section to the module.
9.2. AU: ERA 2023 module now called ANZSRC
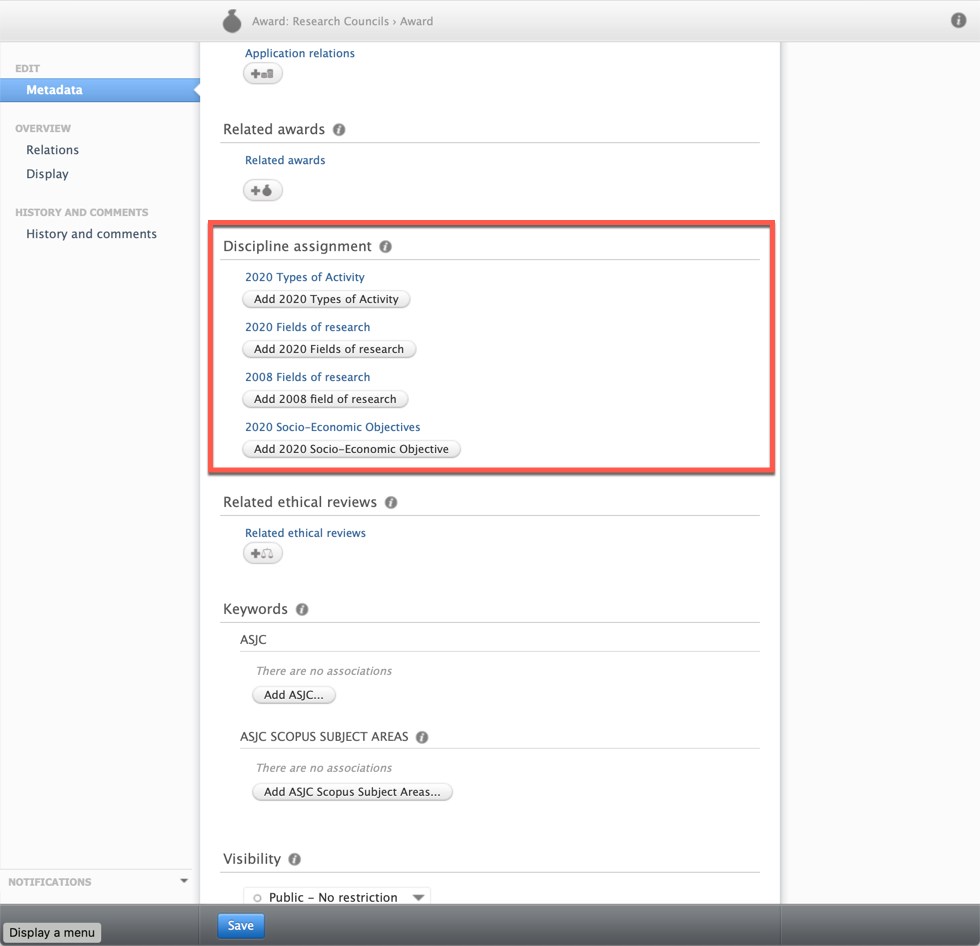
Big news for the Australian and New Zealand clients: we have changed the name of the ERA2023 module to ANZSRC to be more in line with the Australian Bureau of Statistics (ABS) and StatsNZs definitions. We have also introduced two new codes (Socio-Economic Objectives (SEO) and Type of Activity (ToA)) which means that we now support all three classifications:
- Type of Activity (ToA)
- Fields of Research (FoR)
- Socio-Economic Objectives (SEO)
The three codes can only be used when the ANZSRC module is enabled, the default state of the module, is disabled. Our support team will be happy to help you enable the module in your Pure.
9.2.1. Socio-Economic Objectives (SEO) codes
You can now classify content in Pure using the ANZSRC SEO classification. You can classify the same types of content as with the FoR classification, and you can assign up to three SEO codes per content item, and specify the proportion on each SEO code. You can also add the SEO codes in bulk by using the upload job we have created for this. Read more in the SEO discipline assignment bulk upload section of the documentation.
Click here for more details...
Content types
SEO codes can be added to the following content types:
- Research Output
- Application
- Project
- Award
- Person
- Activity
- Journal
- Event
- Prizes
- Press/Media
- Impact
- Datasets
- Student Thesis
9.2.2. ToA codes
You can now classify content in Pure using the ANZSRC ToA classification. You can classify:
- Awards
- Applications
- Projects
You can assign up to three ToA codes per content item, and specify the proportion on each ToA code. You can also add the ToA codes in bulk by using the upload job we have created for this. Read more in the ToA discipline assignment bulk upload section of the documentation.
9.2.3. Reporting on ANZSRC codes
Big updates are also coming in reporting on ANZSRC codes, as we have added the hierarchy specified in the definition from ABS to SEO and FoR.
This means that it is now possible to create reports that provide an overview of classified content (outputs, activities, applications, etc.) on a Division, Group, or Objective level.
Click here for more details…
Here is an example of the type of workspaces that can be created using the hierarchy that is build into the SEO and FoR codes. The example is using SEO, but a similar workspace can be built using FoR codes instead.
Example workspace
Roles
We have introduced a number of new roles that can be used for reporting on the SEO, ToA, and FoR codes.
Role name |
Can report on |
|---|---|
| Administrator of ANZSRC |
|
| Global reporter of ANZSRC |
|
| 2020 Field of Research Reporter |
|
| 2020 Socio-Economic Objective Reporter |
|
| 2020 Type of Activity Reporter |
|
10. Additional features of this release
10.1. Option to configure Pure system time zone
Until this release, the implicit time zone of the Pure application was always based the host time zone. It is now possible for Administrators to configure a different system time zone for the Pure application in Administrator > System settings > System currency and country.
Note: All date and timestamp instances in Pure use the default time zone as an implicit time zone, which means that references to an instant in time will be evaluated against the currently configured time zone. Make sure to adjust your time-related settings after you change your time zone configurations. For example, if you have previously adjusted your recurring job CRON expressions to compensate for a host machine configured for the UTC time zone, this job configuration should be changed to reflect the new default time-zone.
Important for PRS clients: If you are a PRS/QABO client, it is strongly advised that you consult with Pure Support before making time zone adjustments. This is because the scheduling of the QABO sequence of jobs needs to fully known by Elsevier to optimize resource allocation.
Non-PRS/QABO clients can set the time-zone without consulting with Pure Support prior and are encouraged to do so.
Published at October 15, 2024

