
How Can We Help?
Upgrading PureUpgrading Pure
Use this guide if you have a working Pure installation that you want to upgrade to the newest version.
Upgrading Pure on Linux
This guide describes how to upgrade Pure on Linux(and Unix), and it assumes that you have Pure already installed and working.
If you are trying to install Pure see the installation guide Hosting and installation
Prerequisites
A working Pure installation.
You will also need a Supported webbrowser to complete the upgrade.This can be run on any client that can access the Pure server.
Pure distribution file
First you need to request the version of Pure you need. This should be done at least a couple of days before you are planing to do the installation.
See the Request Pure distribution file page for more information about how to request a new version.
When the distribution is ready, download it and put it somewhere where it can be accesses from the Windows server running Pure.
This guide assumes that the distribution file is placed in /tmp on the Pure server,but it can be placed in a different location.
Stop Tomcat
Stop the Tomcat server.
/etc/init.d/tomcat stop
Backup database
It is recommended to take a backup of the Pure database before beginning the upgrade,as that makes it possible to rollback the upgrade.
You can also take a backup of the files ( default /data/pure_data), but that might not be feasible to do if you have a lot of files, and in most cases they are not needed to do the rollback.
For information about how to do a rollback of Pure see “How to roll back an upgrade on Linux” below.
Java
If a Java upgrade is required, it should be done here. See “Upgrading Java on Linux” below for more information.
Tomcat
If a Tomcat upgrade is required, it should be done here.See Upgrading Tomcat on Linux for more information.
Deploy Pure
Deploy the new version of Pure to Tomcat
/pack/scripts/deploy /tmp/cust-dk-abc-5.2.0-distribution.tar.gz
Depending on how the user rights are configured, you might need to run this with sudo.
Start Tomcat
Start the Tomcat server
sudo /etc/init.d/tomcat start
And check the Tomcat log file to make sure that it starts correctly
less /data/tomcat_base/logs/console.log
Look for something similar to thefollowing:
[INFO 20131007095644ootManager: WebBootSequenceInteractionManager] [INFO 20131007095644 ootManager: WebBootSequenceInteractionManager] |

Entering maintenance mode! |

[INFO 20131007095644 ootManager: WebBootSequenceInteractionManager] | Go to http://<yourserver>/admin/prestartup/maintenance.xhtml |

[INFO 20131007095644ootManager: WebBootSequenceInteractionManager] | Password:123ab45c-67de-8910-f2g3-h9900i80j509 | [INFO 20131007095644ootManager: WebBootSequenceInteractionManager]
When it appears, go to the next step: Puremaintenance page
How to roll back an upgrade on Linux
This guide describes how to roll back a Pure upgrade on Linux,and it assumes that you have a recent backup of the Pure database.
Remember that any work done in Pure between the backup was created and the rollback is performed will be lost.
Prerequisites
A recent backup of the Pure database and the Pure distribution file that matches the version of Pure in the backup.
You can always request a new distribution file if you have lost the old one.
Stop Tomcat
First stop the Tomcat server
/etc/init.d/tomcat stop
Restore database
Now restore the Pure database from the backup.
Restore files
If you have a backup of the Pure data files, you should restore that now..
Java
If the Pure upgrade involved a major version upgrade of Java (eg. 7 -> 8), you will need to change Tomcat back to use the old version.
Tomcat
If the Pure upgrade involved a major version upgrade of Tomcat (eg. 7 -> 8), you will need to deploy Pure to the old Tomcat.
Deploy Pure
Run the deploy script with the old Pure distribution file to deploy the old version of Pure.
/pack/scripts/deploy /tmp/cust-dk-abc-5.2.0-distribution.tar.gz
Depending on how the user rights are configured, you might need to run this with sudo.
Start Tomcat
Now start the Tomcat server.
sudo /etc/init.d/tomcat start
Check the Tomcat log file to makesure that it starts correctly
less /data/tomcat_base/logs/console.log
Pure is ready for use when something similar to the following appears in the log file:
[INFO  20150309083034 ootManager: WebBootSequenceInteractionManager] XXXXXXXXXXXXXXXXXXXXXXXXXXXXXXXXXXXXXXXXXXXXXXXXXXXXXXXXXXXXXXXXXXXXXXXXXXXXXX
[INFO  20150309083034 ootManager: WebBootSequenceInteractionManager] X admin started in 384s!
[INFO  20150309083034 ootManager: WebBootSequenceInteractionManager] X Available at: https://<servername>/admin
[INFO  20150309083034 ootManager: WebBootSequenceInteractionManager] XXXXXXXXXXXXXXXXXXXXXXXXXXXXXXXXXXXXXXXXXXXXXXXXXXXXXXXXXXXXXXXXXXXXXXXXXXXXXX
If Pure enters maintenance mode, then the version of Pure deployed is newer than the version in the database
Upgrading Java on Linux
Download new Java
Go to Oracle and download the newest64-bit JDK for Linux in tar.gz format.
See Supported platforms for a list of supported versions.
Only do major version Java upgrades (eg. 7 -> 8) if specified in the Pure requirements for your version of Pure, or Pure might not work correctly.
Stop Tomcat
If Tomcat is running, you should stop it before upgrading Java.
sudo /etc/init.d/tomcat stop
Install new Java
Unpack the Java tar.gz file in /pack.
cd /pack
tar zxf /tmp/jdk-8u45-linux-x64.tar.gzIf this is a minor version upgrade, then you should change the existing symbolic link to point to the new Java version.
cd /packln -f -s /pack/jdk1.8.0_45 jdk8If it is a major versionup grade, then it is recommended to create a new symbolic link for the new Java version.
E.g. if you have Java 7 installed with a symbolic link called /pack/jdk7 and you install Java 8, then create the new symbolic link with the name /pack/jdk8
cd /packln -s /pack/jdk1.8.0_45 jdk8
Configure Tomcat
If this is a major version upgrade we will need to configure Tomcat to use the new Java version.
If you are using the Atira supplied Tomcat init script then you should change the following part to point to the new symbolic link
# Java homeexport JAVA_HOME=/pack/jdk8
Start Tomcat
If you are upgrading Java at the same time as Pure, you should not start Tomcat until the @Upgrading+Pure+on+Linux Pure upgrade guide tells you to.
sudo /etc/init.d/tomcat start
Upgrading Tomcat on Linux
This guide will explain how to upgrade Tomcat on Linux.
Only do major version upgrades (eg. 7 -> 8) if specified in the Pure requirements for your version of Pure, or Pure might stop working!
Download new Tomcat
Go to tomcat.apache.org and download the Core tar.gz file for the version you want to install. See Supported platforms for a list of supported versions.
Stop Tomcat
If Tomcat is running it should bes topped before installing the new version.
sudo /etc/init.d/tomcat stop
Install new Tomcat
Unpack the new Tomcat version in /pack.
cd /packtar zxf /tmp/apache-tomcat-8.0.23.tar.gz
Minor version upgrade
If this is a minor version upgrade of Tomcat, we just need to update the symbolic link in /pack.
cd /packln -f -s /pack/apache-tomcat-8.0.23 tomcat8
Major version upgrade
If this is a major version upgrade of Tomcat, it is recommended to create a new symbolic link for this new version.
If for example you are upgrading from Tomcat 7 to Tomcat 8, then you will have Tomcat 7 linked as /pack
/tomcat7and then create a new symbolic link from Tomcat 8 called /pack/tomcat8.
cd /packln -s /pack/apache-tomcat-8.0.23 tomcat8
Tomcat init script
The Tomcat init script should be updated to use the new Tomcat version, so open /etc/init.d/tomcat in an editor and change CATALINA_HOME to point to the new symbolic link
# Tomcat home dir where the start script and general Tomcat libs areexport CATALINA_HOME=/pack/tomcat8
If you have upgraded Tomcat through your Linux distribution repository , you will most likely have a new init script for that version, e.g. /etc/init.d/tomcat8 for Tomcat 8.
This script should already be correct, but you will need to copy any configuration changes you made to the old Tomcat to the new one. These are most likely in /etc/default/tomcat<version> or /etc/tomcat<version>/tomcat.conf.
Deploy script
If you are using a Tomcat installed through your Linux distribution repository, then the Tomcat webapps folder might be in a new path, and you will need to update the Pure deploy script to point to the new folder.
# Tomcat webapps folder where the Pure webapps should be deployedDEPLOY=/data/tomcat_base/webapps
Tomcat server.xml
The server.xml might have changed between the two major versions, so the easiest is to copy the server. xml from the new version and do afresh configuration as described in “Installing Pure on Linux”
First make a backup of the old server.xml
cd /data/tomcat_base/confmv server.xml server.xml_old
Now copy the server.xml from the newly installed Tomcat
cd /data/tomcat_base/confcp /pack/tomcat8/conf/server.xml .
And configure it like in the "Installing Pure on Linux"
If you had any extra configuration in the old server.xml, remember to copy it to the server.xml file.
Deploy Pure
If the deploy path has changed,you should deploy Pure again, so it will work with the new Tomcat.If in doubt, just run the deploy script with the currently deployed Pure version.
Start Tomcat
If you are upgrading Tomcat at the same time as Pure, you should not start it until the Pure upgrade guide tells you to.
sudo /etc/init.d/tomcat start
Upgrading Pure on Windows
This guide describes how to upgrade Pure on Windows,and it assumes that you have Pure already installed and working.
If you are trying to install Pure see the installation guide Installing Pure on Windows
 |
Prerequisites
A working Pure installation.
Pure Distribution file
First you need to request the version of Pure you need. This should be done at least a couple of daysbefore you are planing to do the installation.
See the Request Pure distribution file page for more information about how to request a new version.
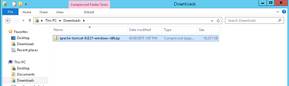
When the distribution is ready, download it and put it somewhere where it can be accesses from the Windows server running Pure.
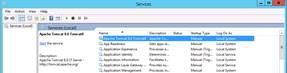
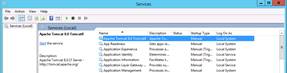
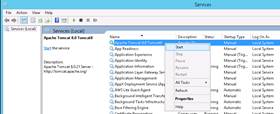
Stop Tomcat
First stop the Tomcat service.
Backup database
It is recommended to take a backup of the Pure database before beginning the upgrade,as that makes it possible to rollback the upgrade.
You can also take a backup of the files ( default d:\pack\pure_data), but that might not be feasible to do if you have a lot of files, and in most cases they are not needed to do the roll back.
For information about how to do a rollback of Pure see How to roll back an upgrade on Windows
Java
If a Java upgrade is required, it should be done here.See Upgrading Java on Windows for more information.
Tomcat
If a Tomcat upgrade is required, it should be done here.See Upgrading Tomcat on Windows for more information.
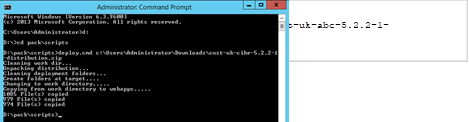
Deploy Pure
Run the deploy script with the new Pure distribution file by opening a command prompt as Administrator and navigate to the deploy script:
cd d:\pack\scripts\deploy.cmd c:\Users\Administrator\Downloads\cust-uk-abc-5.2.2-1-distribution.zip
Tomcat log files
It is a good idea to remove all the Tomcat log files before starting Pure, as Tomcat will reuse the old log files, and it can make it hard to spot if an error if from the current Tomcat start or the previous one.
The default location for the Tomcat logs is C:\Program Files\Apache SoftwareFoundation\Tomcat 8.0
\logs\
It is safe to delete all files in this folder.
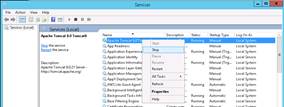
Start Tomcat
Now start the Tomcat service.
Check the Tomcat log file to make sure that it starts correctlyby opening the following file in an text editor (Notepad/Notepad++).
The default location is C:\Program Files\Apache Software Foundation\Tomcat 8.0\logs\and the log file to check is tomcat8-stdout.YYYY-MM-DD.log
Look for something similar to the following:
[INFO 20131007095644ootManager: WebBootSequenceInteractionManager] [INFO 20131007095644 ootManager: WebBootSequenceInteractionManager] |

Entering maintenance mode! |

[INFO 20131007095644 ootManager: WebBootSequenceInteractionManager] | Go to http://<yourserver>/admin/prestartup/maintenance.xhtml |

[INFO 20131007095644ootManager: WebBootSequenceInteractionManager] | Password:123ab45c-67de-8910-f2g3-h9900i80j509 | [INFO 20131007095644ootManager: WebBootSequenceInteractionManager]
When it appears, go to the nextstep: Pure maintenance mode
How to roll back an upgrade on Windows
This guide describes how to roll back a Pure upgrade on Windows,and it assumes that you have a recent backup of the Pure database.
Remember that any work done in Pure between the backup was created and the rollback is performed will be lost.
Prerequisites
A recent backup of the Pure database and the Pure distribution file that matches the version of Pure in the backup.
You can always request a new distribution file if you have lost the old one.
Stop Tomcat
First stop the Tomcat service.

Restore database
Now restore the Pure database from the backup.
Restore files
If you have a backup of the Pure data files, you should restore that now..
Java
If the Pure upgrade involved a major version upgrade of Java (eg. 7 -> 8), you will need to change Tomcat back to use the old version.
Tomcat
If the Pure upgrade involved a major version upgrade of Tomcat (eg. 7 ->8), you will need to deploy Pure to the old Tomcat.
Deploy Pure
Run the deploy script with the old Pure distribution file by opening a command prompt as Administrator and navigate to the deploy script:
cd d:\pack\scripts\deploy.cmd c:\Users\Administrator\Downloads\cust-uk-abc-5.2.1-4-distribution.zip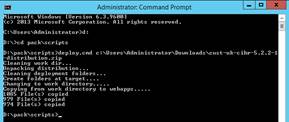
Start Tomcat
Now start the Tomcat service.

Check the Tomcat log file to make sure that it starts correctly by opening the following file in an text editor (Notepad/Notepad++).
The default location is C:\Program Files\Apache Software Foundation\Tomcat 8.0\logs\and the log file to check is tomcat8-stdout.YYYY-MM-DD.log
Pure is ready for use when something similar to the following appears in the log file:
If Pure enters maintenance mode, then the version of Pure deployed is newer than the version in the database
[INFO  20150309083034 ootManager: WebBootSequenceInteractionManager] XXXXXXXXXXXXXXXXXXXXXXXXXXXXXXXXXXXXXXXXXXXXXXXXXXXXXXXXXXXXXXXXXXXXXXXXXXXXXX
[INFO  20150309083034 ootManager: WebBootSequenceInteractionManager] X admin started in 384s!
[INFO  20150309083034 ootManager: WebBootSequenceInteractionManager] X Available at: https://<servername>/admin
[INFO  20150309083034 ootManager: WebBootSequenceInteractionManager] XXXXXXXXXXXXXXXXXXXXXXXXXXXXXXXXXXXXXXXXXXXXXXXXXXXXXXXXXXXXXXXXXXXXXXXXXXXXXX
Upgrading Java on Windows
Download new Java
Go to Oracle and download the newest64-bit JDK for Windows. See Supported platforms for a list of supported versions.
Only do major version Java upgrades (eg. 7 -> 8) if specified in the Pure requirements for your version of Pure, or Pure might not work correctly.
Stop Tomcat
If Tomcat is running, it is agood idea to stop it before installing Java.

Install new Java
Install the new Java version in the default folder.
For Java 8 Update 45 that would be C:\Program Files\Java\jdk1.8.0_45\ and C:\Program Files\Java\jre8\
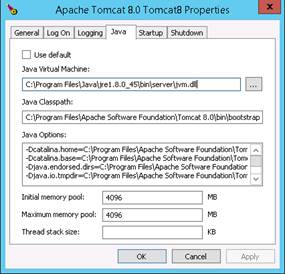
Configure Tomcat
Now we need to configure Tomcat to use the new version of Java. This is done by running Tomcat8w.exe. It can be found in the Tomcat installation folder in the bin folder.The default installation folder is C:
\Program Files\Apache Software Foundation\Tomcat8.0\bin\.
Go to the Java tab and change the value of the Java Virtual Machine to point to the newly installed Java version. You can browser the filesystem for the correct file by clicking on the button with the three dots.
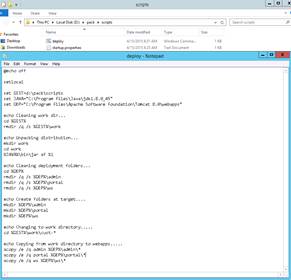
Deploy script
If you are using the Atira deploy script,you will also need to change the Java path inside that to point to the newly installed Java version.
set JAVA="C:\Program Files\Java\jdk1.8.0_45"
The default path for this script is d:\pack\scripts
Start Tomcat
If you are upgrading Java at the same time as Pure, you should not start Tomcat until the Pure upgrade guide tells you to.
Start the Tomcat service again, and it should start up using the new version of Java.
Upgrading Tomcat on Windows
This guide will explain how to upgrade Tomcat on Windows.
Major version upgrade
If you are upgrading Tomcat major versions (eg. 7 -> 8), follow this guide.
Only do major version upgrades if specified in the Pure requirements for your version of Pure, or Pure might stop working!
Download new Tomcat
Go to tomcat.apache.org and download the newest Tomcat 32-bit/64-bit Windows Service Installer for the version you want to install.
Stop Tomcat
If Tomcat is running it should be stopped before proceeding with the installation.
If the service is set to startup automatically, set it to manual startup,so you do not end up with two running Tomcats after a server reboot.
Install new Tomcat
Follow the Tomcat part of the Installing Pure on Windows guide to setup the new Tomcat.
Afterthe installation is done, copy the configuration from the old Tomcat (server.xml and Tomcat<version>w.exe) to the new Tomcat.
Deploy script
Change the Tomcat path in the deploy script to point to the newly installed Tomcat.
Deploy Pure
Deploy Pure to the new Tomcat
Start Pure
Minor version upgrade
If you are upgrading Tomcat from one minor version to another (eg. 8.0.20 -> 8.0.21) follow this guide.
Download new Tomcat
Go to tomcat.apache.org and download the newest Tomcat 64-bit Windows zip for the version you want to install.
You can also download the 32-bit/64-bit Windows Service Installer but that will overwrite all your Tomcat configuration, so you will need to do the Apache Tomcat Properties part of the installation documentation.
Stop Tomcat
If Tomcat is running it should be stopped before proceeding with the installation.

Backup server.xml
First create a backup of the Tomcat server.xml file,as that will be overwritten by the upgrade. The default location is in C:\ProgramFiles\Apache Software Foundation\Tomcat 8.0\conf
The upgrade will overwrite the server.xml file so if you do not create a backup, you will need to do the Server.xml part of the installation document again
Install new Tomcat
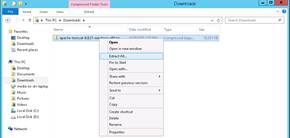
First find the Tomcat zip file you just downloaded through the file explorer
and extract it
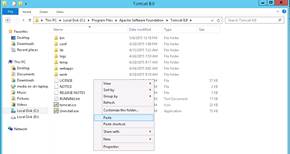
Now copy the extracted files
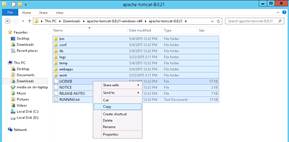
and paste them into the Tomcat installation folder C:\Program Files\Apache Software Foundation\Tomcat 8.0\
If the installation complains about not being able to write to Tomcat<version>w.exe check if the Tomcat monitor is running in the Windows Taskbar, and close it if it is.

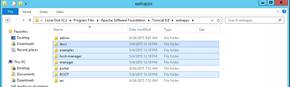
Now go the web apps folder in the Tomcat installation folder (C:\Program Files\Apache Software Foundation\Tomcat 8.0\webapps), and remove any extra web apps that you do not need
Restore the server.xml file from your backup and start Tomcat again.

Published at November 23, 2023