How Can We Help?
5.16.0 Release notes5.16.0 Release notes
Highlights of this release
![]() Co-managing organizations
Co-managing organizations
5.16 introduces a feature that allows for co-managing organizations on awards, applications and projects. Multiple organizations can now view and edit content giving them the ability to better understand their contributions to an award, application or project. This feature allows for greater visibility, control and communication between editors across the participating organizations, which is no longer limited to only those in the managing organization. The co-managing editor role, an extension of the current Editor and Assisting Editor roles, has been introduced to take full advantage of these benefits. The co-managing organizations feature is configurable and disabled by default.
![]() DataSearch API
DataSearch API
With this release we are happy to announce the integration with DataSearch, a data search engine for researchers covering a variety of institutional repositories and data sources. DataSearch enhances the search experience by allowing you to search not only in the metadata but also in the data itself. Through DataSearch, research managers can search for datasets that are relevant to their institutions and synchronize their details into Pure. Users will can select one or more data sources and to preview datasets before importing them into Pure. The integration with DataSearch enriches the Mendeley Data integration, expanding the coverage of this functionality to a wide range of domain-specific and cross-domain repositories.
![]() Bulk delete sensitive personal information
Bulk delete sensitive personal information
For an institution, balancing the functionality and value of a RIM/CRIS/Repository system with GDPR (and similar privacy frameworks) can be difficult. The bulk delete feature introduced in this release provides administrative users with the ability to bulk delete sensitive fields from person records, giving institutions the tools to effectively manage this balance. Some information will be retained to ensure any underlying data models function effectively, and to ensure Pure functions correctly. Administrators can access this feature as a Bulk edit operation on persons, and can select persons based on multiple criteria, using personal information that is available in the specific Pure installation.
 Redesigned "Contact Expert" feature
The Pure Portal is about building connections - facilitating stronger, more prolific engagement and collaboration between your institution and the world. With this is mind, we have focused this release on improvements to how visitors to the Pure Portal can get in touch with your researchers. This could be to discuss a recent finding, to grow their network or to present an exciting new collaboration opportunity. The "Contact Expert" feature already existed in the Pure Portal, but by working together with our clients and outside partners we have added made it easier to configure to meet the specific needs of your institution and switched to a web form to simplify the user experience to make it easier than ever to connect.
Watch the 5.16 New & Noteworthy seminar
We are pleased to announce that version 5.16.0 (4.35.0) of Pure is now released.
Always read through the details of the release - including the Upgrade Notes - before installing or upgrading to a new version of Pure.
Release date: 15th of October 2019
Hosted customers:
- Staging environments (including hosted Pure Portal) will be updated 16th of October (APAC + Europe) and 17th of October (North/South America).
- Production environments (including hosted Pure Portal) will be updated 30th of October (APAC + Europe) and 31st (North/South America).
Advance Notice
The Funding Discovery module will be retired with the February release of Pure (version 5.17).
We did not take this decision lightly as we do believe that searching for and working with funding opportunities is an important part of the pre- and post award process. However, we felt that, based on the main use cases that Pure is designed to work with, that the functionality is better served in the dedicated Elsevier Funding Institutional product. If you are a user of the Funding Discovery module and would like to continue access to the Elsevier body of funding content, we encourage you to speak with your Elsevier sales representative.
Download the 5.16 Release Notes
last updated 22/10/2019
View the 5.16 Translation Updates: Welsh, German, Dutch, Danish, Finnish, Swedish, Spanish, Russian, Chinese (Simplified).
1. Web accessibility
We continue to work towards being fully WCAG 2.1 AA compliant by February 2021 by ensuring accessible design in new features.
In addition to this we implemented the following improvements to existing features:
1.1. Update to Pure Portal's Voluntary Product Accessibility Template (VPAT)
We have prepared an updated version of our VPAT, which records our current status on meeting WCAG 2.1 accessibility requirements for the Pure Portal. We are proud that it shows we have made major steps towards making our portals fully accessible to all, keeping us on track for our goal of WCAG 2.1 AA compliance.
The document is available for visitors of your portal to view by clicking on the 'About web accessibility' link in the footer:

This will open our page on accessibility support. From here you can select to 'download the VPAT'.
2. Privacy and personal data
The protection of privacy and personal data is extremely important to Pure. Based on guidance provided by GDPR (and similar frameworks), we continually add improvements to how Pure handles sensitive data, and we continually provide tools for users to manage their own and others' data in Pure.
In this release, the following features that support the protection of user privacy and personal data have been introduced:
2.1. Access rights for non-active users
You can now configure a grace period so that former staff members can access Pure for a certain amount of time after they leave your institution. Institutions may require former-status personal users to access Pure: access may be required to fulfill policy or evaluation requirements and/or to ensure data is as complete and correct as possible. Access rights given through this feature are superseded by the general access rights of the institution and their single-sign-on (SSO) policies.
Click here for more details...
To configure grace periods for personal user (staff) and (student), go to Administrator > Users > Person access grace period. The grace period for personal user (staff) roles also applies to honorary and visiting scholars.
| Setting a grace period | |
|---|---|
| For personal users that are either students or staff, administrators can set an access grace period (in days). Once they become 'former' in Pure, the users will still be able to add and edit only their own content in Pure. | 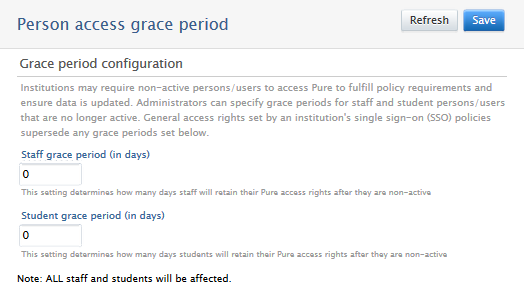 |
| Important notes | |
|
2.2. Bulk delete sensitive personal data
For an institution, balancing the functionality and value of a RIM/CRIS/Repository system with GDPR (and similar privacy frameworks) can be difficult. The bulk delete feature introduced in this release provides administrative users the ability to bulk delete sensitive fields from person records, giving institutions the tools to effectively manage this balance.
Some information will be retained to ensure any underlying data models function effectively, and to ensure Pure functions correctly.
Administrators can access this feature as a Bulk edit operation on persons, and can select persons based on multiple criteria, using personal information that is available in the specific Pure installation.
Learn more from Bulk delete sensitive personal data
2.3. Search indices and permissions
In this release we have limited which attributes and related content, specifically awards, funders and usernames, can be searched upon in either Pure, or in Pure or Custom portals, depending on visibility statuses. This lowers the likelihood of confidential information being made publicly available.
The fix introduced in this release ensures that any indexing of public content, related to any confidential content, accounts for all possible permission options when searching.
Click here for more details...
For example, consider a confidential award (A) with Funder (B), related to a public project (C).
User's role |
Previously |
Now |
|---|---|---|
| Administrator (or user with permissions to access the content) | A search for the award (A), or Funder (B), or project (C) returns results. | A search for the award (A), or Funder (B), or project (C) returns results. |
| Does not have permissions to access the content | A search for the project (C) returns a result, as it is public. A search for the Award (A) or funder (B) returns the project as a result, with the award or funder as an attribute. | A search for the project (C) returns a result, as it is public. A search for the Award (A) or funder (B) does not return any results. |
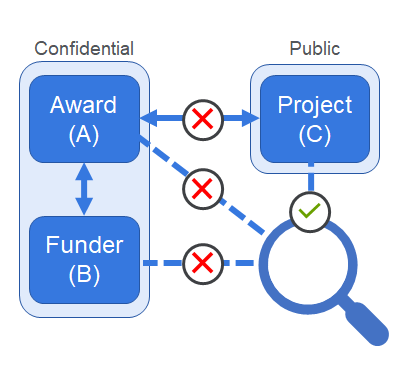
The fix removes any search results (in either Pure or portals), that would be returned when searching for confidential award- or funder-related content, even if public content is related to the search target.
As such, if the user performing the search does not have appropriate permissions to access the content, only the public visibility content and public visibility attributes will be returned in the search results.
Please note:
There is, however, one remaining known exception to this fix. It is still possible to search in portals based on 'restricted' keywords. We are working on this fix, and plan to release it with the 5.16.2 update.
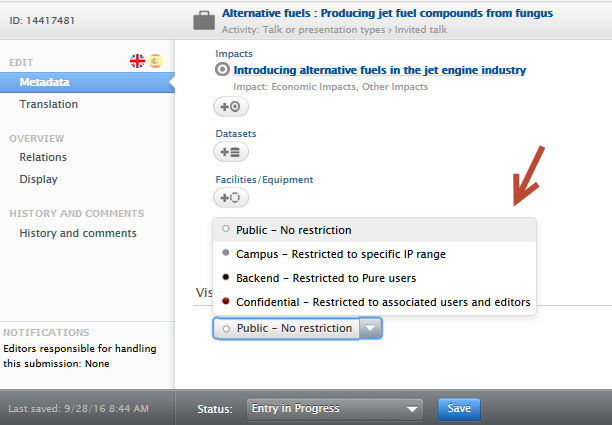
2.4. Confidential visibility setting for activities
Institutions that fall under the GDPR (or similar) framework may occasionally not gain approval from visitors for their identifying data to be available in activities. However, these institutions may rely on recording all activities for internal evaluations, which if not included in Pure may negatively affect the evaluation.
With this release, you can now set the visibility on Activities, so that Activities can be entered into Pure without the data being made available elsewhere.
You can do this from the drop down list in the Activity editor window. You must save the record afterwards.
2.5. Roles removed from trusted user search
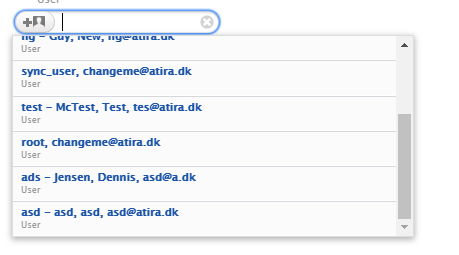
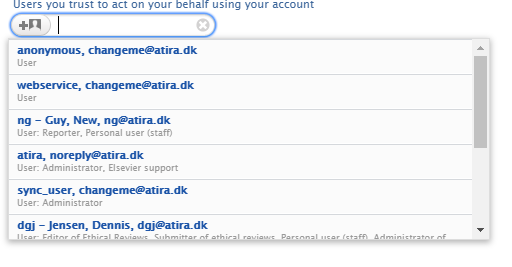
For privacy reasons, now only Administrator or Administrator of Users can see the roles of users when adding a trusted user.
Click here for more details...
View when searching for user to add as trusted user if not Administrator or Administrator of Users
View when searching for user to add as trusted user only if Administrator or Administrator of Users
3. Pure Core: Administration
3.1. User acceptance of Terms of Agreement
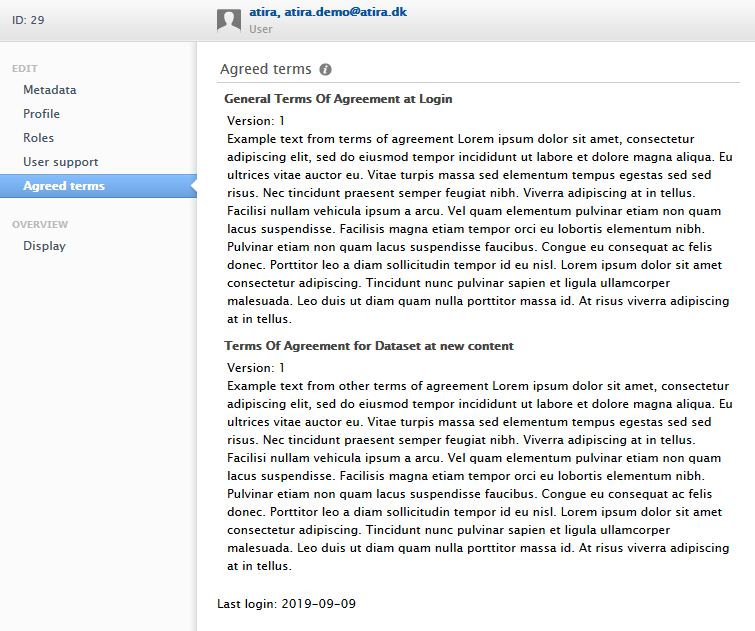
With 5.16 you can now track acceptance of your institution's Terms of Agreement when using Pure. This change makes it easier to access this information, and see specifically which version was agreed to.
You can explicitly see which Terms of Agreement each user has agreed to:
- in the User editor window > Agreed terms tab (the latest accepted terms of agreement).
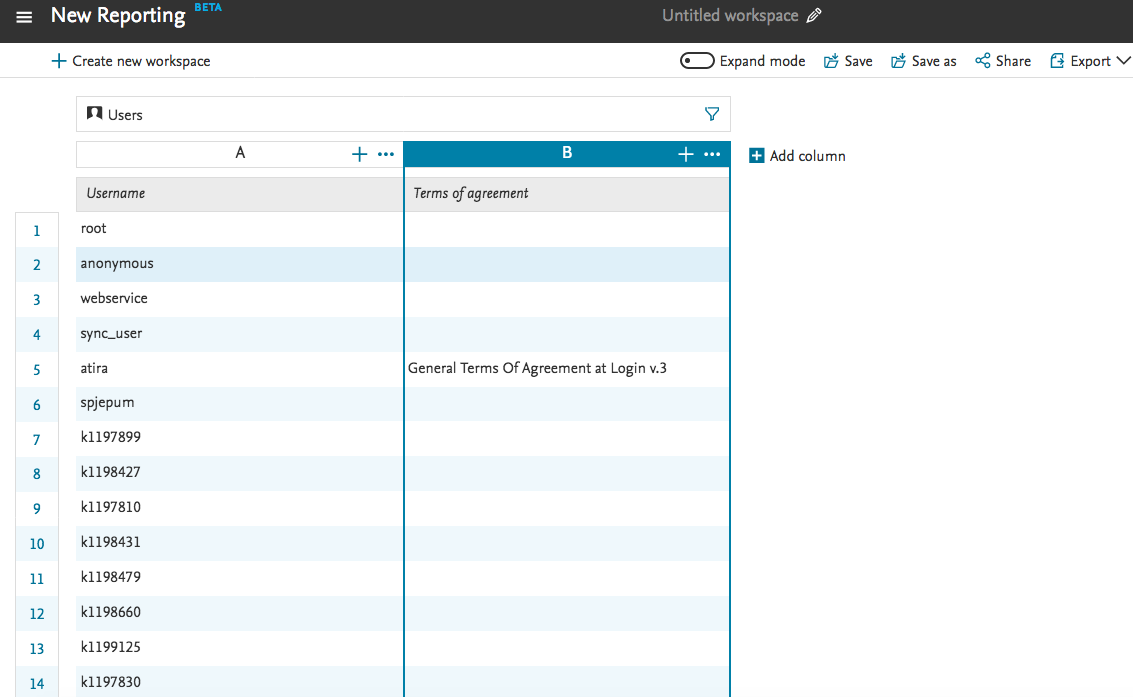
- in the new reporting module
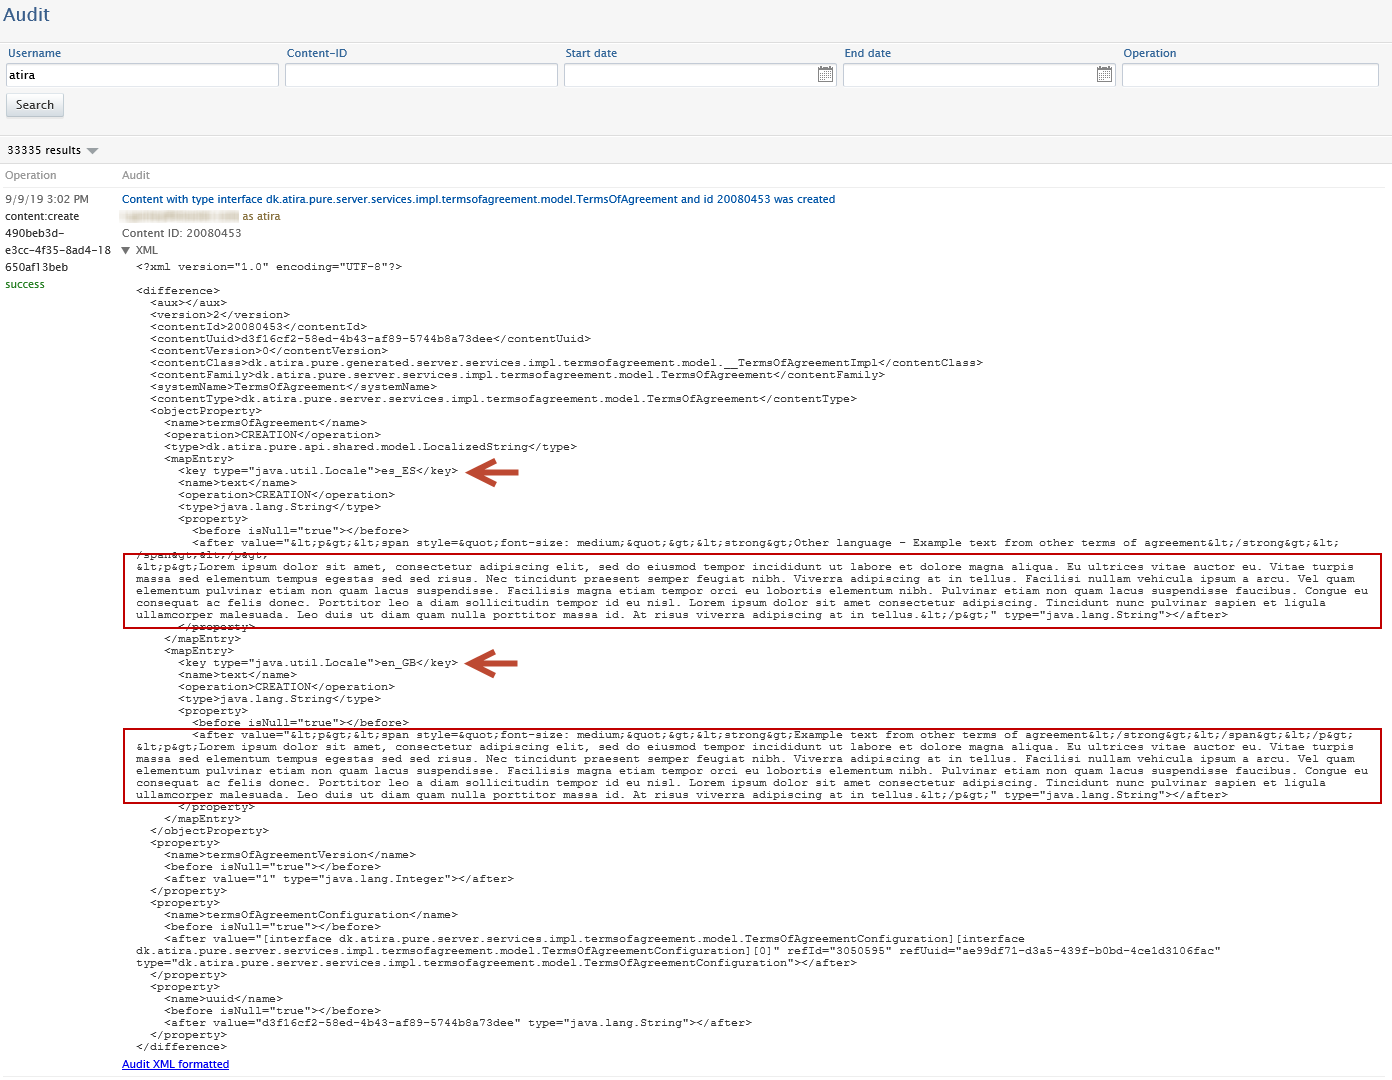
- in the audit log (full terms of agreement that were agreed to)
Click here for more details...
You can configure a Terms of Agreement on the Administrator > Terms of Agreement tab. Administrators can create a Terms of Agreement that is shown to (and accepted by) Users when they next log into Pure.
Viewing what Terms of Agreement have been accepted by a User |
|
|---|---|
| A new Agreed terms tab is now available on the User editor window. The latest version of each category of Terms of Agreement accepted by a User are now displayed in this menu tab, including the users last login date. |
|
| Viewing acceptance of Terms of Agreement in audit log | |
| The audit log now contains the exact text used in the accepted Terms of Agreement, with multiple locales supported. |
|
Reporting on users and Terms of Agreement acceptance | |
| The new reporting module also supports reporting on which users have accepted which Terms of Agreement. To create this, within a workspace, start on user and add a value on "terms of agreement". |
|
3.2. Use of journal or approximated dates for content from Scopus
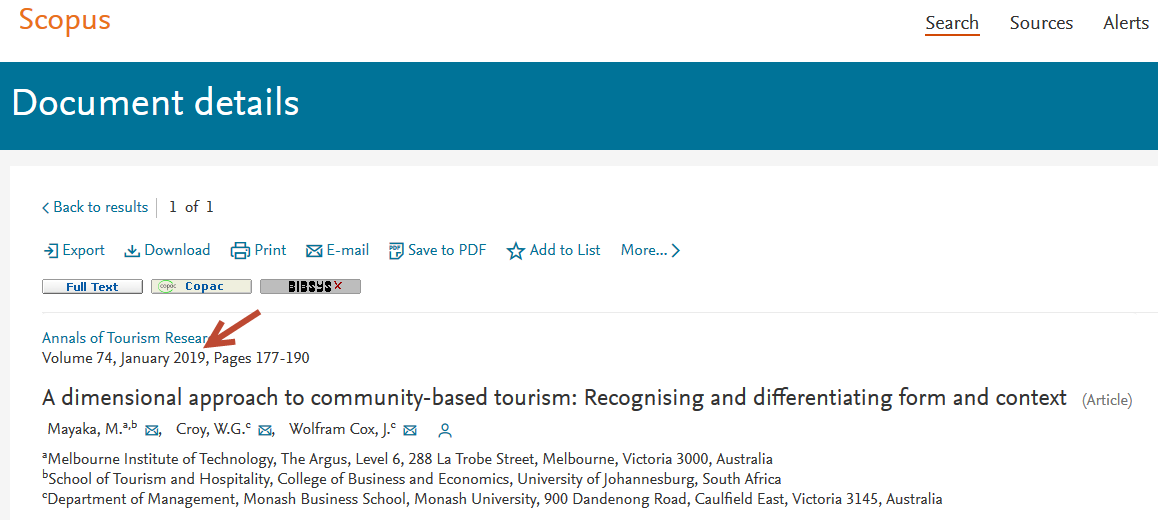
Scopus provides publication data with all content indexed in Scopus. Occasionally, dates provided by the journals, and shown on Scopus.com, are vague - for example 'Spring 2019', or 'January 2019' or '2019'. Scopus provides an approximation service that fills in 'missing' month and day information. As a result, content with a journal-provided date such as March 2019 appears in Pure as '1st of March 2019'.
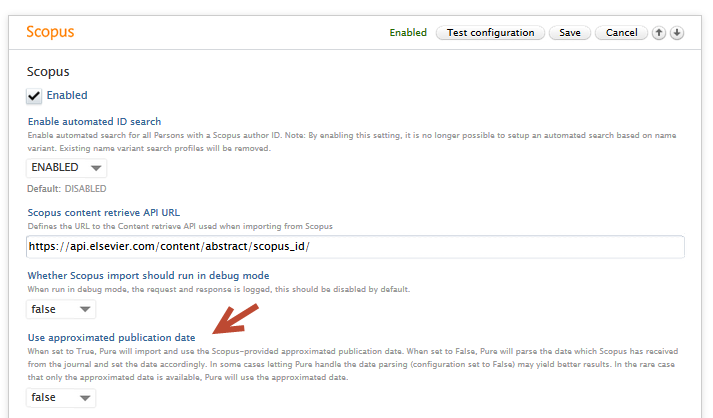
To ensure that the content found in Pure best reflects the date found in the journal, we have introduced a configurable feature. This allows administrative users to:
- configure content imported from Scopus to use the exact journal date versus the approximated date,
- backfill content already imported from Scopus.
The feature will not overwrite any manually changed publication dates, and is disabled by default.
Click here for more details...
For REF customers
Before enabling this feature and/or back filling content, REF customers should note: Running the run once job could change the publication date on content that has been proposed to REF2021, in some cases removing the full publication date. This might have implications in relation to REF compliance. We recommend to first run the job on your test servers to see the implications of the job in relation to REF2021.
Example record from Scopus.com
Provided below is an example of the publication date as seen in Scopus.com for the record with Scopus ID: 85058052904. The publication date, as of the writing of this release note text, is January 2019 and reflects the journal's representation of the publication date. However, the publication date when imported into Pure is represented as '1 January 2019' due to the data provided via the Scopus API.
Configuration options to use exact journal versus approximated publication dates
Configuring Scopus as an import source for future content import: |
|
|---|---|
|
Note: For imports from Scopus, you must have enabled Scopus as an import source.
|
|
| To use exact journal dates on all previously imported content: | |
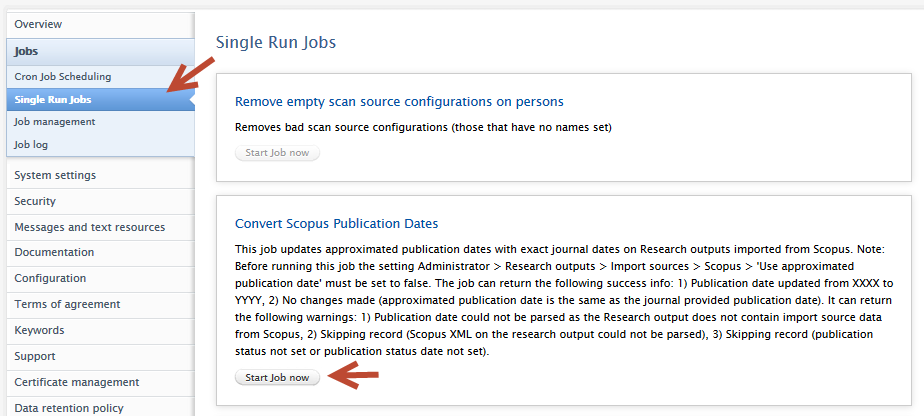
A single run job has been created that will convert all content previously imported from Scopus to use exact journal dates. This job will not overwrite any manual publication date changes even if the content was imported from Scopus. To use the job:
Important note If you convert all previously-imported content to use exact journal dates, you will not be able to use the same job to convert back to using approximated dates. |
|
|
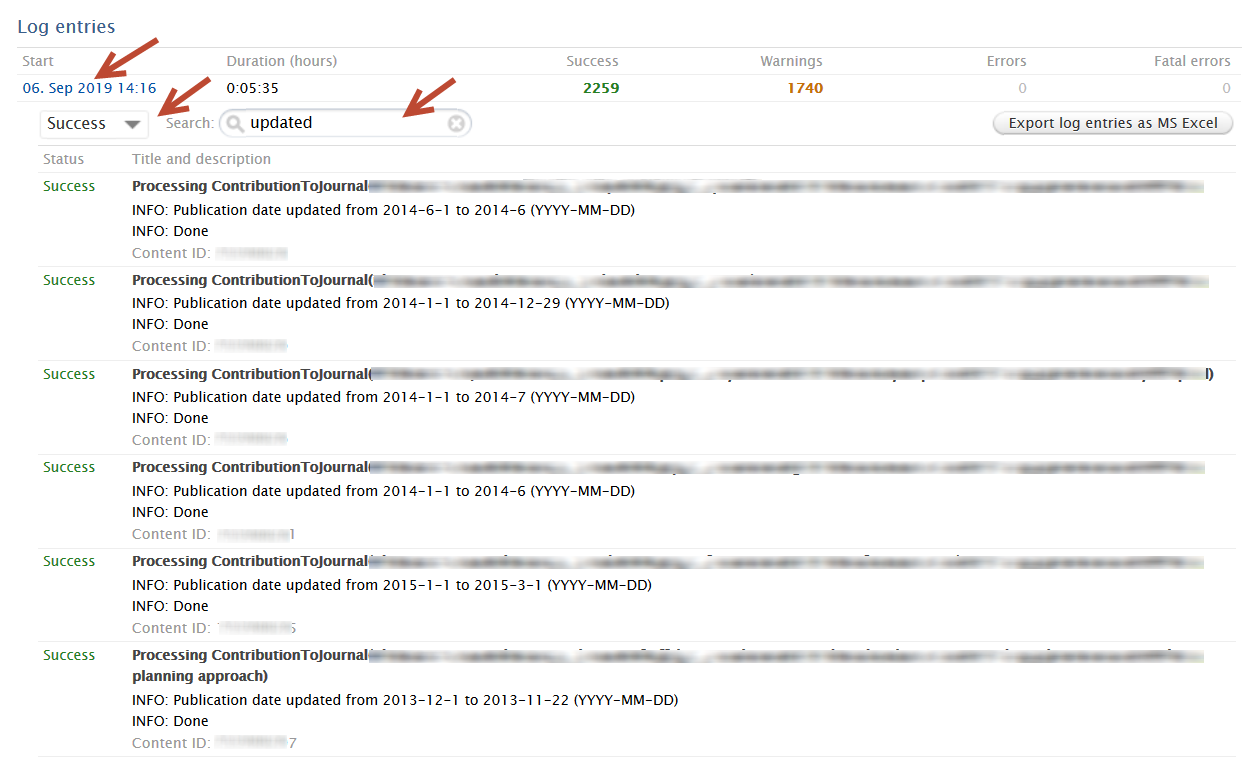
Once the job has run, you can inspect the results in the job log by clicking on the job run date. Users can use the dropdown filter and search option to view successes, or warnings if records were not processed. Success status information includes:
Warning status information includes:
|
|
| If you are a QABO customer: | |
|
To ensure all content imported from Scopus uses approximated dates:
To ensure all content imported from Scopus uses exact journal dates:
|
 |
|
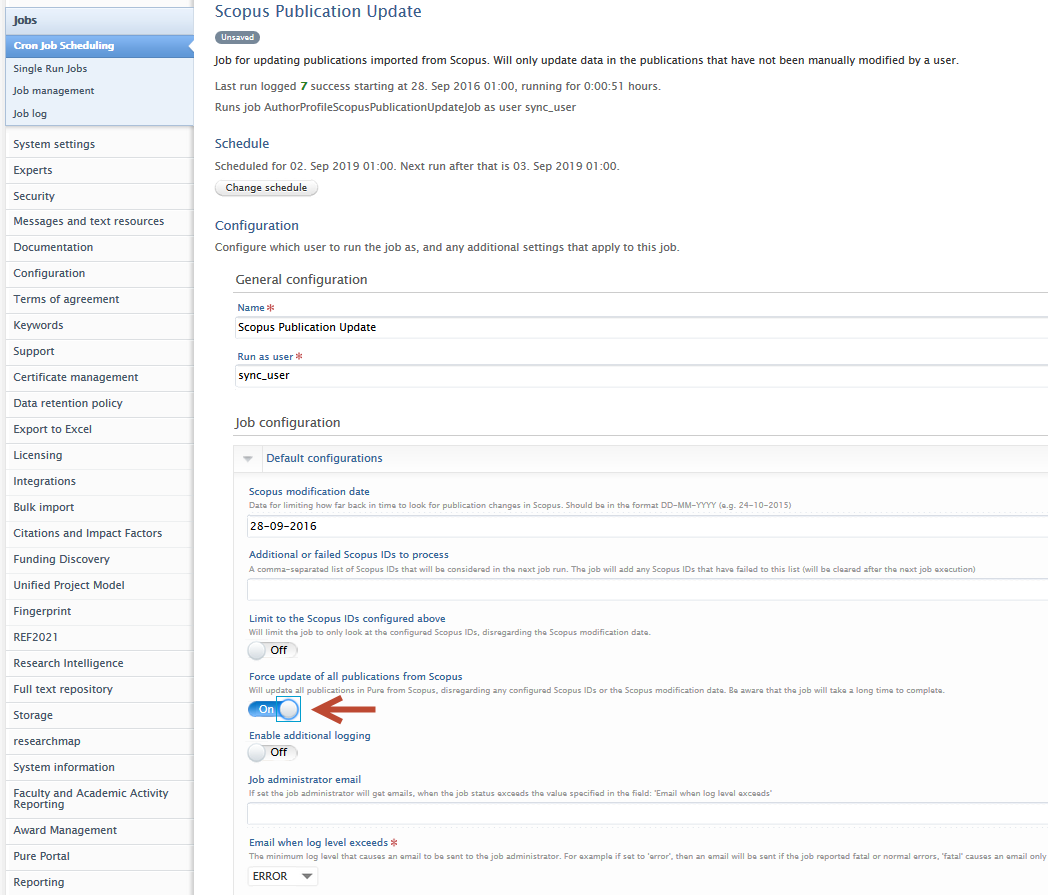
Important note for QABO customers: if you would like to process all previously-imported Scopus content, we suggest you enable 'Force update of all publications from Scopus' in the job configuration. Please remember to save any changes to the job configuration. |
|
3.3. Multiple corresponding authors
Journals increasingly allow more than one corresponding author on a publication. Additionally, the corresponding author title is often used in evaluations as assessments as a proxy indicator of a significant contribution to the publication. As such, in this release, Pure now allows you to set more than one corresponding author in a contributor list. The option to add corresponding author tags was introduced in 5.14, and, as well as allowing multiple corresponding authors, has also undergone some UX improvements.
Click here for more details...
Enabling corresponding author
The option to set or change Corresponding Author is disabled by default and can be enabled through Administrator > System settings > Publication > Enable Corresponding Author.
Automated addition:
Publications imported from Scopus and Web of Science via the Import from online source option will be scanned for XML tags that specify which of the authors are the corresponding author. If the XML tag is found, the corresponding author tag will be automatically added, and is viewable once imported. Unfortunately neither Scopus nor WoS are particularly reliable in identifying multiple corresponding authors. In most cases, only the first occurence of a corresponding author is found in the import XML.
To manually set or change corresponding author via the record editor:
Set (or remove) a corresponding author |
|
|---|---|
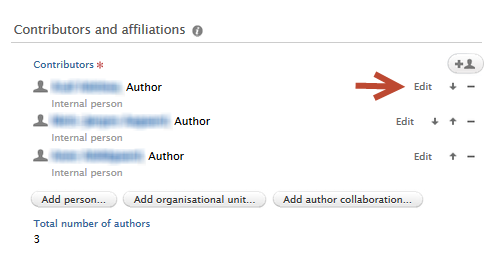
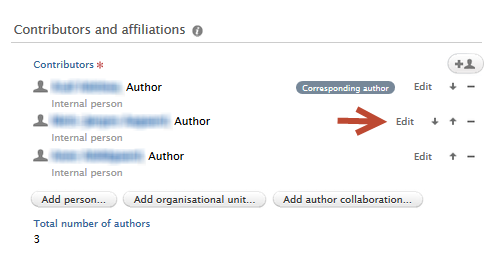
| The corresponding author can be set by first clicking on 'Edit' on a contributor. |
|
|
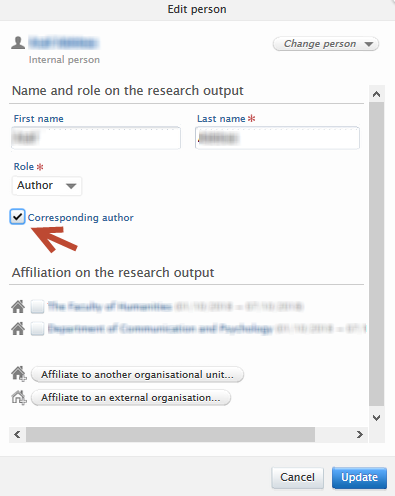
In the Edit person dialog, check the 'Corresponding author' box. To remove the corresponding author tag from that contributor, uncheck the 'Corresponding author' box. Please remember to click on 'Update' once any changes have been made. |
|
| Add another corresponding author | |
| Follow the same procedure to set (or remove) a corresponding author. |
|
|
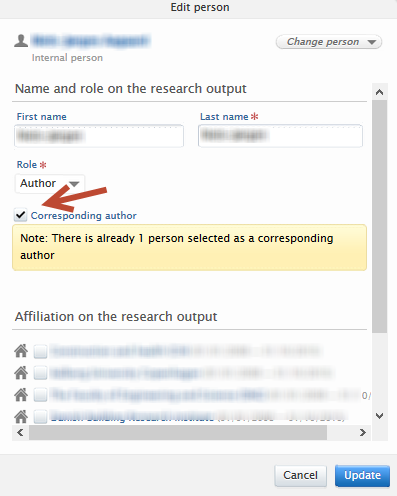
In the Edit person dialog, check the 'Corresponding author' box. If other corresponding authors are already set on the record, a note will be shown specifying how many other corresponding authors there are. To remove the corresponding author tag from that contributor, uncheck the 'Corresponding author' box. Please remember to click on 'Update' once any changes have been made. |
|
Back filling corresponding author tags
On upgrade to 5.16.0, records in Pure with corresponding twins in either Scopus or Web of Science are checked for corresponding author. When found, the tags are added automatically and only when the setting is enabled will they be shown. For records without twins in Scopus or Web of Science, a filter exists to identify those without corresponding authors. Users can then manually add the corresponding author.
Access to corresponding author information via the Web Service (WS):
Corresponding author is exposed in the author listings per research output via the WS in get/research-outputs with the following tags, <correspondingAuthor>true</correspondingAuthor>:
<result>...<items><contributionToJournal>...<personAssociations><personAssociation...<names><name>Author A</name></names>...<correspondingAuthor>false</correspondingAuthor>...</personAssociation>...<names><name>Author B</name></names>...<correspondingAuthor>true</correspondingAuthor></personAssociation></personAssociations></contributionToJournal></items></result> |
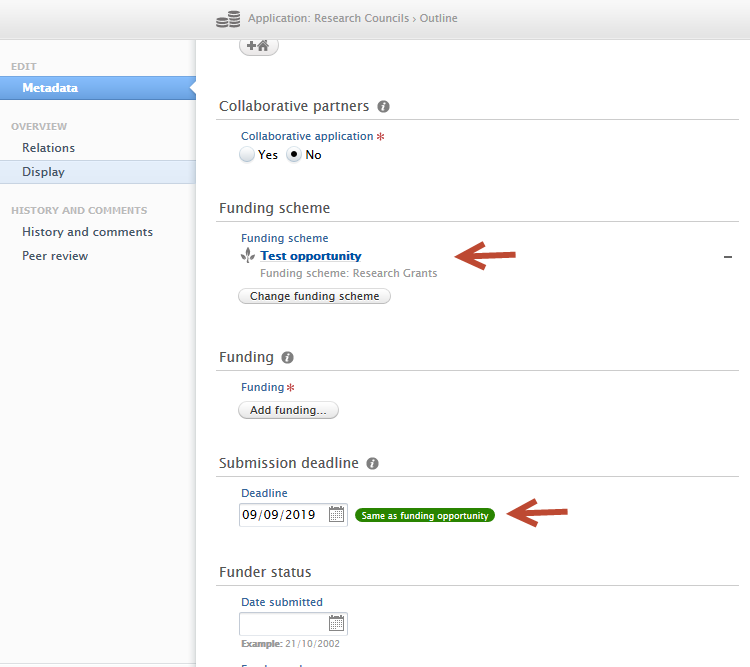
3.4. Application submission deadline dates
Researchers, editors and administrators rely heavily on Applications providing the most relevant and timely data. An extremely important piece of data is the application submission deadline date. If a submission deadline is missed, an opportunity for funding is missed.
From this release, Pure allows the recording of a submission deadline date for applications. It is linked with any related funding opportunities and includes filters for approaching deadlines. It is only available for customers with the Award Management Module.
Click here for more details...
Adding or editing an application submission deadline date |
|
|---|---|
|
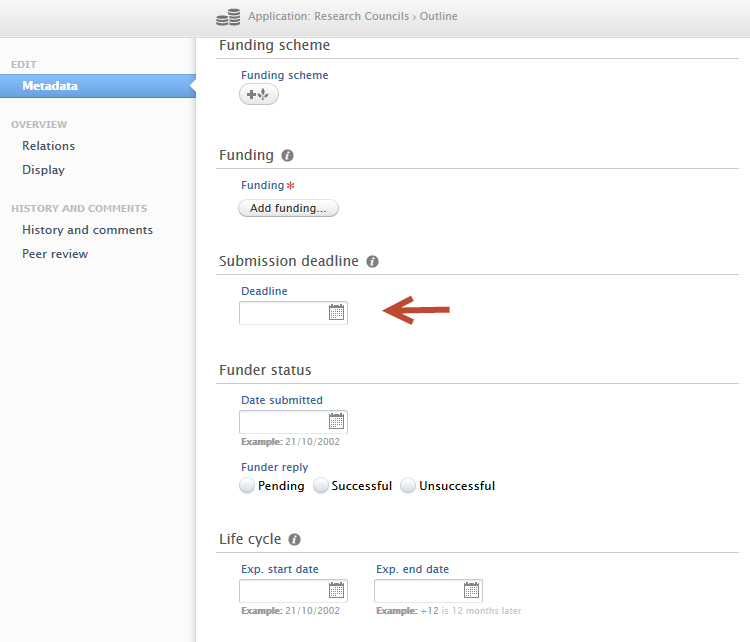
A new date picker is available when creating or editing an application. You can see it on the Application editor window > Metadata tab > Submission deadline section. |
|
|
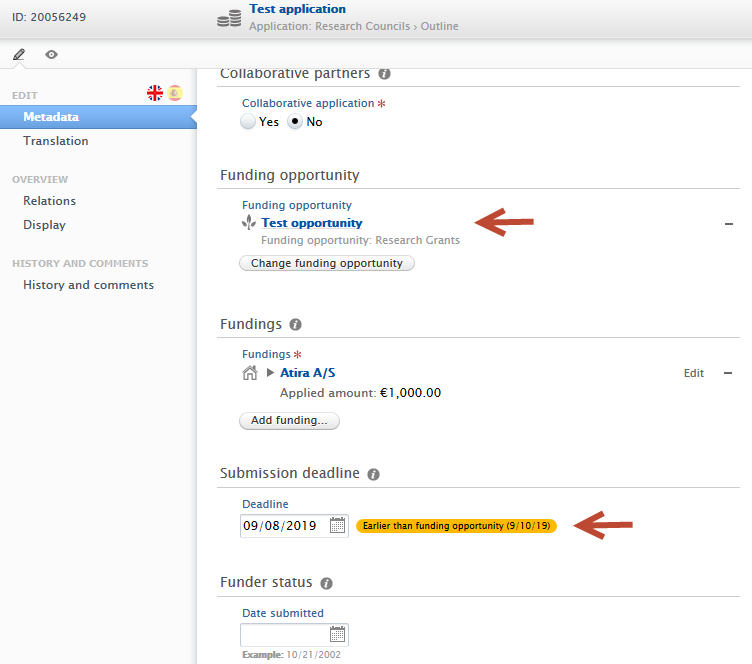
When you link an Application and a Funding Opportunity, the Application's submission deadline date (2) is set to the Funding Opportunity's deadline date (1). When you create an Application from a Funding Opportunity, the new Application also receives the deadline from the Funding Opportunity. |
|
|
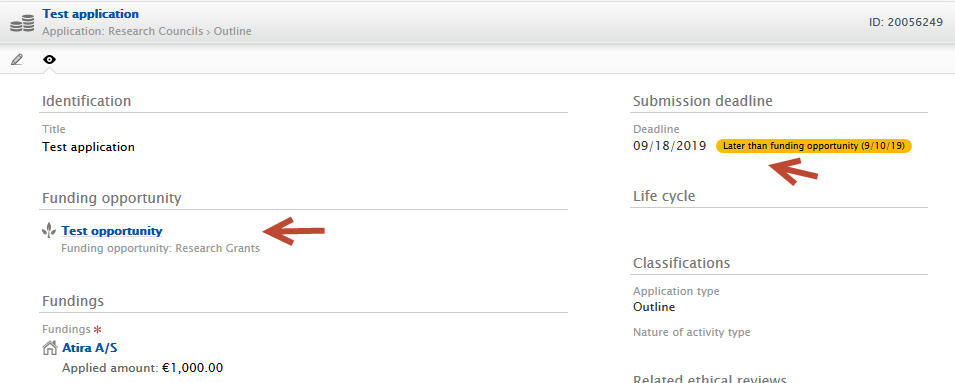
If either the deadline on the Funding Opportunity or Application is modified, the submission deadline date on the Application displays a prominent tag next to the submission deadline date field. This indicates a difference between this date and the Funding Opportunity deadline date. This tag is shown in both the edit (1) and read (2) layouts of the application. |
|
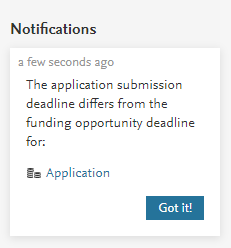
| Additionally, any users with editorial access, including Editors of Applications, validators, assisting editors and checkers/approvers, receive a notification that the deadline dates of the opportunity and related application(s) are different. |
|
Application submission deadline filters |
|
|
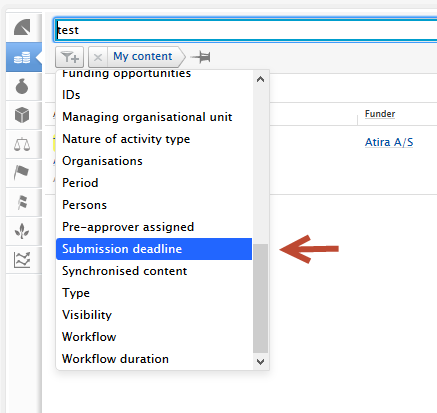
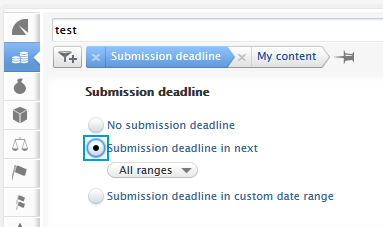
New filters have been created to support the addition of application submission deadlines. The filters can be found in the Application content list view > add filter dropdown (1). The Submission deadline filter allows users to filter Applications to show:
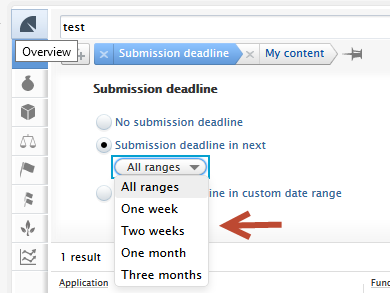
Approaching deadline periods (3) include one week, two weeks, one month and three months, whilst the custom date range allows for more refined periods. |
|
| Sorting content by application submission deadline | |
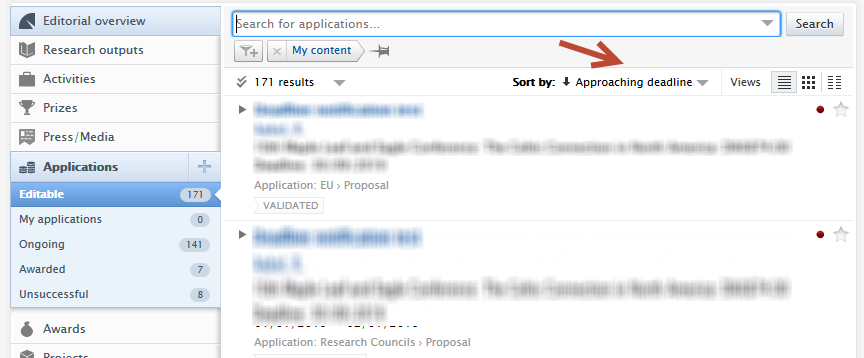
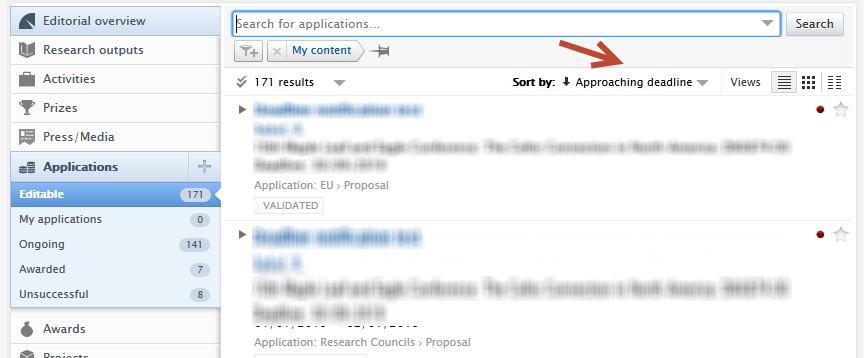
| Users can sort by approaching deadline in the content list view (1), and applications with approaching deadlines can be quickly identified in the content matrix view (2). The approaching deadline tag in matrix view can be configured (3) under Administrator > Award Management > Module configuration > Application approaching the submission deadline. Users can select periods that best reflect their needs and range from 1 week to 3 months. |
3.5. Improved search - DOIs
With 5.16 users can now search on full and partial DOIs in both the content list view search bar and the global search bar. This is another step towards improving the overall search experience, starting with identifiers.
Click here for more details...
Global search |
|
| Full DOI | 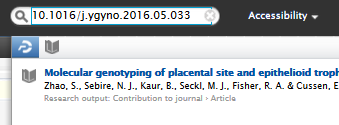 |
| Partial DOI | 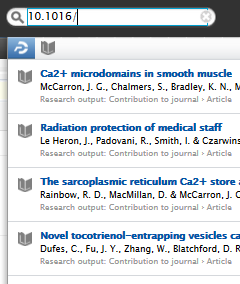 |
| Content list search | |
| Full DOI | 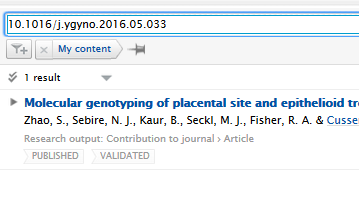 |
| Partial DOI | 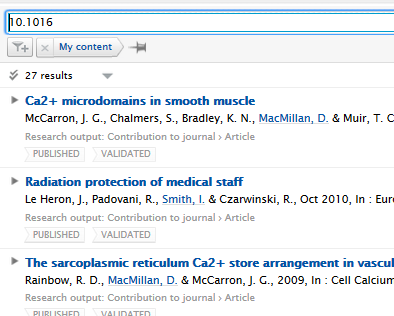 |
3.6. Remove associated user from person directly
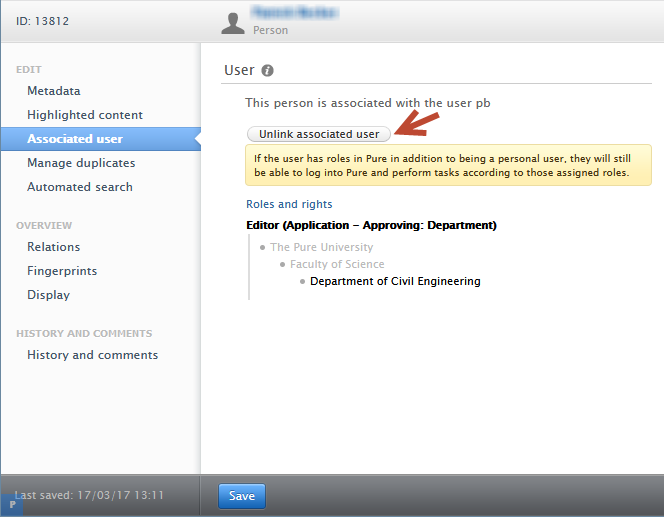
Previously, administrators were only able remove associated users from persons with help from Pure Support. We have now introduced the ability to manually and easily remove user associations directly within the Person editor window.
To do so, navigate to a Person's editor window > Associated user > Click on "Unlink associated user".
Typically, a Person and User must be linked for them to log in to Pure. However, if the user has roles beyond a 'personal user' they will still be able to log in. The elevated roles must removed by an administrator.
The "Unlink associated user" feature is deactivated if a Person sync job is enabled and the content is currently being synchronized. In this case the text shows: "You cannot manually unlink a user when the user information is synchronized from another system".
3.7. Vendor message for Pure version end of support
To ensure Pure customers enjoy the full support of our Pure support team, we have added messaging to encourage those who are not on the latest version to update.
This is a popup shown to Administrator users only, upon login to Pure.
As a reminder about support, Pure provides:
- full support for current active release
- fixes for one release back
- fixes for two releases back when all of the following are true:
- in special cases
- it is both agreed on between customer and Pure
- it is a blocker or security issue
- no support for installations three releases behind the current version.
3.8. URL field for journal
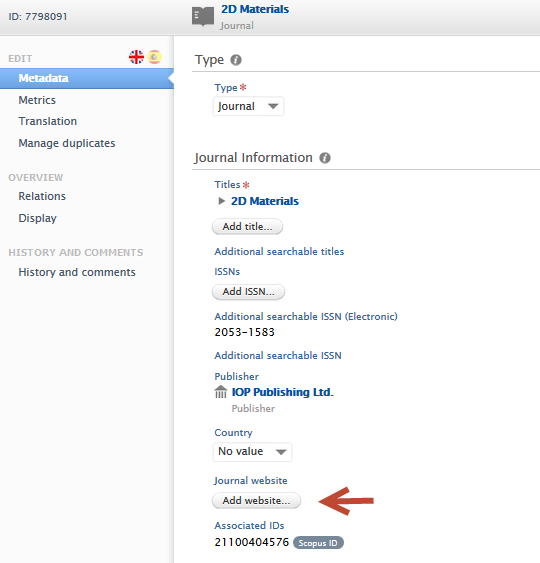
It is now possible to add a URL to a journal website. This makes it easier for users to access the journal website, especially for those journals that do not have an ISSN or similar common identifier.
Click here for more details...
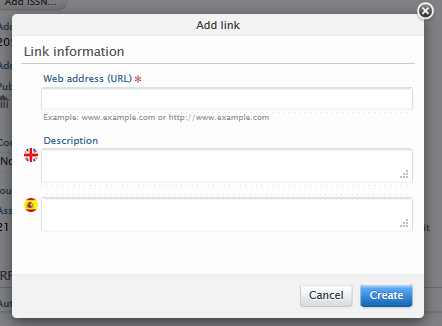
A URL can be added in the Journal editor window > Metadata tab by clicking on the 'Add website' button, and providing a URL and description text if necessary.
3.9. User-specific Checker and Approver overview filters
For persons/users who have elevated roles, such as Administrator of applications role as well as Editor (Application - Checking) and Editor (Application - Approving), it can be burdensome to find and check the various workflow steps they have been assigned to.
We have introduced user-specific Checker and Approver overview filters to improve ease of use and increase efficiency,
Click here for more details...
The users who will benefit from these new filters are:
- Users with multiple application-specific Administrator and/or Editor roles
- who have an overview of either department, faculty or institution-wide applications
- are also named Checkers or Approvers on specific applications.
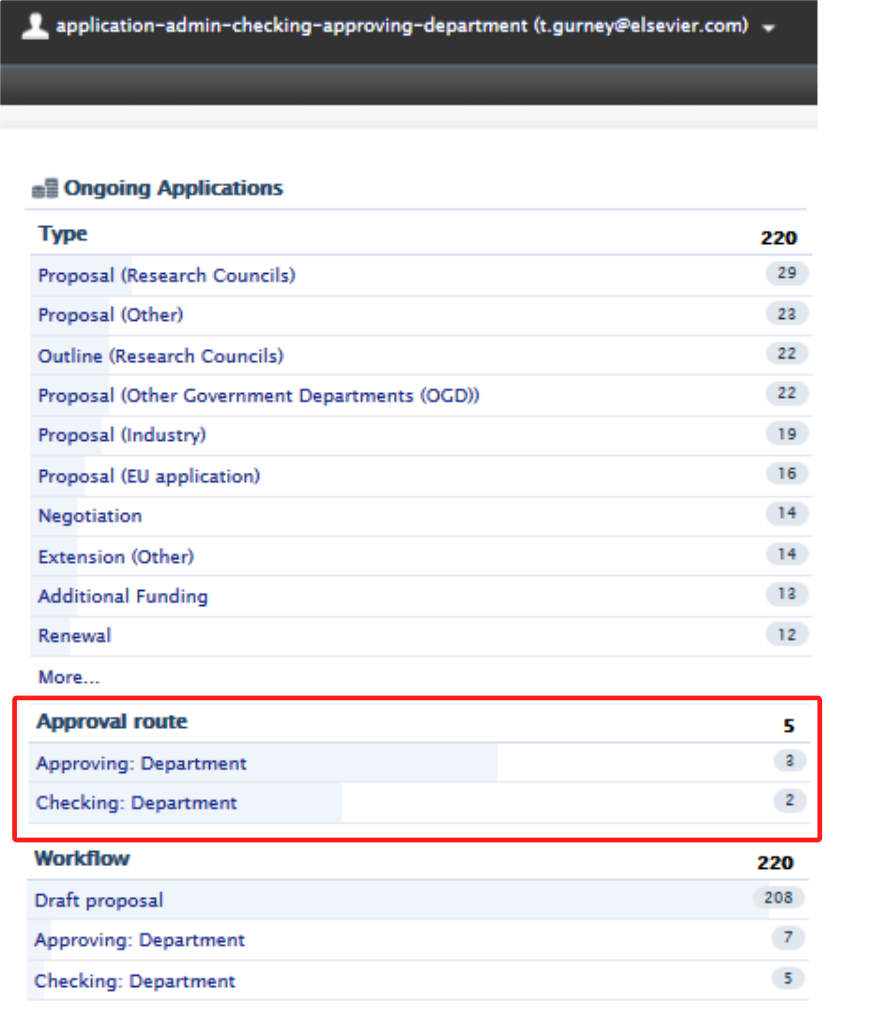
Users can now quickly access these filters on the applications where they are Approver or Checker. To do this, they should (shown in the image below) navigate to the Application overview screen > Approval route section> Approving: or Checking: workflow steps links.
3.10. Audit log improvements - all job names in audit log
All data modifications by jobs that run in Pure are now clearly marked in the audit log with the name of the job that made modifications. This extends the improvements that were first introduced in 5.14 (Improvements to naming of job activity in audit logs).
4. Pure Core: Web services
4.1. WSFileRef element removes DigestAlgorithm and Digest, adds PureId
The WSFileRef element has been updated to display more meaningful data.
The child elements DigestAlgorithm and Digest have been removed. This is because Digest didn't correctly match the referenced filed if coversheets are enabled.
Instead, the child element PureId has been added instead. This ID accurately indicates which file is being referred to. If the file is updated in Pure, the PureID is different the next time this element is returned.
Below are examples of the new output.
Click here for more details...
<file><fileName>file.pdf</fileName><fileURL>http://pure-server/ws/files/17724/file.pdf</fileURL><mimeType>application/pdf</mimeType><pureId>17724</pureId><size>9028271</size></file> |
"file": {"fileName": "file.pdf","mimeType": "application/pdf","size": 9028271,"pureId": 17724} |
4.2. Person sensitive data configuration moved to API keys
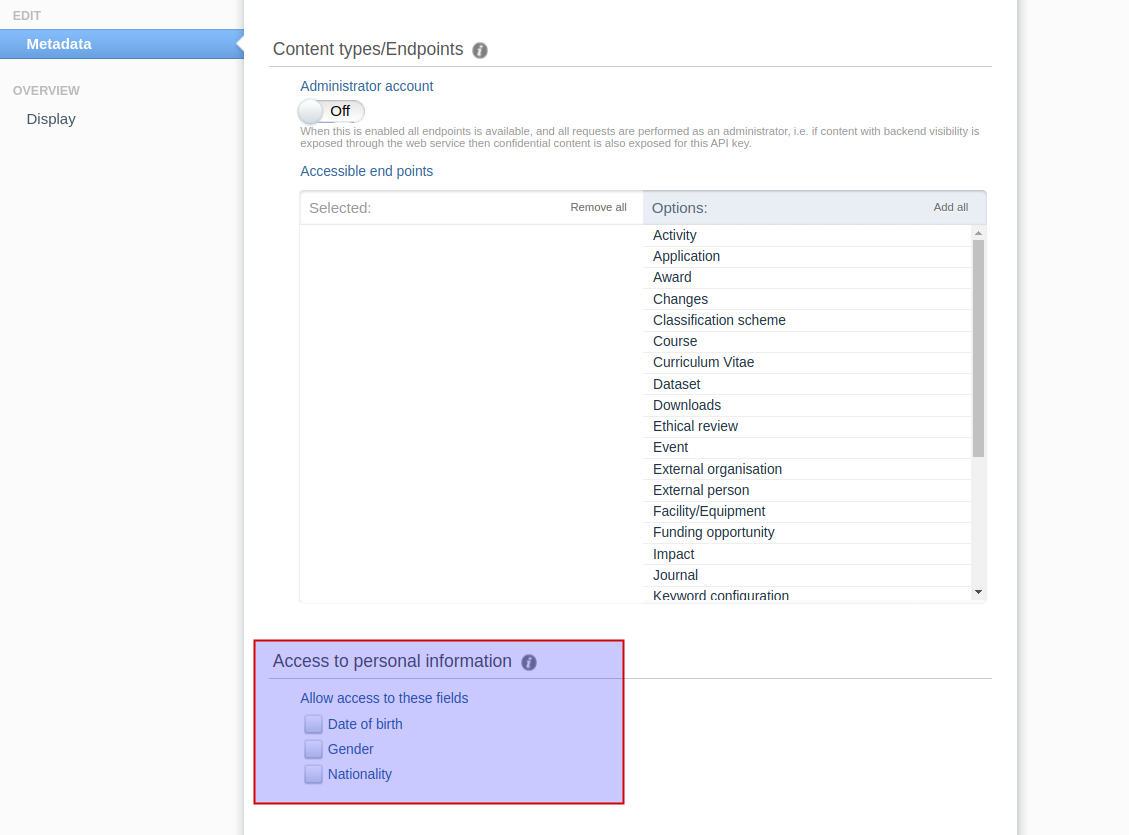
Configuration of person sensitive data fields has been moved to individual API keys. Instead of being a global configuration for the web service these fields are now configured on an API key level.
Existing API keys will inherit the old global configuration and new API keys will default to the most restrictive setting. The fields that can currently being restricted are:
- Gender
- Date of Birth
- Nationality
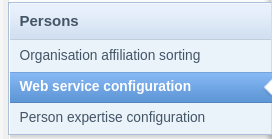
The old global values could be found in Administration > Persons >Web service configuration. This page no longer exists.
The API key configuration can now be found on the API key itself at the bottom of the page.
5. Integrations
5.1. DataSearch takes over from Mendeley Data
DataSearch and Mendeley Data are currently deprecated in Pure.
In this release the integration with DataSearch replaces the Mendeley Data integration, expanding the coverage of this search functionality to a wide range of institutional repositories and other data sources.
Customers who had an active integration with Mendeley Data will be migrated to DataSearch and will automatically be limited to Mendeley Data from the list of sources in DataSearch, but can change the sources as they please.
More information on DataSearch and its integration with Pure is available here.
The DataSearch functionality can be found under Administrator > Datasets. By enabling this integration, datasets relevant to an institution are automatically imported into Pure.
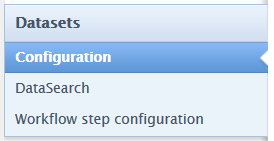
The integration with DataSearch can be set up through the configuration page, through the following steps:
|
1. Navigate to Administrator > Datasets > DataSearch. Note: You must have Datasets enabled on your Pure to set up the integration with DataSearch. |
||
| 2. Turn on/off DataSearch integration, which disables the corresponding cron job. |
|
|
|
3. Specify either your institution ids or your institution names. For clients with a DataSearch subscription it is a viable option to specify institution ids. DataSearch enriches harvested data from other repositories with institution ids and makes these available to search for through their API, but this is only available as a part of the paid integration. If you make use of the free API, the best approach is to limit using your institution name(s). The reason for this is that in the free API the enriched ids from the paid API are not available to search for. Currently it is not possible to both limit using ids and names as the DataSearch API handles this as an "AND" query, which will return a very limited result or no result. This will be changed in a future version of the DataSearch API to an "OR". |
|
|
| 4. Set the default managing organization to be associated with datasets, if no other organization is found on the dataset's metadata. |
|
|
| 5. Define the Workflow step to be given to datasets imported through DataSearch in the Dataset workflow settings section. |
|
|
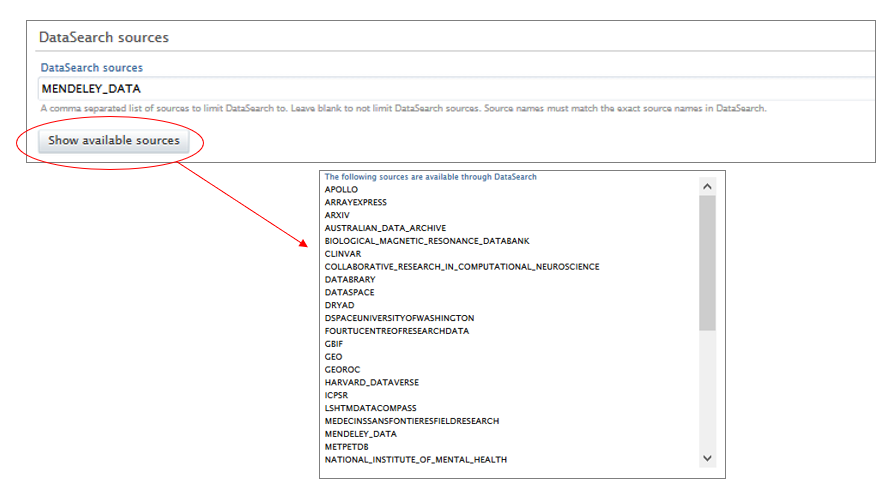
6. Select one or more data sources for import by listing their names in the DataSearch sources field. The names you enter must match the DataSearch source names exactly. Note: By clicking on "Show available sources", a list of available source names will appear. This is not the full list of sources as this is currently too comprehensive to show in Pure. For a full list of sources available go to: https://api.datasearch.elsevier.com/api/v2/sources An example from this document for Mendeley data looks like this:
In order to then limit to this repository you need to enter the id value into the source field. In this case that would be MENDELEY_DATA |
|
|
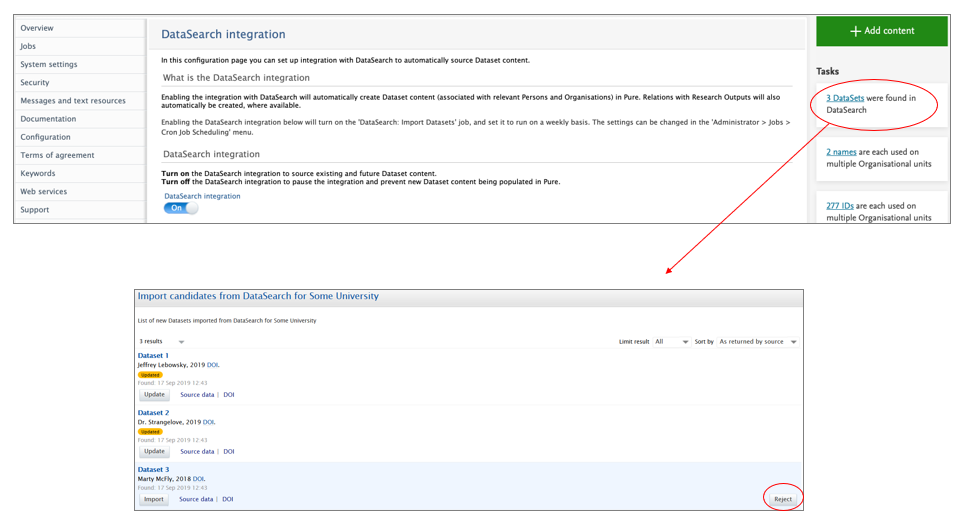
| Once the cron job is completed, users are presented with a preview of dataset import candidates. They can then update existing datasets or reject candidates. |
|
|
|
Datasets that are rejected will automatically be excluded when the job runs again. Rejected candidates will be shown at the bottom of the Administrator > Datasets > DataSearch configuration page. If you select a rejected candidate and click the button Clear rejected candidates, it will be included again at the next run. |
 |
5.2. Co-managing organizations in web service
Co-managing organization information is now available in the web service. It is available on awards, applications and projects. The code snippet below provides a view of the relevant XML tags in the responses from the web service. For more information on how to enable and add co-managing organizations, see the section in these release notes on Co-managing organizations.
For example, in /applications, co-managing organization information has the following format.
 <coManagingOrganisationalUnits>
 <coManagingOrganisationalUnit uuid="...">
 <link ref="content" href="..."/>
 <name formatted="false">
 <text locale="en_GB">Department of Clinical Medicine</text>
 </name>
 <type pureId="..." uri="/dk/atira/pure/organisation/organisationtypes/organisation/department">
 <term formatted="false">
 <text locale="en_GB">Department</text>
 </term>
 </type>
 </coManagingOrganisationalUnit>
 </coManagingOrganisationalUnits>
5.3. Moving masterlist configuration from file to database
This change is only relevant for customers using the masterlist import.
In this release the masterlist configuration has been moved from file to database. The masterlist configuration was previously stored in the local file system and accessible via a file handle. This has now been moved to the database, so when data is imported from the database, the masterlist configuration will be included automatically.
The old masterlist configuration will be migrated to the new database version. If you are a self-hosted client, then to check if any errors occurred during the migration of the masterlist configuration, please look into the console log. If one of the following errors occur, then please contact Pure support:
No valid MasterlistOrganisationSyncConfiguration found. Creating new configuration...
No valid MasterlistPersonSyncConfiguration found. Creating new configuration...
If you have not used masterlist before this is fine. If you have then we cannot validate your configuration and you should contact Pure support.
6. Unified Project Model and Award Management
6.1. Co-managing organizations
This release introduces a feature that allows for co-managing organizations on awards, applications and projects.
This feature gives multiple organizations within an institution the ability to better understand their contributions to an award, application or project. It allows for greater visibility, control and communication between editors across the participating organizations, and is no longer limited to only those in the managing organization. The co-managing editor role, an extension of the current Editor and Assisting Editor roles, has been introduced to take full advantage of these benefits.
The co-managing organizations feature is configurable and disabled by default.
Click here for more details...
Adding a co-managing organization to an award, application or project
This section describes:
- how to enable the use of co-managing organizations and how to add a co-managing organization.
- The benefits of adding a co-managing organization
- overview of related permissions of users associated with the organizations and the award, application or project.
Although these instructions and screenshots refer to Applications, the same process is used for adding a co-managing organization to an Award or Project.
| Enabling co-managing organizations | |
| Administrators can enable co-managing organizations by going to Unified Project Model > Enable co-managing organizations, and selecting Enabled. You must save before this change can take effect. |
|
| Adding a co-managing organization | |
|
Any awards, applications or projects created require a managing organization. For a given application with one or more applicants from different organizations (1 & 2), a co-managing organization can be added with the Add co-managing organization button (3). |
|
| In the Add co-managing organization dialog that is shown, all of the other applicant-specific organizations. Users can search further for other organizations if necessary. It is not recommended to add the managing organization as a co-managing organization. |
|
Permissions and roles across an award or application with co-managing organizations
To allow co-managing organizations to access awards, applications and projects, the roles of the Co-managing editor of Applications/Awards/Projects have been created. This role is an extension of the Editor and Assisting Editor roles (the Assisting Editor role was introduced in 5.15 - see the release notes for more information), and cannot be granted directly. The Co-managing Editor role is automatically assigned to Assisting Editors and Editors within an organization only when that organization is listed as a co-managing organization on an award, application or project.
Permission across roles typically associated with awards, applications and projects:
| Current Roles | New Roles | ||||
|---|---|---|---|---|---|
| Personal User (PI) | Editor | Assisting Editor | Co-managing Editor | ||
| Create | Yes | Yes | Yes | ||
| Permissions | Read | Yes | Yes | Yes | Yes |
| Update | Yes | Yes | Yes | Yes | |
| Delete | Yes | Yes | |||
| Workflow | Yes |
Standard roles and permissions |
|
|---|---|
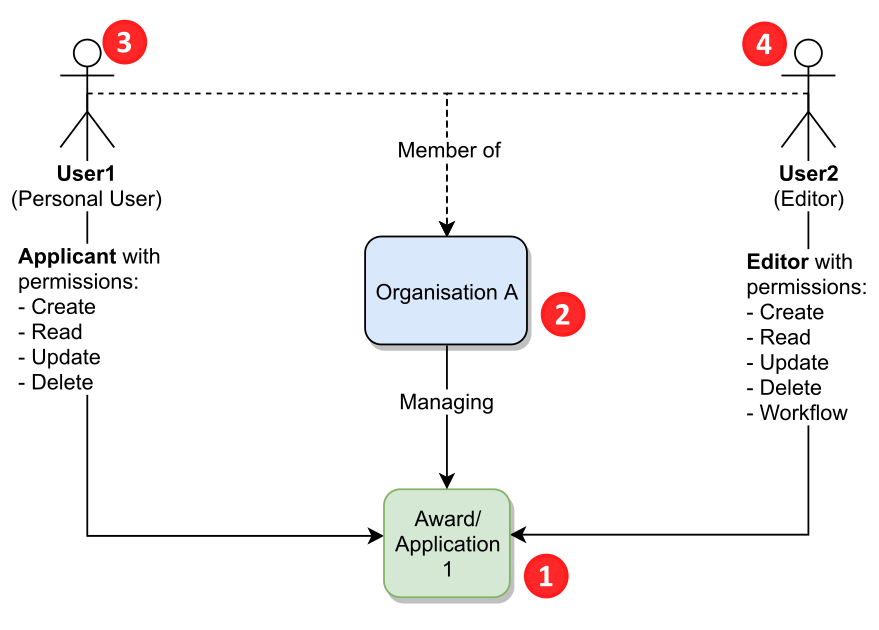
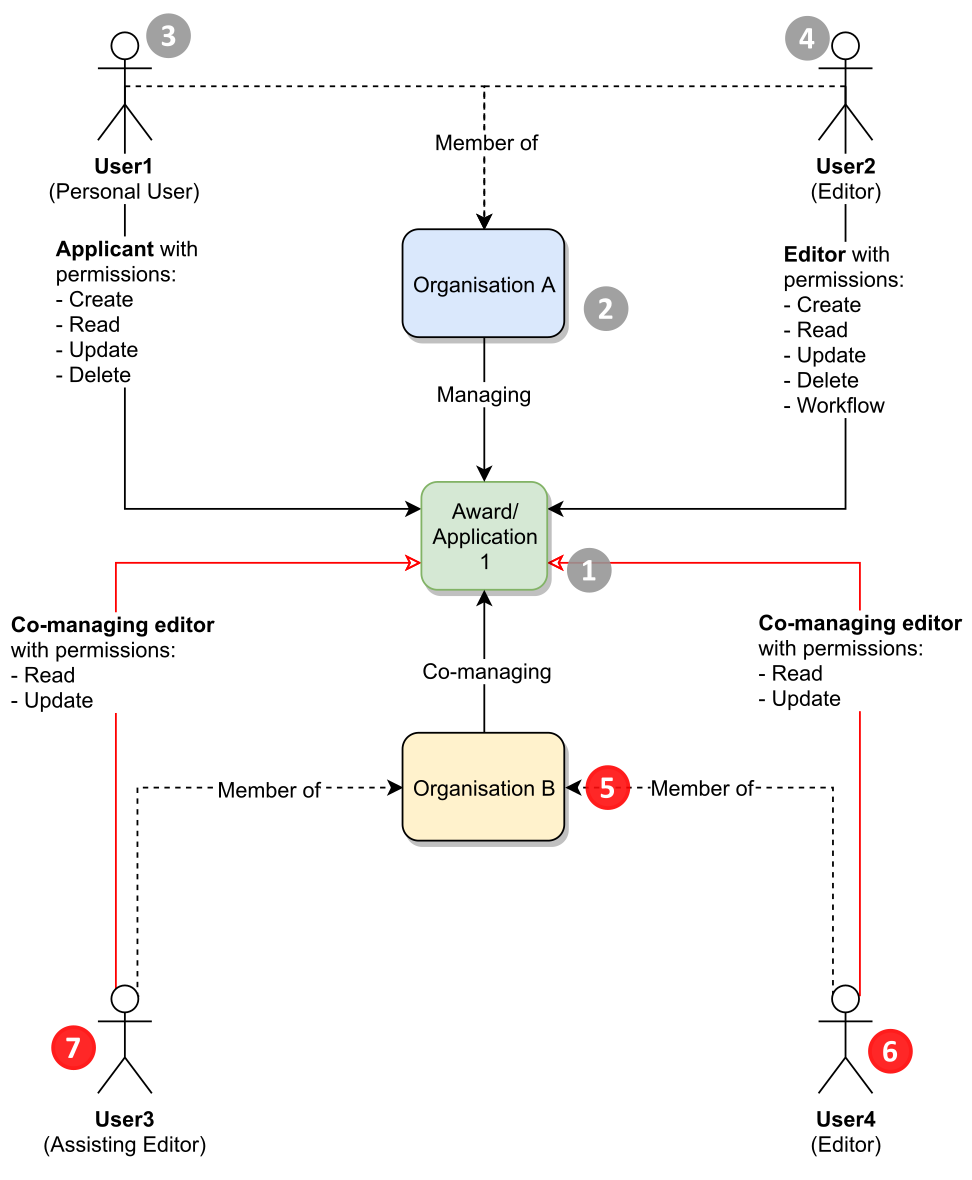
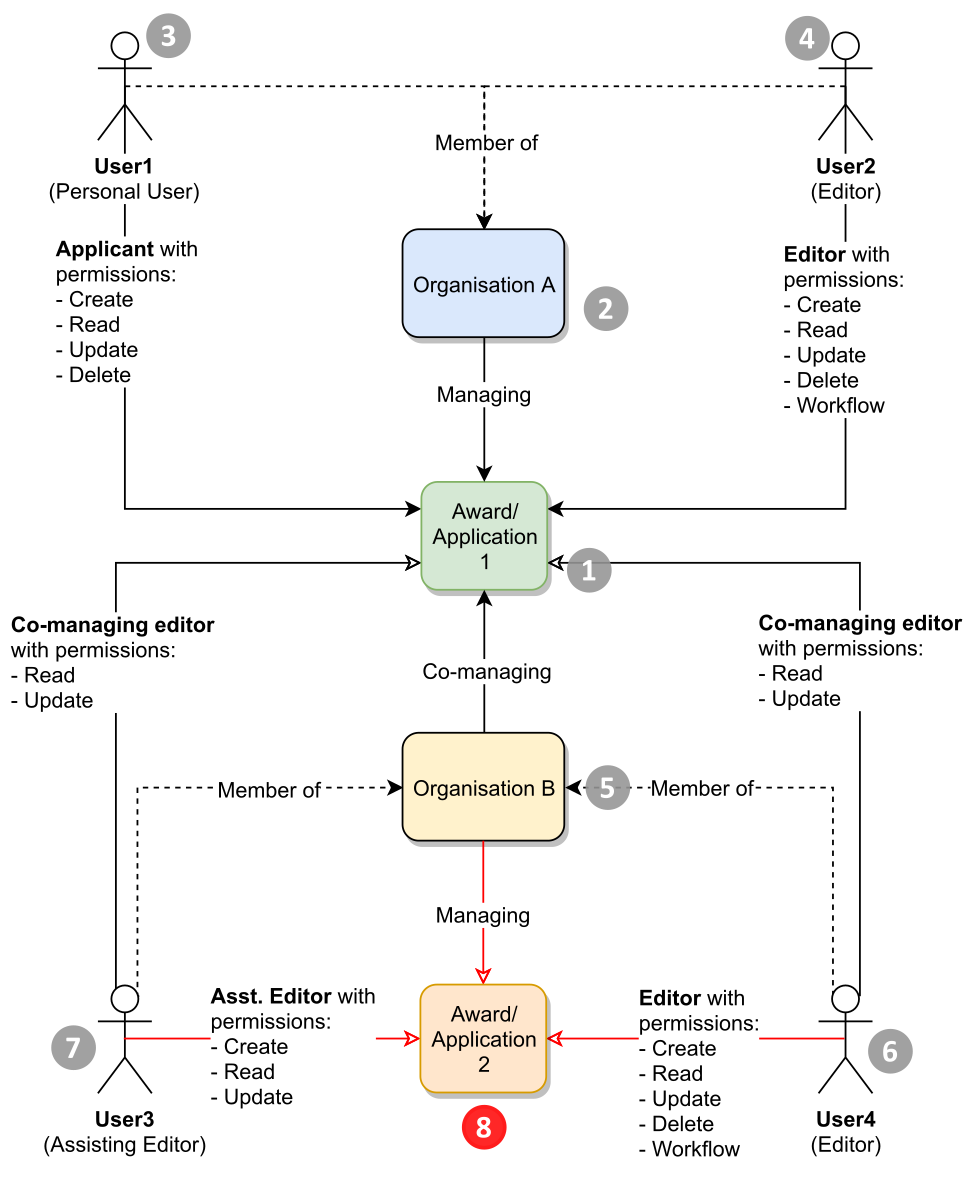
| Given an award, application or project (1), that has a managing organization, Organization A (2). User 1, the PI or CoI as personal user (3), is able to create, read, update and delete the award, application or project (depending on the the workflow step). User 2, an Editor in Organization A (4), has permission to create read, update, delete and advance the workflow. |
|
| With the addition of Organization B (5) as a co-managing organization, any users who are editors (6) or assisting editors (7) from Organization B will now have the ability to read and update the co-managed award, application or project (1). The ability to read and update is limited to only those awards, applications or projects on which Organization B is a co-managing organization. |
|
| In the case where Organization B also has awards, applications or projects (8), editors from Organization A (4) cannot read or update other awards or applications of Organization B, unless Organization A is a co-managing organization on those awards or applications. |
|
Filtering and reporting on co-managing organizations
In the table below are brief instructions on how to filter for content that have co-managing organizations.
Filter on co-managing organizations |
|
|---|---|
| Users can filter on awards, applications and projects that have a co-managing organization(s). |
|
| Users can also filter by name of co-managing organization. |
|
| Reporting and co-managing organizations | |
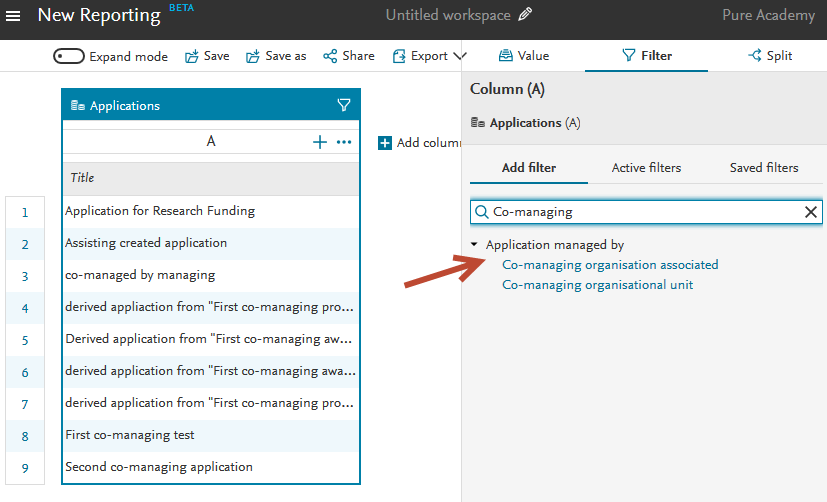
| Within the new reporting module, users can filter by co-managing organization on awards, applications and projects. Using applications as an example, the co-managing filters can be found in the Application managed by category in the Filter tool. |
|
Important notes about co-managing organisations
- The co-managing organization is included in web service for use in any other business intelligence software. For more information on co-managing organizations and the WS, see the section in these release notes: Co-managing organizations in web service.
- Co-managing organizations will not be included in portal renders as they are already represented by the participants on the award, application or project.
- Co-managing editors cannot edit regardless of workflow step - co-managing editors only have the same read/update rights as the Personal User.
- Co-managing organizations are syncable, and this functions much the same as organization sync for awards, applications and projects.
7. Pure Portal
7.1. Redesigned "Contact Expert" feature
The 'Contact Expert' functionality on Pure Portals has undergone a significant reworking based on feedback from our clients and users. These changes were made with three main goals:
- To streamline the process for interested parties to get in touch with members of your institution
- To make it easier and provide flexibility for your institution in managing incoming messages
- To protect email addresses from programs which spider through web pages looking for email addresses
Click here for more details...Title
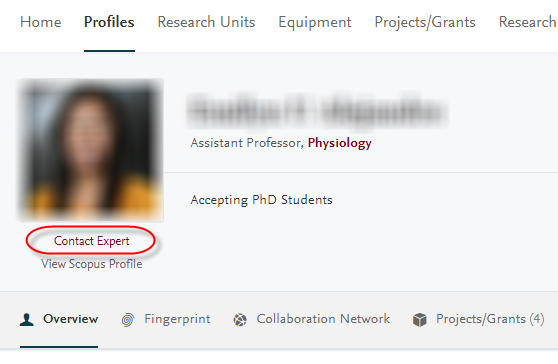
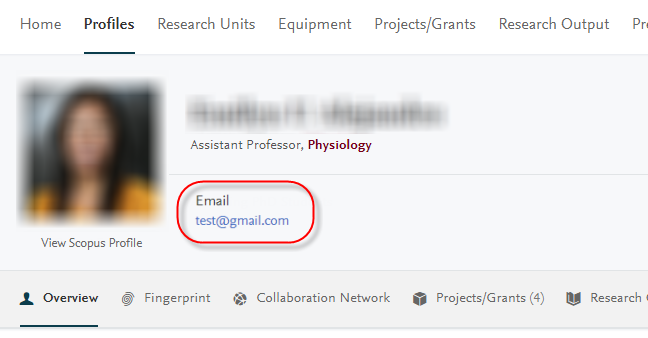
Previously, the 'Contact Expert' link could be configured to either:
- provide a "mailto:" link to a researcher's email address, to open in your mail client.
- link to an external page - for instance a web form on your institutional website.
The link displayed on the profile page, or it could be configured to show the email address directly. This is problematic as it leaves email addresses vulnerable to harvesters. Note, this functionality remains in 5.16, but we will consider removing it in later versions, also taking your feedback into account.
 |
 |
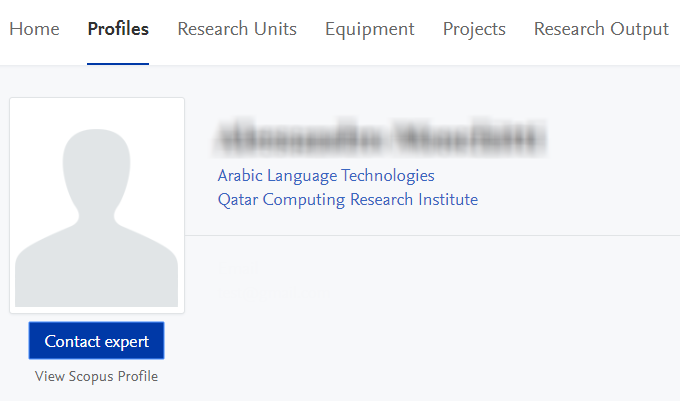
In 5.16, the first change is we have made the link more prominent on the page, turning it into a button. This is to better draw the eye of the visitor and so drive more engagement with your research assets:
Secondly, we have integrated a new web form into the design, which opens when the 'Contact Expert' button is clicked:
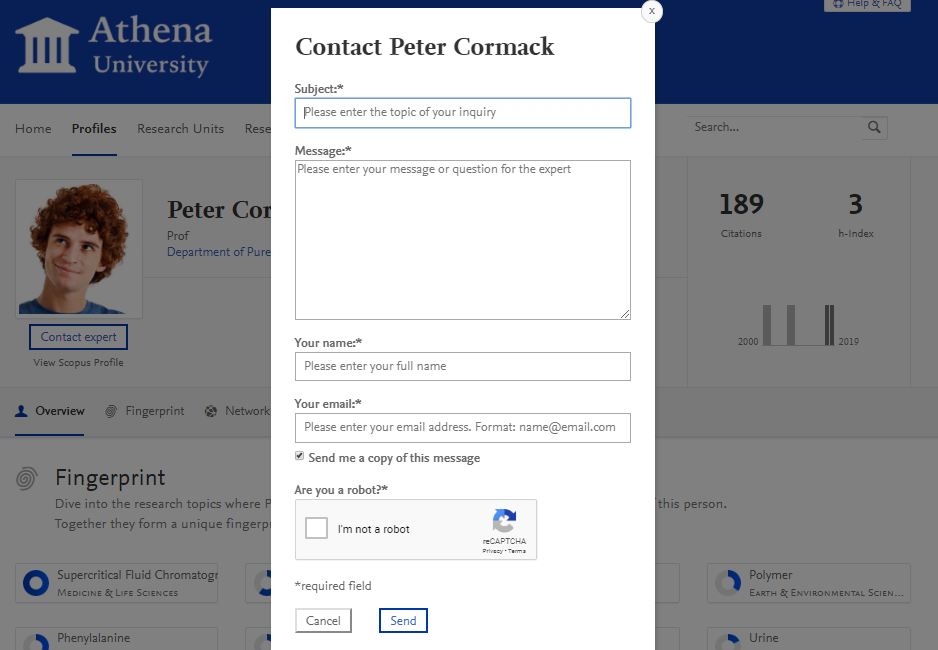
The web form provides separate fields each for the subject, message, sender name and sender email address. The form also includes a CAPTCHA as a protection against automated spam. Once the Portal visitor has filled in all required fields she clicks "Send" and the message is dispatched. She can also opt to receive a copy of the mail sent to her own email address.
The final, but most important change is in how the recipient of the mail is configured. This can be set via the backend configuration settings for 'Contact Expert'.
Backend configuration settings
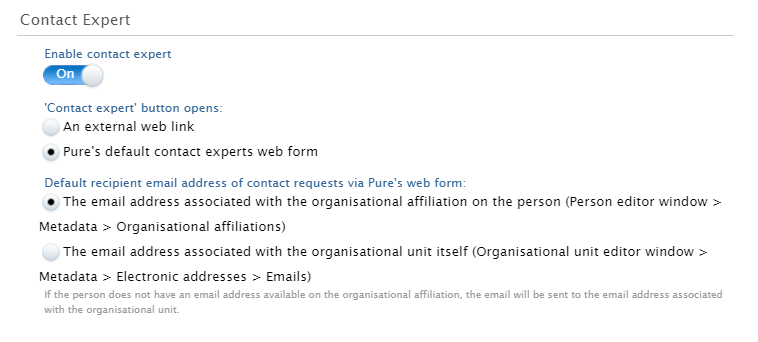
The first step is to enable the feature. This is done by going to Administrator > Pure Portal > Configuration > Content Types > 'Edit' Persons > Enable contact expert.

Once enabled, you have a few options:
- Choosing whether to use the deafault Pure Portal web form, or to use an external link to your own web form
- Choosing which email address is used (recipient rules)
Using the web form or an external link
If you choose that the 'Contact Expert' button should open 'An external web link', this will bypass the Pure web form and link the button directly to an external webpage (for instance, on your institution's central website). When you select this option, a further field will appear where you can add the URL as the page you would like to link.
Select "Pure's default 'Contact Experts' web form" to use the Pure web form, as described above.
Recipient rules
You can choose whether:
- Emails sent via the contact form to go directly to the researcher
- Emails are sent to the 'address associated with the organizational affiliation': Pure checks first if the primary affiliation has an associated email address and send the mail to this address. If one is not found, it will move down through subsequent affiliations. If an address is not found, it will attempt to default to the address of one of these organizations themselves, again starting with the primary affiliation and working down. If still no address is found, the mail will be sent to your institution's default 'contact email address, which is configured on the main 'Configurations' tab.
- Pure should bypass researcher email addresses and search only for department addresses, following the cascading rules above.
7.2. Hiding "Update fingerprint data" job
It has come to our attention that there was some confusion about the job "Update fingerprint data". Some clients may have been running it periodically, under the impression that it is necessary to do so in order to keep fingerprints current.
However, this is a "vendor" job, which only needs to be run when triggered by Elsevier in cases where (such as in this release) we update to use a newer version of the fingerprint job. Therefore, this job will be hidden to clients from now, so as to remove the possibility of confusion.
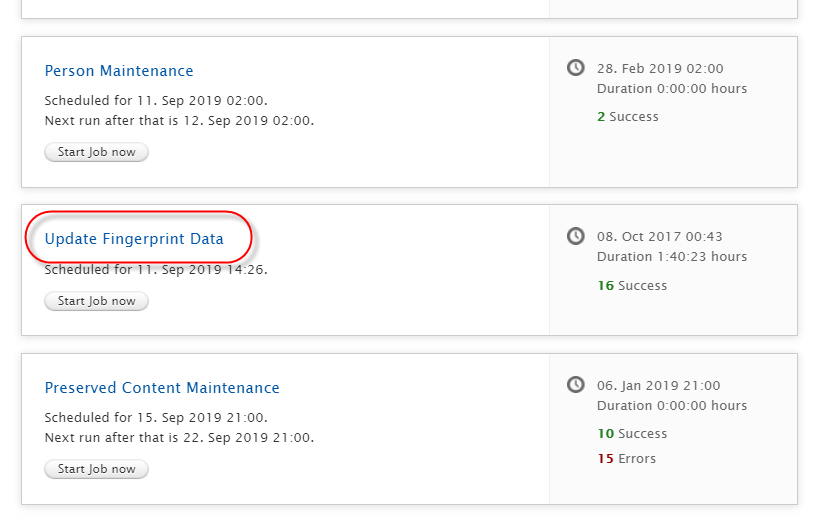
When "in version" updates to thesauri are available, these will be synchronized automatically via a separate job once a month, with timings staggered across servers. No action is required here by you the client.
7.3. Search Engine Optimization (SEO) improvements - "noindex" additions
We continuously monitor and review how discoverable Pure Portals are in search engines and make regular adjustments accordingly. In this release, we have focused on reviewing which pages should not be indexed by search engines, and ensuring appropriate page tagging is in place to communicate this to the web crawlers indexing the content.
It could be advantageous to not index certain pages for many reasons - either the page contains less relevant or interesting content for searchers (e.g. a cookie information page), or the page contains information that is duplicated in full or in part elsewhere.
Search engines determine the index ranking for your portal based on a multitude of factors, but one of these is an estimate of the average "searcher value" of the indexed pages. If pages adding little or no value are added to the index, then this average goes down, and therefore so can your page rankings.
In this release, among the additional pages marked for not indexing are the "tab alternate" versions of profile pages.
Click here for more details...
For an example of what has been tagged for removal from indexation, take a look at this page:
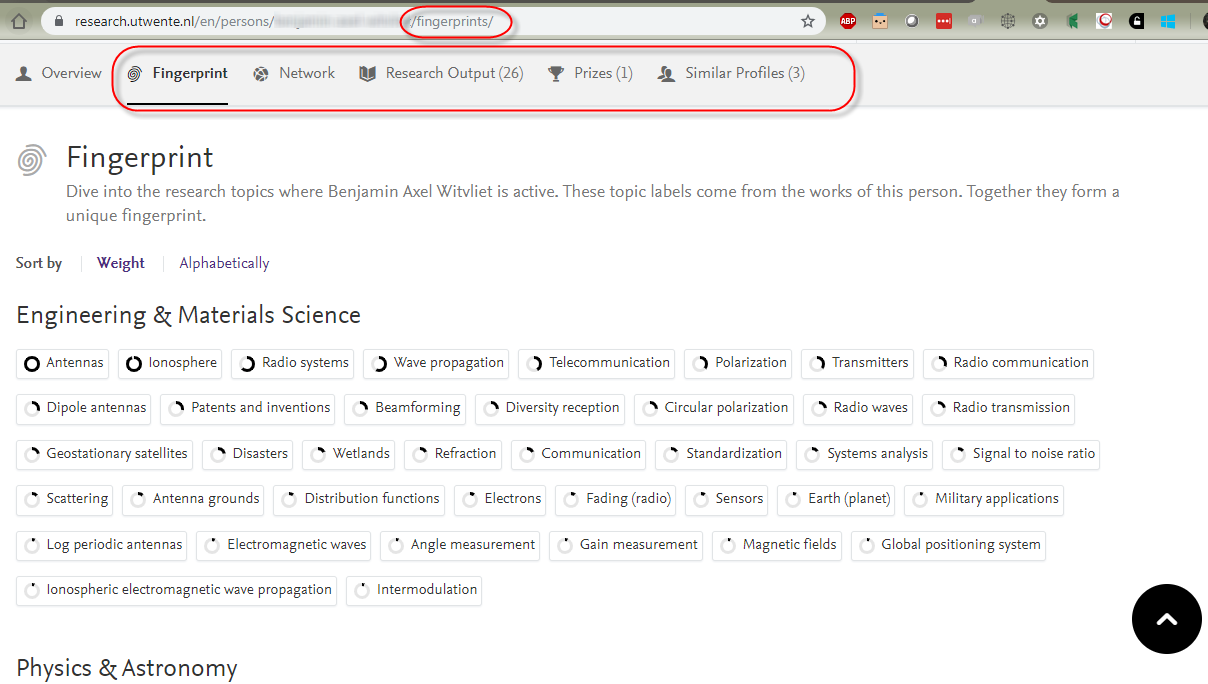
While the information on these pages may be relevant, most of the information on these tabs can already be found on the researcher's 'overview' profile page:
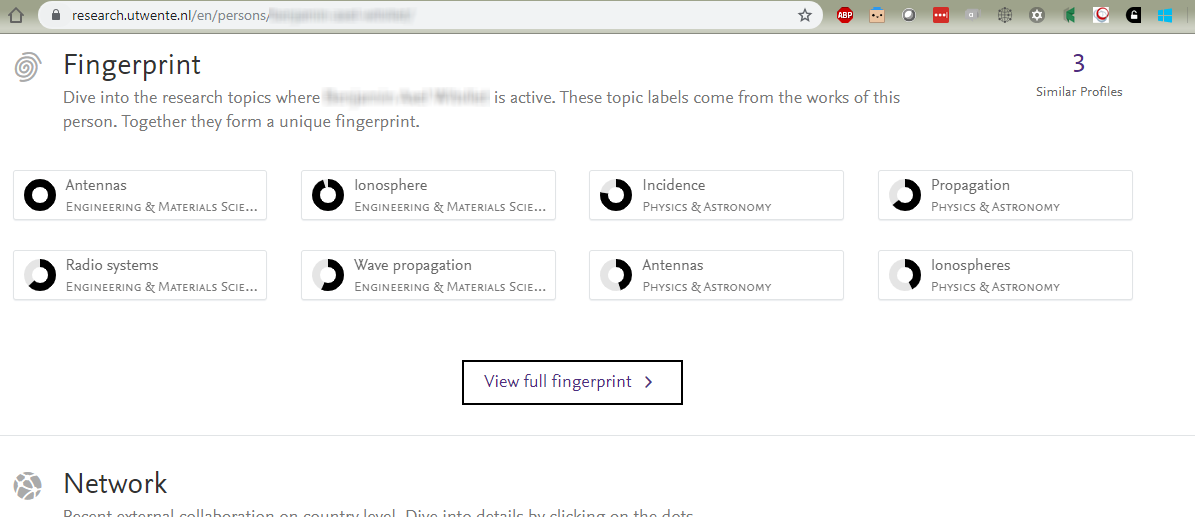
Unfortunately SEO is not always an exact science, but by leaving both versions in the index, we leave open two undesirable outcomes:
- Both pages are indexed by search engines, however the 'competition' between the two overlapping pages leads to a sub-optimal ranking for both.
- Only the variant 'tab' page is indexed, at the expense of the richer, more engaging main profile page, which is where we would prefer to send searchers.
Therefore, we have added 'noindex' tags to the tab subpages which will be read by the search engine crawlers on their next visit, telling them to remove the pages from their index. It is not possible to predict exactly when your site will next be reindexed, but this will occur most likely within one month of the 5.16 update going live on your portal.
7.4. "Click to Share" improvements - Portal shares contribute to PlumX metrics (COMING IN 5.16.2 UPDATE*)
Here, we have revisited the popular new "Click to Share" functionality from the previous release and delivered an improvement to allows PlumX to track social shares and usage. This engagement will then contribute towards the content's altmetric scores.
This is facilitated by adding the DOI to the data we share with the platform. If the DOI is removed, or unavailable, the data cannot be tracked. More improvements and refinements to Click to Share are set to follow in coming releases, including improvements to allow tracking via additional identifiers, e.g. ISBN, PMID, etc.)
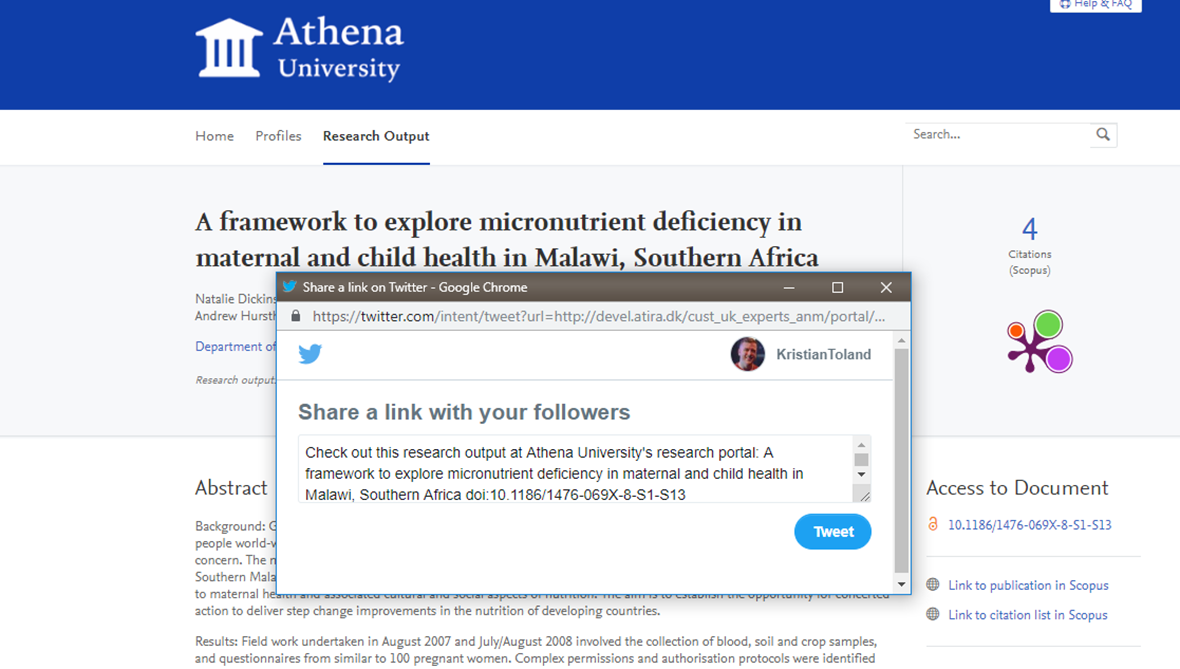 |
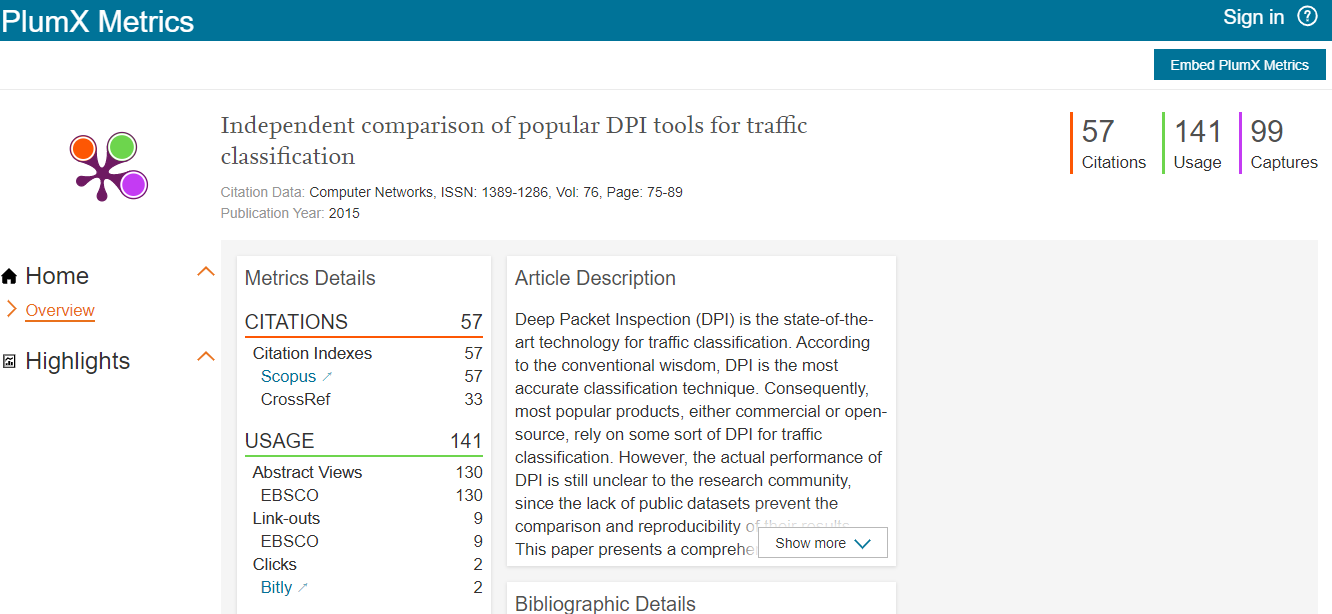 |
*Due to testing constraints, this improvement unfortunately did not make the release cut-off date for 5.16.0, but will follow in the 5.16.12 update. However, we think it is important to still give advance notice of this functionality and to make it visible in the major release notes. This note will be repeated in the 5.16.2 release notes also.
8. Country-specific features
8.1. UK: REF
In this release we have made a number of updates to the REF module:
8.1.1. Deletion of old text resources (copied from REF2014)
When the REF2021 module was created, it was originally a copy of the REF2014 module. With the copy, we also copied REF2014 related text resources. These text resources are no longer accurate and can be misguiding. While we are able to overwrite the original text resources with new and accurate texts, we cannot overwrite manual changes that have been done by clients.
In order to avoid confusion, manually added text resources related to the REF2021 module, will be deleted with the upgrade to 5.16.0. Unfortunately, that also means that text resource changes you have added to the REF2021 after the original copy of the module will be overwritten.
Click here for more details...
If you would like to get an overview of your current text resources, in order to bring them back to the system after upgrade to 5.16.0, we recommend extracting these prior to the upgrade. This can be done on the Administration tab > Messages and text resources > Text resources > Export ODS.
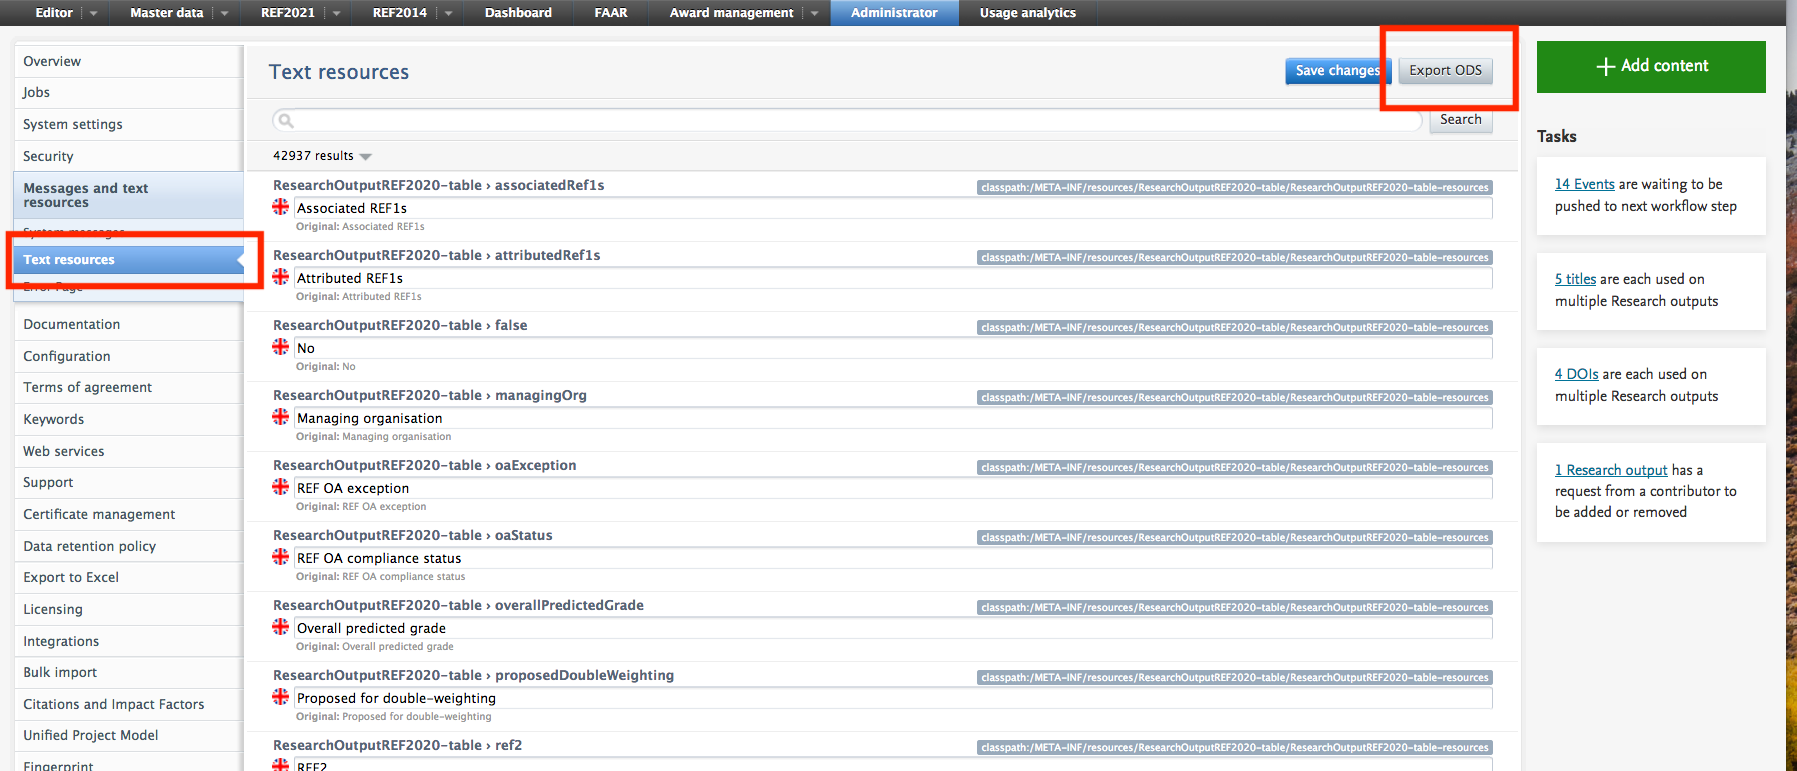
8.1.2. Attribution of REF2
With 5.16 there are now three ways of defining attributions of REF2s to staff members: Manual attribution, using the attribution algorithm, and using a spreadsheet upload.
8.1.2.1. Attribution algorithm
An algorithm has been introduced that, for each UoA, calculates the optimal way to attribute REF2s to staff members to achieve the maximum calculated GPA, whilst respecting any manual attributions that have been entered and 'locked'.
In version 5.16 the algorithm runs on the REF2021 > REF2 (2021) > Attribution algorithm tab. Progress is shown in a progress bar.
Once the algorithm is complete, you can see the results in the table and the calculated GPA.
You can read more about the attribution algorithm and how to access the job log in the REF2021 wiki.
8.1.2.2. Spreadsheet upload of attribution
A new job enables users to create attributions based on a CSV input file. This is found under Administrator > REF2021 > Attribution bulk creation.
The CSV input file must contain the IDs of REF2s that need attributions and the Staff IDs that need to be attributed. You can view an example file with the correct structure.
Once you upload the CSV file the attributions are performed immediately.
You can view the job log at Administrator > Jobs > Job log > Bulk creation of Attributions.
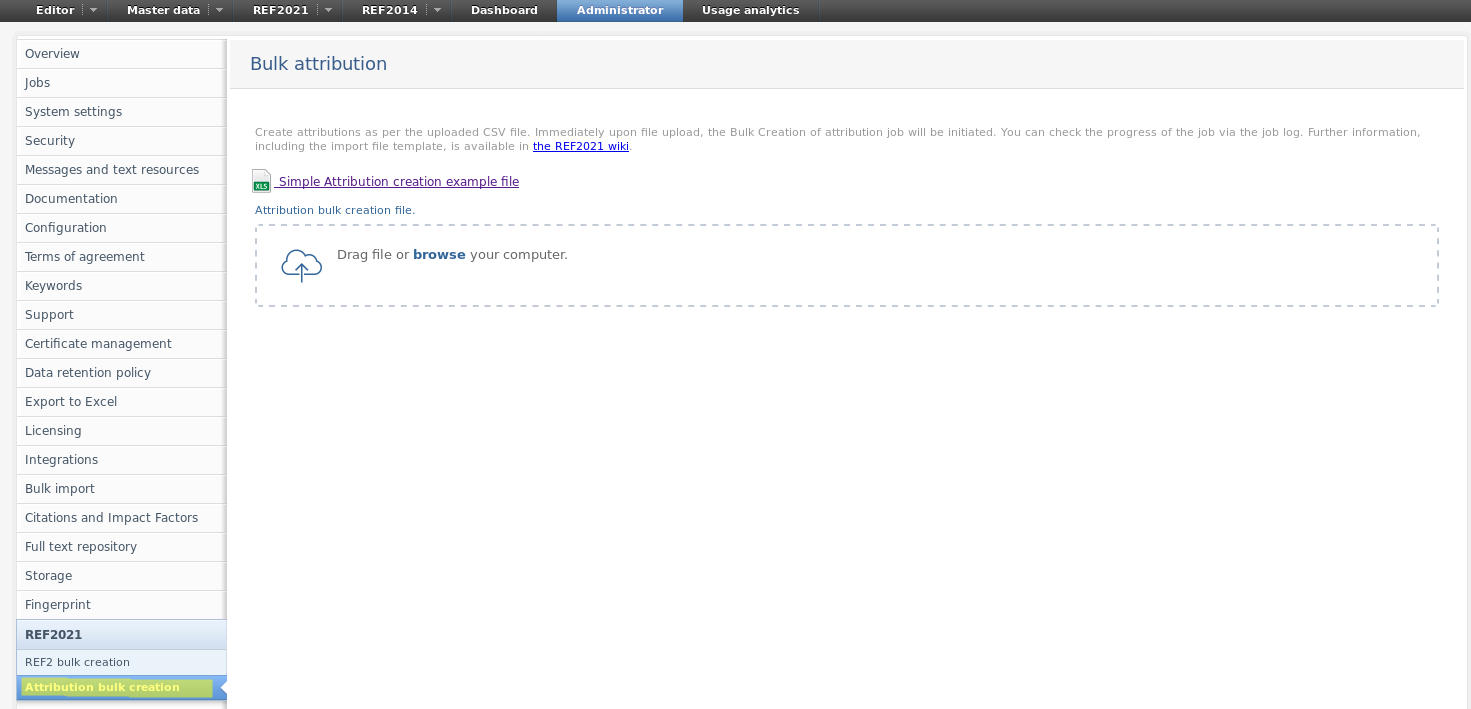
Further information about this job can be found here.
8.1.2.3. Bulk operation for attribution removal
Removal of attributions is now available as bulk edit option.
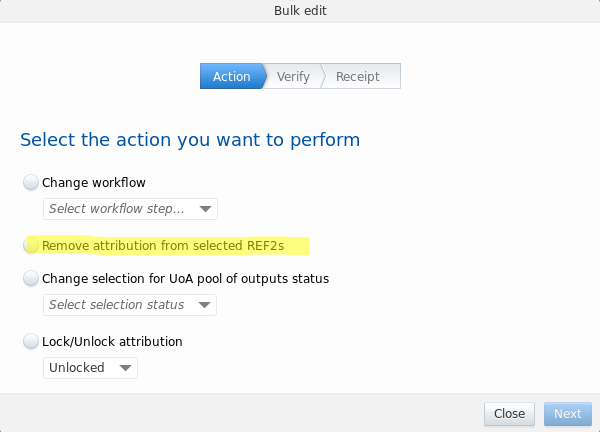
8.1.3. REF3 Updates for REF2021
Due to changes in the REF requirements from 2014 to 2021, Pure has been updated to reflect the changed needs in REF3.
Click here for more details...
The following changes have been made:
- The REF3a content type as been removed. You can no longer access the editor window for REF3a to add, edit or view content. On upgrade to 5.16.0 all existing REF3a content in the REF2021 module is deleted. Note: Any REF3a content that you have in the older REF2014 module is unaffected.
- REF3b has been renamed to REF3. This is due to the removal of the REF3a content type and follows the standard in the REF requirements.
- An Additional contextual information section was added to the REF3 editor window (see screenshot below).
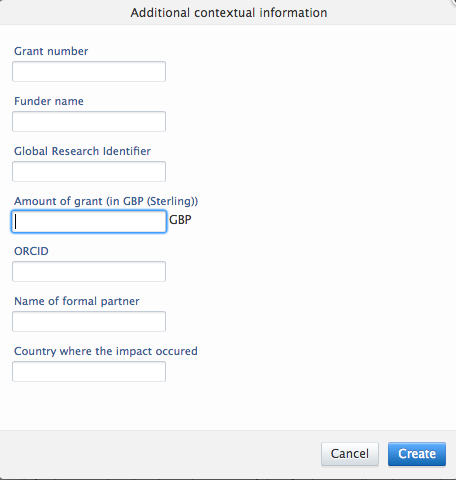
8.1.4. REF4 a/b/c
8.1.5. REF4a and REF4b synchronization jobs
With this release the REF4a/b/c has been updated to fit the requirements of the REF2021 submission.
During the development of REF4a and REF4b the option for setting 'REF4a sync type' and 'REF4b sync type' to 'PURE' has been removed in both the 'REF2021: REF4a Synchronisation Job' and 'REF2021: REF4b Synchronisation Job'.
As any existing jobs would be invalidated, a migration script has been made which removes any existing jobs of these types. The consequence is that you have to add and configure the jobs again. Further information on the jobs can be found in REF2021 wiki.
8.1.6. REF5
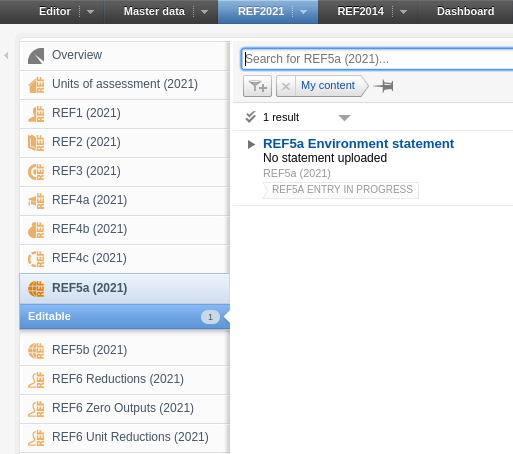
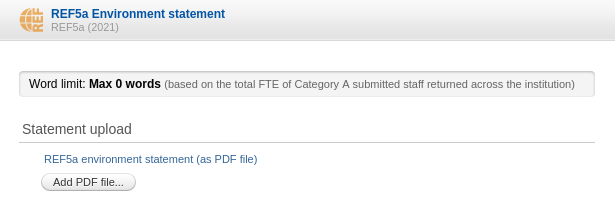
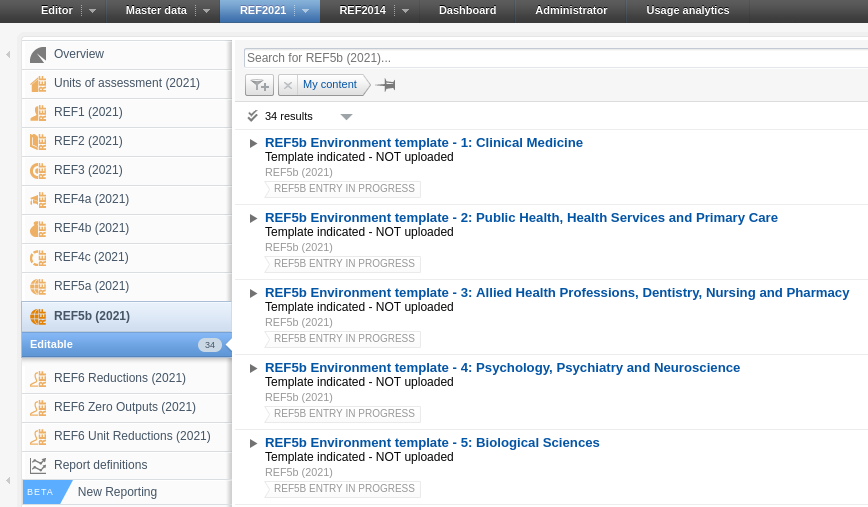
REF5a and REF5b has been added to the REF2021 module and is available for users with Admin or REF2020 Admin rights.
Click here for more details...
REF5a |
|
|---|---|
| REF5a can be used to provide a single statement on institutional level regarding the institution's strategy and resources to support research and enable impact as described in 'REF2021 Guidance on Submissions (page 80)'. |
|
|
In the REF5a editor the user can upload a file containing the institutional-level environment statement. The Word limit info bar shows the maximum allowed words in the uploaded statement. It depends on the total FTE of Category A submitted staff returned across the institution and is calculated as stated in Table F1 on page 93 in 'REF2021 Guidance on Submissions'. The max word value is for guidance only and no validation is done on the uploaded file regarding whether it conforms to this limit. Hence, it is up to the person uploading the file to ensure that it does not exceed the max words restriction. |
|
| REF5b | |
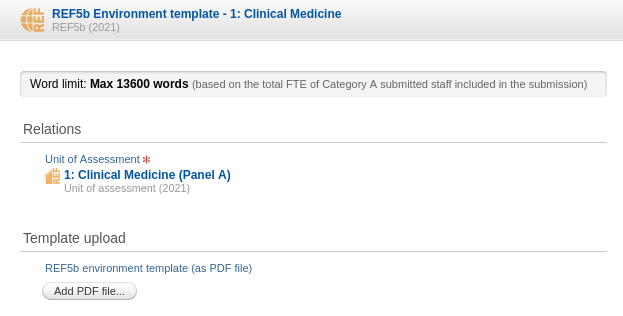
| REF5b can be used to provide a information regarding research and impact for each submitting Unit of Assessment as described in 'REF2021 Guidance on Submissions (page 81)'. |
|
|
In the REF5b editor the user can upload a file containing information about the environment for research and enabling impact for the given Unit of Assessment. The Word limit info bar shows the maximum allowed words in the uploaded information file. It depends on the total FTE of Category A submitted staff included in the submission and is calculated as stated in Table F2 on page 94 in 'REF2021 Guidance on Submissions'. The max word value is for guidance only and no validation is done on the uploaded file regarding whether it conforms to this limit. Hence, it is up to the person uploading the file to ensure that it does not exceed the max words restriction. |
|
8.1.7. Bug resolved that could potentially delete REF2
It has come to our attention that a bug has found its way into Pure. In a few scenarios when merging Research Output (merging two Research Outputs with different author lists) a related REF2 could by mistake be deleted.
The bug has been fixed with version 5.16.0 and we have for this release created a migration script that will recreate the deleted records. The script will run automatically with deploying version 5.16.0.
Click here for more details...
The bug has been fixed with version 5.16.0 and we have for this release created a migration script that will recreate the deleted records. The script will run automatically with deploying version 5.16.0.
The migration will create a filehandle with an Excel document that lists the REF2s that are recreated. You can locate the file on Master data -> Filehandles ->'REF2021 Recreate Deleted REF2s Migration'
We recommend that you take a look at the REF2s in the Excel sheet to ensure that they have the correct information, e.g.:
- Workflow for selection to REF2021
- Predicted grade of the REF2 (Peer comments are not affected by this)
- Attribution
Note: If the excel sheet is empty, no REF2s has been affected by the bug.
8.1.8. Performance optimizations on REF overview screens
For this release we have worked on optimizing the performance of the newly introduced REF2021 overview screens. The performance improvements is reflected on all roles, but especially editorials roles can expect a performance improvement on up to 30 percent. For instances running on Oracle databases we have removed some of the obstacles that has cause significant slowdowns. Oracle servers will now have comparable performance to other databases.
In upcoming releases there will be further focus on performance of the REF2021 overview screens.
8.1.9. Reporting on Proposing text
Submitter's reason for proposing has been added to the new report module.
Click here for more details...
In order to report on the data added by the researcher in "Submitters' reason for proposing" an output for REF2021, you will in the report module have to look into the relation between the Person and the Research Output.
A suggestion for a report could be
- Start your report by reporting on Persons
- Add a second column on Value on Person → Submitters' reason for proposing
- Add a their column on Content related to Persons -> "Research Output" - here select "Proposed"
- Click on Expand
It is possible to start you report on other content types, as long as the report also contains information on Person and the relation to Research Output.
8.2. AU: ERA
8.2.1. Additional reporting functionality on FoR
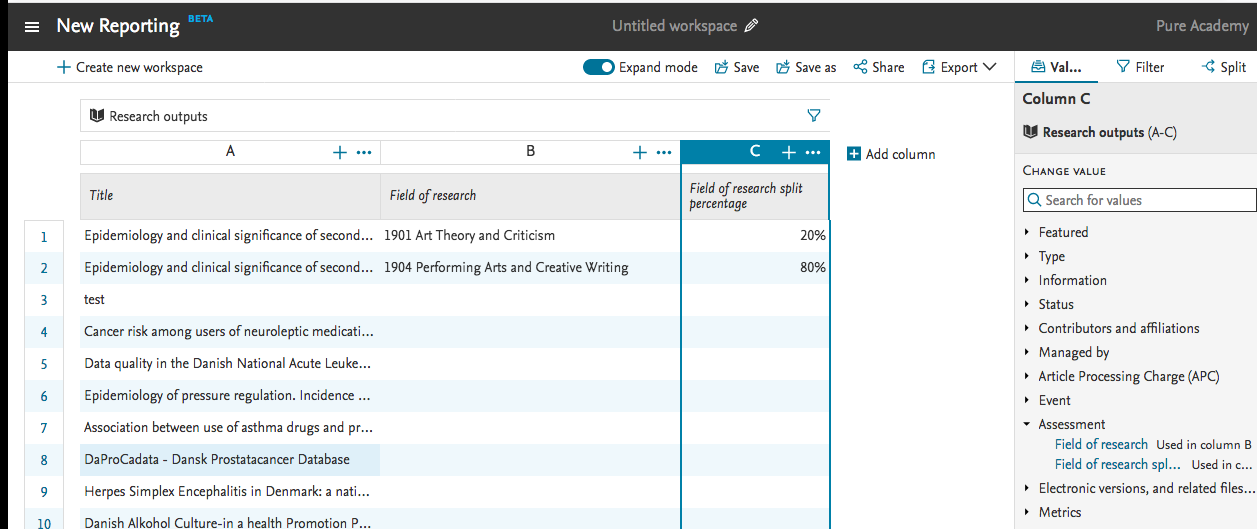
The ability to report on Field of Research (FoR) and Field of Research split percentage has been added to the report module. As a starting point this has been added to reporting on Research Output. In later releases the ability will be added to the remaining ERA related content types.
Click here for more details...
9. Additional features of this release
9.1. Translation and Localization Transparency
In order to be more transparent about changes to text and translation that may affect your edited text resources, with this release we are introducing a series of PDFs that describe all of the text changes made to Pure for backend UI locales (not the Pure Portals' text or locales). This shows which texts were added or changed between major releases.
If you have made extensive edits to text resources, you can refer to this file to see where keys have changed - in this situation your custom edits will be overwritten. Note that not all of the texts shown in the PDF may be able to be edited directly as text resources.
As always, we encourage you to download a spreadsheet of your custom edits before upgrading using the Administrator > Messages and Text Resources > Text resources > Export ODS button so you can refer back to the text edits that were shown in your previous version.
You can access the changes files here (PDF): Welsh, German, Dutch, Danish, Finnish, Swedish, Spanish, Russian, Chinese (Simplified), as well as in the right-hand column at the top of the release notes.
Published at June 23, 2025

