
How Can We Help?
5.24.05.24.0
Highlights of this release
![]() Reporting on complex relations
Reporting on complex relations
Pure holds a lot of valuable information about relations between content: for example, between Persons and Research outputs, or between Persons and Organizational units. In the context of reporting, these complex relations can pose a challenge: sometimes you may not be sure if the details you want to include are stored within the Person, or the Research output record. With this release, we are introducing a new way of reporting on this type of information.
 Custom-defined fields
Custom-defined Fields (CDFs) have been created to provide an extremely powerful way for your institution to extend your coverage of content without the need to wait for Pure updates. As such, CDFs are created with care and consideration, and your institution (and user) needs and possibilities will be balanced with the limitations and technical considerations associated with CDFs.
 h-index source and time range expansion
Pure now provides a choice of citation source and time span (5-, 10- or All years) for the h-index metric. Visibility of the h-index within the personal user overview is now configurable, and personal users have access to multiple sources and time ranges, if enabled by Pure administrators.
 Fingerprinting updated to use OmniScience
Elsevier Fingerprint Engine as used by Pure is changing: the new unified OmniScience thesaurus will now be used to generate the fingerprints. This means a significant change to the fingerprint concepts themselves, but no change to the way fingerprints are aggregated and displayed.
To benefit from the new Fingerprint Engine, update your Pure to the 5.24 version. The old Fingerprint Engine will be discontinued towards the end of 2022.
Advance Notice
We will be adding the following new sub-processors to the list of sub-processors that may assist Elsevier in providing Pure services:
Entity name |
Location |
Service |
|---|---|---|
| Elsevier Japan KK | Japan | Support and related services |
| Elsevier S.r.l. | Italy | *Integration Delivery Services |
| RELX India Private Limited | India | *Integration Delivery Services |
| Reed International Books Australia Pty Ltd. | Australia | **Implementation consulting services |
| Reed Elsevier Information Technology (Beijing) Co., Ltd | China | **Implementation consulting services for customers in China and Japan |
* Integration Delivery Services refers to a newly available service from Elsevier where professional programmers can build and maintain data transfers between other databases and Pure (in either direction). These are custom/bespoke client-specific data integrations. This new service from Elsevier is independent and separate from the "built into the Pure product" data source integrations.
** Implementation consulting services refers to paid for services subject to agreement with client.
Advance Notice
Please be advised that in release 5.26 we will be discontinuing our Long Term Preservation connector to Fedora. We suggest that you get in touch with pure-support@elsevier.com in case this can cause any issues for your Institution.
The 5.24.0 (4.43.0) release notes are now available. Please check release dates below for details of the Pure release schedule.
Always read through the details of the release - including the Upgrade Notes - before installing or upgrading to a new version of Pure.
Release date: 20 June 2022
Hosted customers:
- Staging environments (including hosted Pure Portal) will be updated 22 June 2022 (APAC + Europe) and 23 June 2022 (North/South America).
5.24.0 delay
Due to the delay in 5.24.0, hosted customer will receive 5.24.1 in production in the below dates
- 5.24.1 in Production environments (including hosted Pure Portal) will be updated 6 July 2022 (APAC + Europe) and 7 July 2022 (North/South America).
Download the 5.24.0 Release Notes
last updated 16 June 2022
1. Pure Core: Administration
1.1. Custom-defined fields
Custom-defined Fields (CDFs) are an extremely powerful way for your institution to extend your coverage of content without the need to wait for Pure updates. As such, CDFs are created with care and consideration, and your institution (and user) needs and possibilities will be balanced with the limitations and technical considerations associated with CDFs.
Click here to expand...
CDFs are limited to specific content types and formats of fields, listed below.
Where can CDFs be added? |
What type of fields can be added? |
|---|---|
CDFs can be added to the following content types and their associated templates:
CDFs will not be supported on the following content types: old project model, PhD Theses, Student Projects, and any Master data content types other than Person and Organization. |
CDF fields can take the following formats:
CDFs will not be supported for the following formats: lists, datetime and any other data structure not explicitly mentioned above.
|
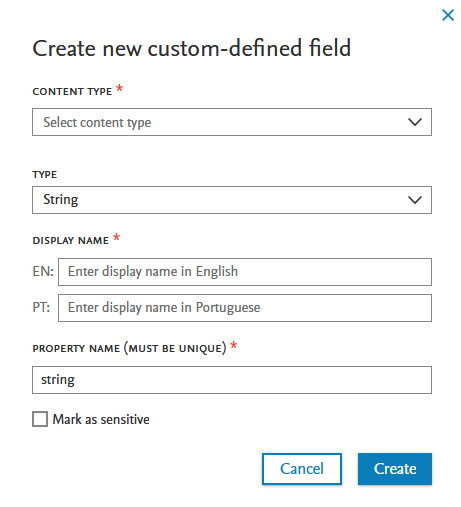
A custom-defined field can only be created on the primary metadata level. CDFs cannot be created on any sub-editors of the content type. Additionally, CDFs cannot be set as mandatory fields.
Sensitive fields
CDFs can be marked as sensitive. Only users who can modify the content can view or edit sensitive CDFs in the content type editor. In reporting and API, only administrators can use sensitive CDFs when creating a report, or when querying/adding content to Pure via the API.
Changing templates
Occasionally, users are required to change templates. Only CDFs configured to exist on both the source and the target template will be migrated. If the same CDF is not present on the target template, the values in the CDF will be copied to the history and comments section of the updated record. If the source CDF is set as sensitive, and target CDF is not set as sensitive, no values will be migrated across, and will not be shown in the history and comments.
Who can add to, modify or view a CDF?
After creation, CDF fields are available almost immediately in the relevant content type editor, reporting and the API.
Adding content to a CDF
Viewing and modifying a CDF
Modify CDFs
Only users who can modify content, can modify a CDF.
For example, for a CDF on a research output, contributors can modify or view the fields in the editor once a record has been saved, and if revalidation is enabled.
View CDFs
CDFs are currently only shown in the metadata tab of a record. CDFs are not displayed in the long render - only with revalidation enabled will a contributor be allowed to view and modify a CDF.
Reporting and accessing CDFs
For non-sensitive CDFs, users with reporting permissions are able to use CDFs in reporting, and only for the content types for which they have reporting permissions. For sensitive CDFs, the reporting user must also have editing permissions before they can report on the CDFs.
How do I request a CDF for my Pure?
Create an improvement suggestion in PURESUPPORT Jira with the following elements:
- Simple title
- Issue security level set to My institution
- CDF label on issue
- Description, including:
- detailed description of your requested CDF
- screenshot of potential location in content type editor
- list of applicable content types (and templates, where relevant)
Acceptance or rejection of request
A CDF will be created in your Pure after careful consideration from our panel of subject matter experts based on the information provided in your request. The panel will consider your institution’s needs, and either:
Suggest an alternative field
or
Accept the request for a CDF (and decide if the suggested CDF should become part of the core data model)
or
Reject the request for a CDF
For each request, detailed reasons for acceptance or rejection will be provided. For accepted requests, a meeting will be scheduled to confirm choices and field names per language. The CDF will be created in a demo (or staging) server and once confirmed by you, will be implemented in your Pure.
Who will create the CDF in my Pure?
CDFs can only be created by Pure staff. This is necessary considering the complications that can arise from an incorrect configuration of a CDF.
Tracking of CDFs
In order to better understand the needs that CDFs address, Pure will track which customers have which CDFs. Any positive trends towards a specific CDF on a specific content type will indicate to us that the field should be included in the core model on that content type.
1.2. h-index source and time range expansion
Pure now provides a choice of citation source and time span (5-, 10- or All years) for the h-index metric. Visibility of the h-index within the personal user overview is now configurable, and personal users have access to multiple sources and time ranges (if enabled by Pure Administrators). The h-index is also available in reporting (see h-index in reporting) and the Pure Portal (see h5- and h10- index in Pure Portal).
Click here for more details…
Responsible use of metrics
The h-index is considered a metric of interest and used at institutions in some regions. As a global software provider for these institutions, Pure supports what regional communities request. Please make your own local determinations on what metrics are appropriate for your institution to use in various situations. For more information on the responsible use of metrics, download:
- Research Metrics Guidebook (PDF format)
- Usage Guidebook (PDF format)
- Metrics in Pure (Client Space)
Instructions |
Screenshot |
|---|---|
|
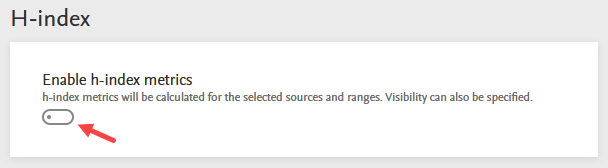
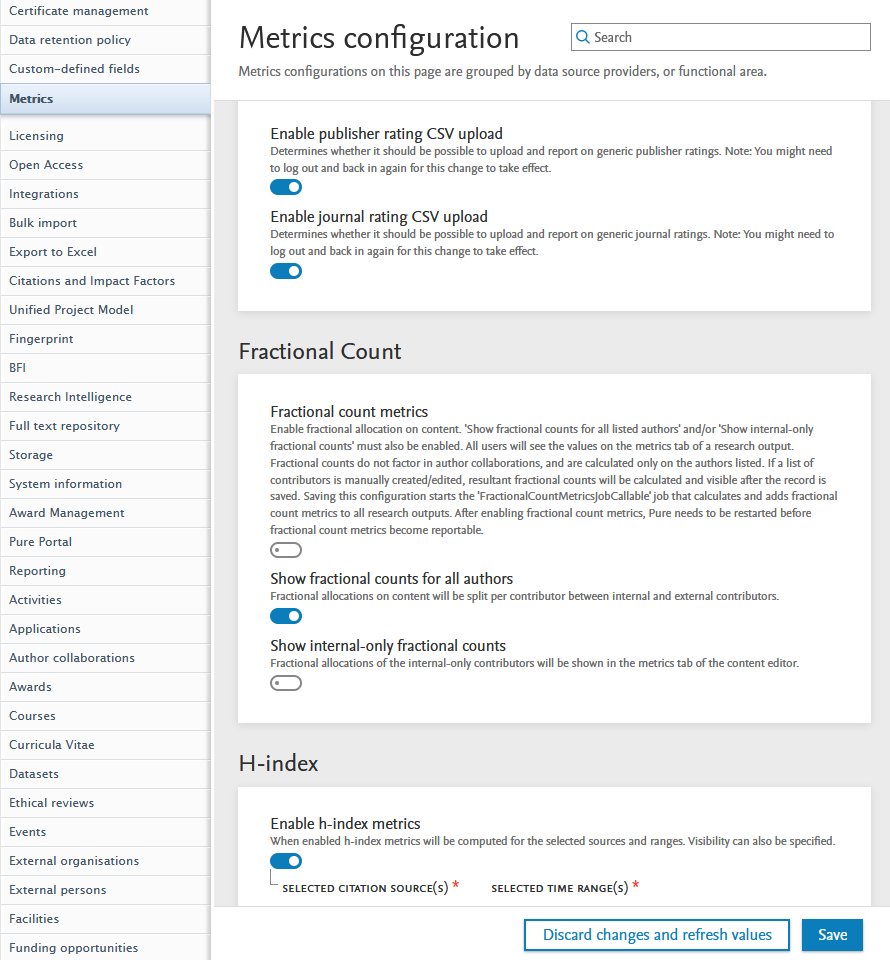
Enabling h-index Pure Administrators can enable and configure h-index on the new Metrics configuration page: Administrator > Metrics. |
|
|
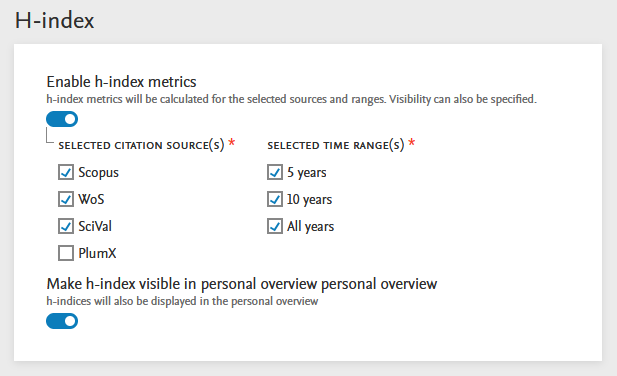
Source and time range configuration options Pure Administrators can select which citation sources should be used for the h-index, which time ranges to include (5-, 10- or All years), and whether to show h-index values on personal overview pages. |
|
|
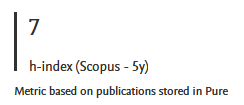
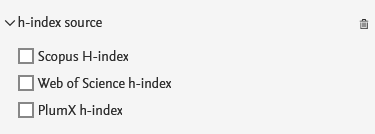
h-index in personal overview By default, the first h-index in the list of options is selected when users first log in to Pure 5.24.0. After that, the personal overview will remember the user's last choice. If h-index is set to not show in personal overview, only PlumX metrics (if enabled) will show. |
h-index enabled, and set to show in personal overview, with PlumX enabled:
h-index enabled and set to show in personal overview, with PlumX disabled:
h-index disabled, or set to not show in personal overview, with PlumX enabled:
|


Availability of h-index after upgrade to 5.24.0
On upgrade to 5.24.0, the Person h-index Calculation job is scheduled to run daily so as to calculate the h-index as soon as the new version of Pure is live for your users. The schedule can be modified to your needs via the job configuration.
Any updates to the h-index configuration after upgrade to 5.24.0 will not immediately show new values. New values from new source(s) and time range(s) will only show after the job has completed its next run.
1.3. Metrics configuration page
The metrics configuration page, previously found at Administrator > System settings > Metrics, can now be found in a dedicated Metrics menu item (Administrator > Metrics). Metric options are grouped by metric providers and/or functional areas for improved ease of use.
Available documentation
Pure Client Space > Technical User Guides > Metrics-related configurations
2. Pure Core: Pure Web Service and Pure API
Pure Web Service is the read-only service available to all clients. See Administrator > Web services for more details.
Pure API is the read-and-write service currently under development and available to clients through the Early Access Program. See Administrator > Pure API for more details.
2.1. Pure Web Service: 5.24 version becomes the persistent version of the Web Service
We are happy to announce that the newly released 5.24 version of the Web Service will become persistent.
This means that integrations with this version of the Web Service will not have to be updated as new versions of Pure are released. This decision has been made as we consider the current Web Service stable: use cases that it was designed to address are now supported.
However, the Pure API will continue to evolve and the use cases not supported by the Web Service will be evaluated against the new API.
Until the release of Pure 5.27 (June 2023), we will follow the existing deprecation strategy: we will support the persistent version (this version) and three previous versions. This means that Pure 5.25 will support the persistent version of the Web Service along with Pure 5.23 and 5.22 versions. Pure 5.26 will support the persistent version along with the Pure 5.23 version. Starting with Pure 5.27, only the persistent version of the Web Service will be supported.
2.2. Pure API: custom-defined fields available through the API
The new functionality of Custom-defined fields is also made available in the new API. The API supports the following use cases:
- Bulk read/write of custom-defined fields
- Control of which custom-defined fields are exposed in the API
- Sensitive fields are only exposed if available to the user associated to an API key
These new fields will be available in the API on the content types where the data model supports them, and only if they are configured in a given Pure instance.
Available documentation
See our API documentation for more details on how to work with custom-defined fields.
Click here for more details…
Introduction |
Screenshot |
|---|---|
|
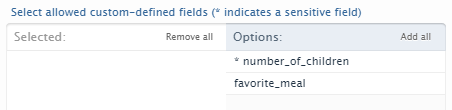
Like in the case of other fields, you can configure which custom-defined fields are available using access definitions assigned to the API keys. However, the custom-defined fields are separate from the fields available on the standard Pure data model. This to clearly indicate that they are not fields that all Pure customers have access to. Sensitive fields are additionally marked with an asterisk. When a field is sensitive, it will only be exposed if the user associated to the API key has permissions to access sensitive fields. |
|
2.3. Pure API: upcoming breaking changes in 5.25.0
We have not yet addressed the inconsistencies found during API review. We apologize for the inconvenience and plan to address these in the near future.
Our plan is to make the following changes:
- The contributors field on research output will support three types instead of just one. This is to make it clear for the API user what fields are available/required, based on what type of contributor they are adding, i.e. internal person, external person, or an author collaboration.
- Organizations are sometimes spelled with an 's', both in the field and in the documentation. We will update this to be consistently spelled with a 'z'. This is to be compliant with Elsevier API standards.
We will introduce these changes in 5.25.0, and will provide a detailed overview of the changes in the relevant release notes.
3. Integrations
3.1. Funding Database: import of sub-Projects and Award renewals
The integration now supports the import of additional content such as sub-Projects, and Award and Project renewals.
This information will now be visible on the Project (when available), showing related Awards (and Award renewals), sub-Projects, as well as the hierarchy of related Projects. Contributors to a given sub-Project are listed both on the relevant Project and at the top level (the parent Project).
This information will also be visible on the Portal.
Background
The integration was released in Pure 5.22 and previously supported the import of Awards and Projects from a number of funders (see these 5.22.0 release notes for more details). Since its initial release, we have been working hard in collaboration with Funding Database to increase the scope of data that is harvested from funders. As we release the above improvements, we continue to work with the Funding Database to increase the number of relations captured between funding content and other content types such as Research outputs or Datasets.
3.2. Bulk operations: bulk-unlock now possible
You can open up content that was previously synchronized and locked in Pure for editing much faster using the bulk-unlock option.
Click here for more details…
Instructions |
Screenshot |
|---|---|
|
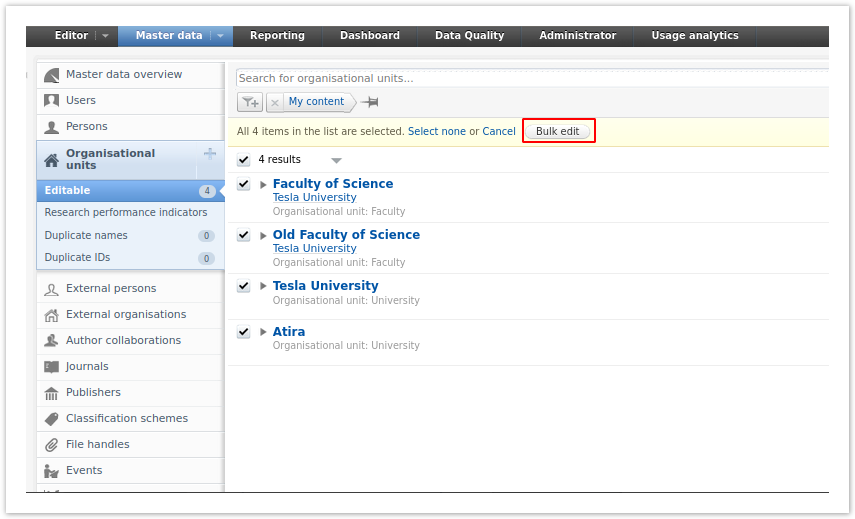
To select the content you want to unlock:
In the screenshot, Organizational units are shown as an example. |
|
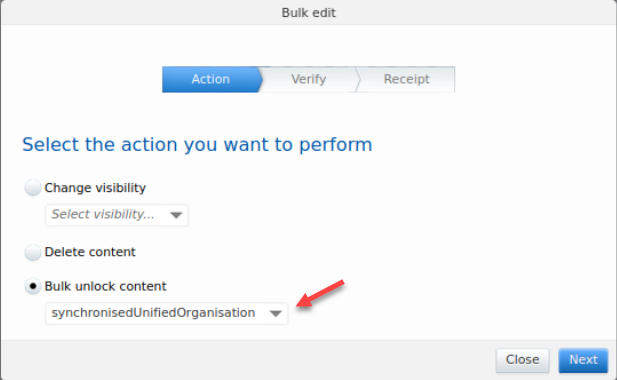
| When in the bulk edit wizard, you can limit the content you want to unlock to a specific source (listed in a dropdown). You can also choose to not limit to a specific source. |
|
3.3. Digital Commons: Automatic Import (available on request)
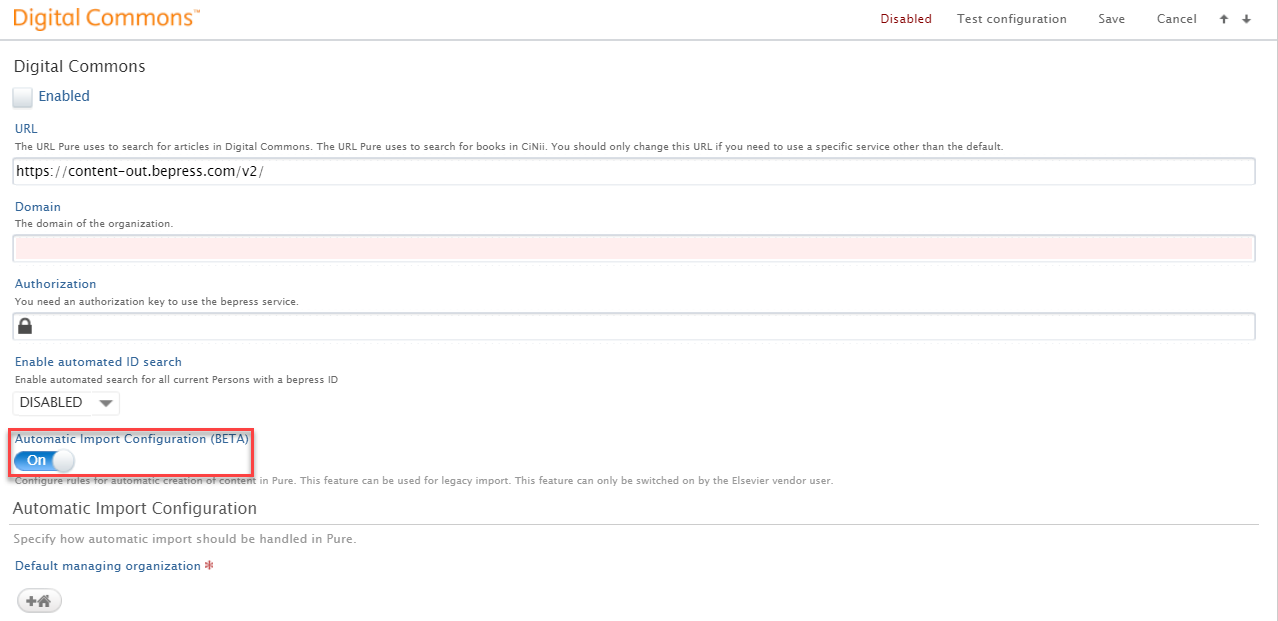
It is now possible to run an automated search in Digital Commons based on the Institution's name and configure the integration to either list records as import candidates, or automatically save the content in Pure.
A number of configuration options let you determine the rules used for matching and enrichment of content in Pure.
This feature is currently only available on request. Please contact pure-support@elsevier.com if you wish to enable this feature.
Click here for more details...
Background
Digital Commons was first added to Pure in 5.22 as an import source, allowing researchers to manually search for and bring content into Pure. With this release, we have expanded this integration and added functionality to automatically import research output on an institutional level.
The current configuration options for the Automatic Import of research output from Digital Commons are described below. The work to improve the automatic import configuration is ongoing and we are adding more configuration options and matching rules. Our goal is to optimize the automatic import configuration by making it possible to customize these rules based on the import source that is selected.
Feature details
Instruction |
Screenshot |
|---|---|
|
To enable the Automatic Import of research output from Digital Commons:
|
|
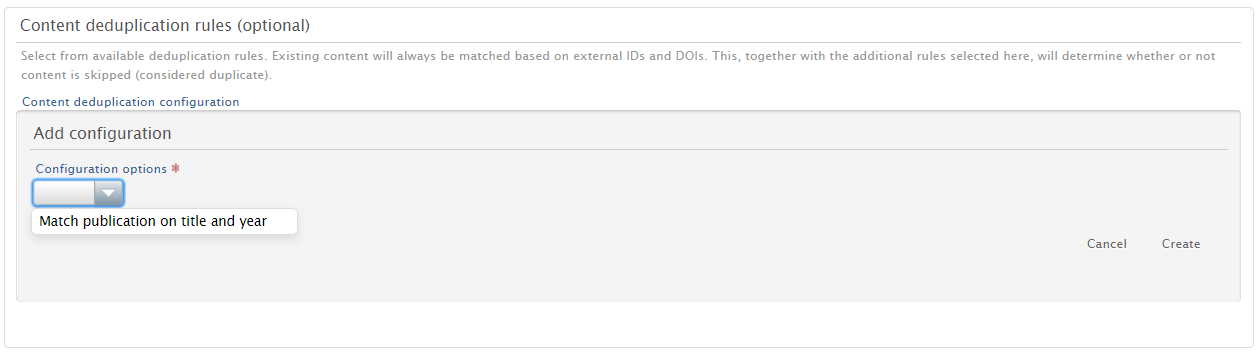
| It is possible to set rules for the deduplication of content. A description is shown when a rule is selected from the menu. |
|
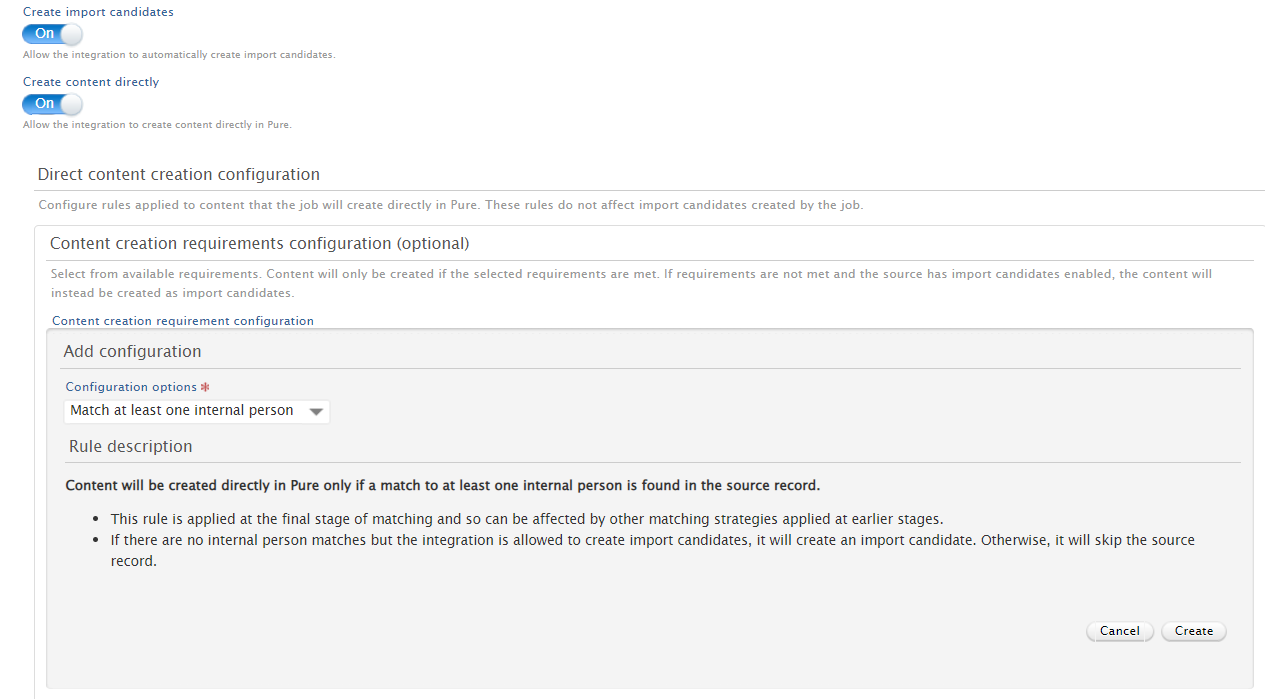
| You can decide if you want to list records as import candidates or, based on configurable rules for the creation of content, automatically save the records to Pure. |
|
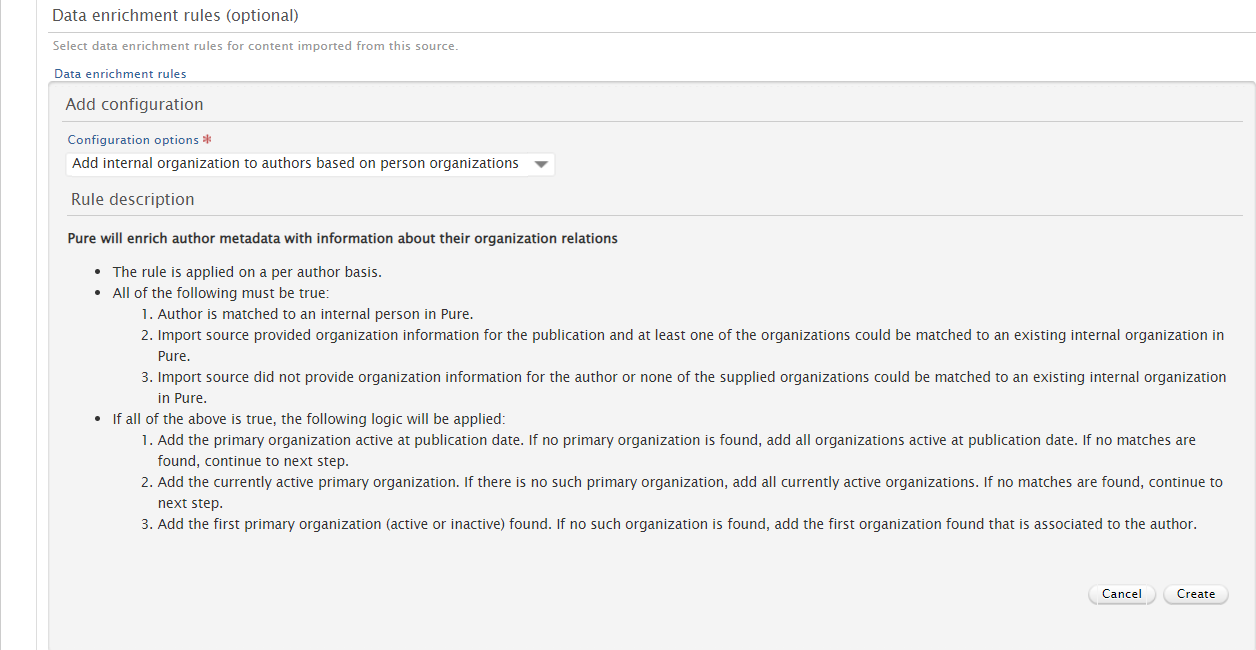
|
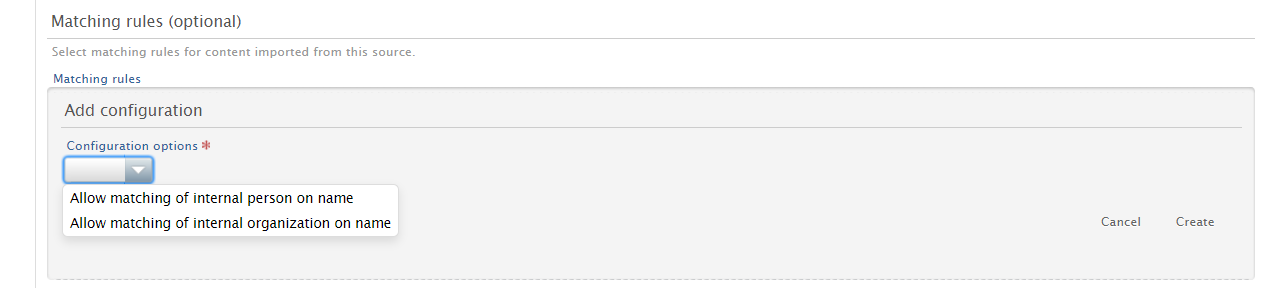
In the 'Matching rules' section, you can set the conditions under which content is matched in Pure. In the 'Data enrichment rules' section, you can set the rules (and data) with which you want to enrich existing content in Pure. |
|
| You can also set the workflow step the imported content should be saved in to allow for a check on content that was imported directly. |
|
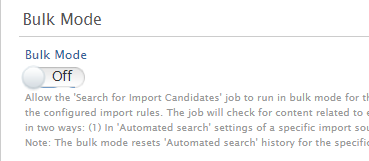
|
If you are enabling Digital Commons as an import source for the first time, you can select to import content in Bulk Mode. The job will check the import source for all content related to an organization, and all matched content will be imported into Pure in line with the configured import rules. |
|

3.4. WISEflow integration for student projects
This feature is currently available only to customers based in Denmark. Please contact pure-support@elsevier.com if you are interested in expanding its availability to your country/region.
We are happy to announce that in this release we have added an integration to WISEflow, a cloud-based digital end-to-end exam and assessment platform that supports the creation, management and delivery of exams and assessments (https://www.uniwise.co.uk/wiseflow). WISEflow covers the majority of traditional exam and assessment formats across the different subject areas at universities and uses advanced technologies for creating data analytics about the exam and assessment process available to the institution.
Click here for more details...
Instructions on how to enable and configure the integration with WISEflow are shown below.
Instruction |
Screenshot |
|---|---|
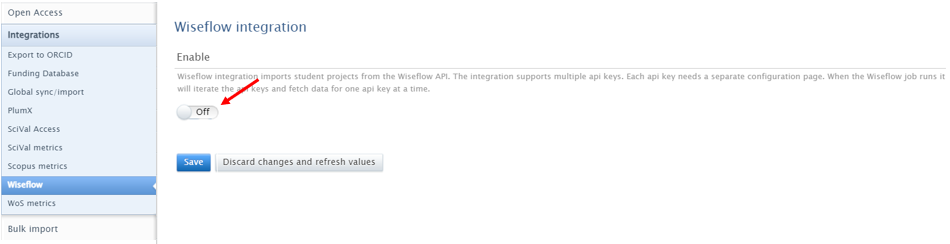
| To enable the integration go to Administrator > Integrations > Wiseflow |
|
|
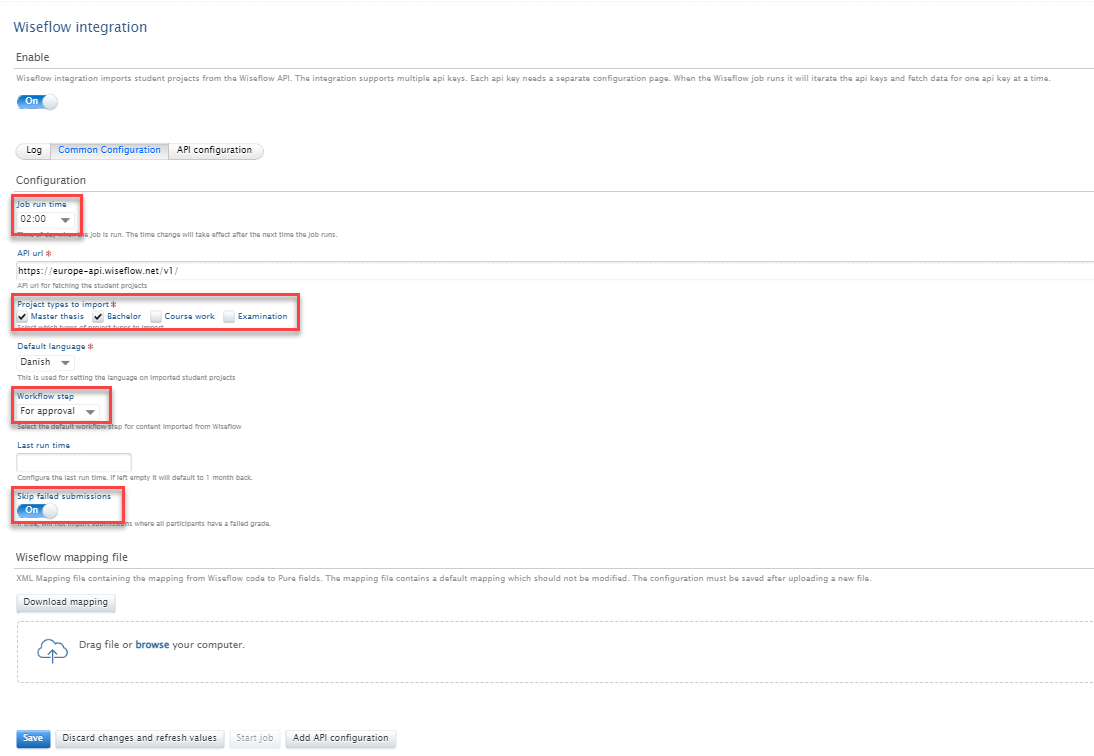
To set up the integration go to the Common Configuration tab. Here you will be able to select the following:
|
|
|
An API key is required for this integration, and this can be added In the API Configuration > 'Add API Configuration'. When adding a new API key you need to select a name for the configuration. It is possible to add multiple API keys to the integration, allowing support for multi-tenant customers. Once the configuration is saved, the job will run the following day at the selected time. |
|
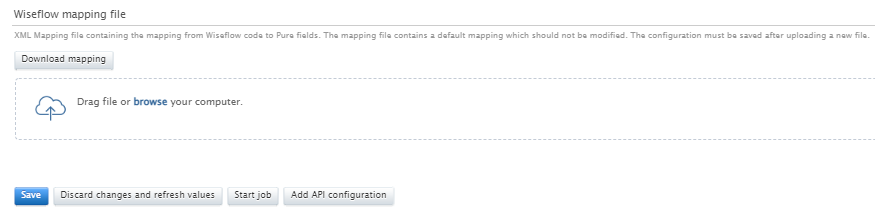
Mapping configuration: Once the API key configuration has been set up, it is possible to customize the mapping of data from WISEflow to Pure. At the bottom of the Common Configuration section you will find a mapping file containing a default mapping of the data fields from WISEflow to Pure content. It is possible to customize this mapping by editing the mapping file. To do this, first 'Download mapping' and, after editing, upload the new file to Pure. You must then save the configuration. For more details on how to edit the WISEflow mapping file please contact pure-support@elsevier.com. |
|
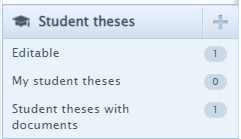
| Records imported from WISEflow can be found in Editor > Student theses. |
|

4. Unified Project Model and Award Management
4.1. Milestones on Applications: better support in the pre-Award process
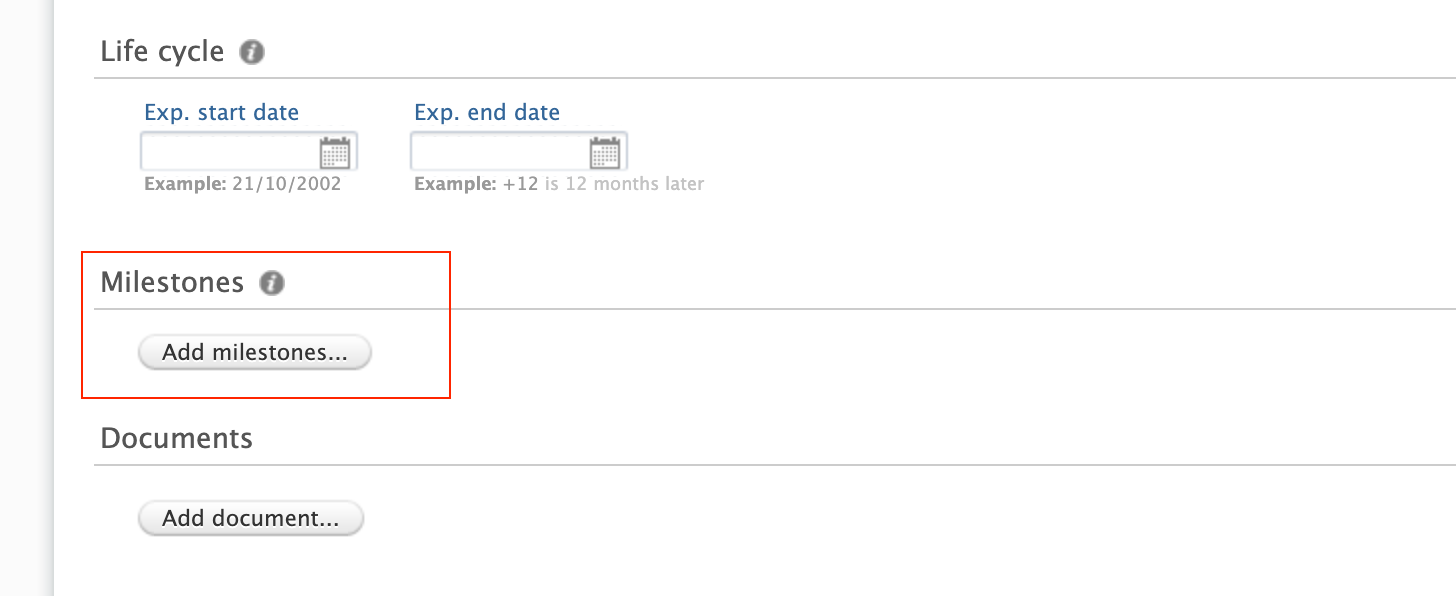
While previously Milestones could only be added to Awards, they can now be added to the Applications as well. This allows for better support of task management in the pre-award process: preparing Applications for submission to funders.
Milestones on Applications work similarly to Milestones on Awards: you can create and specify details for custom Milestones, or choose to create templates.
Milestone overview screens show what content family Milestones are associated with, and Milestone reporting includes support for Application Milestones.
Available documentation
Pure Manual > Award Management > Awards and Milestones > About Milestones
Click here for more details…
Instructions |
Screenshot |
|---|---|
|
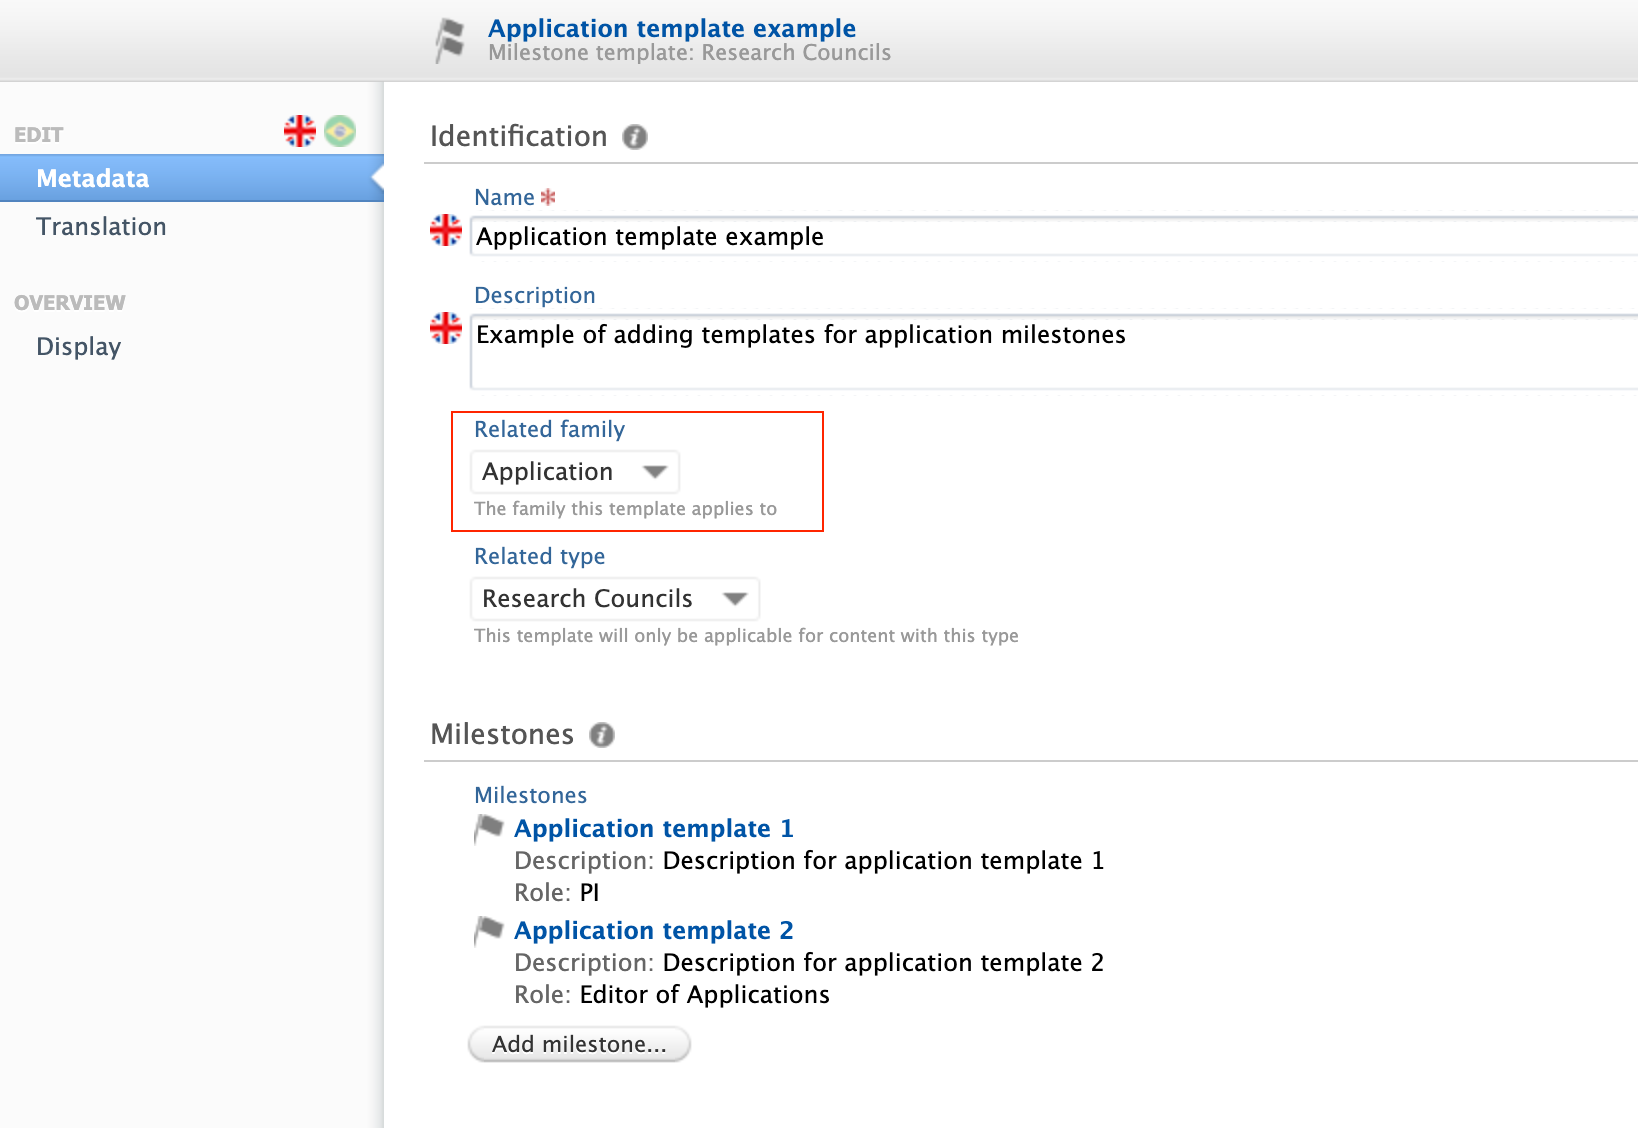
To add Milestone templates for Applications:
|
 |
|
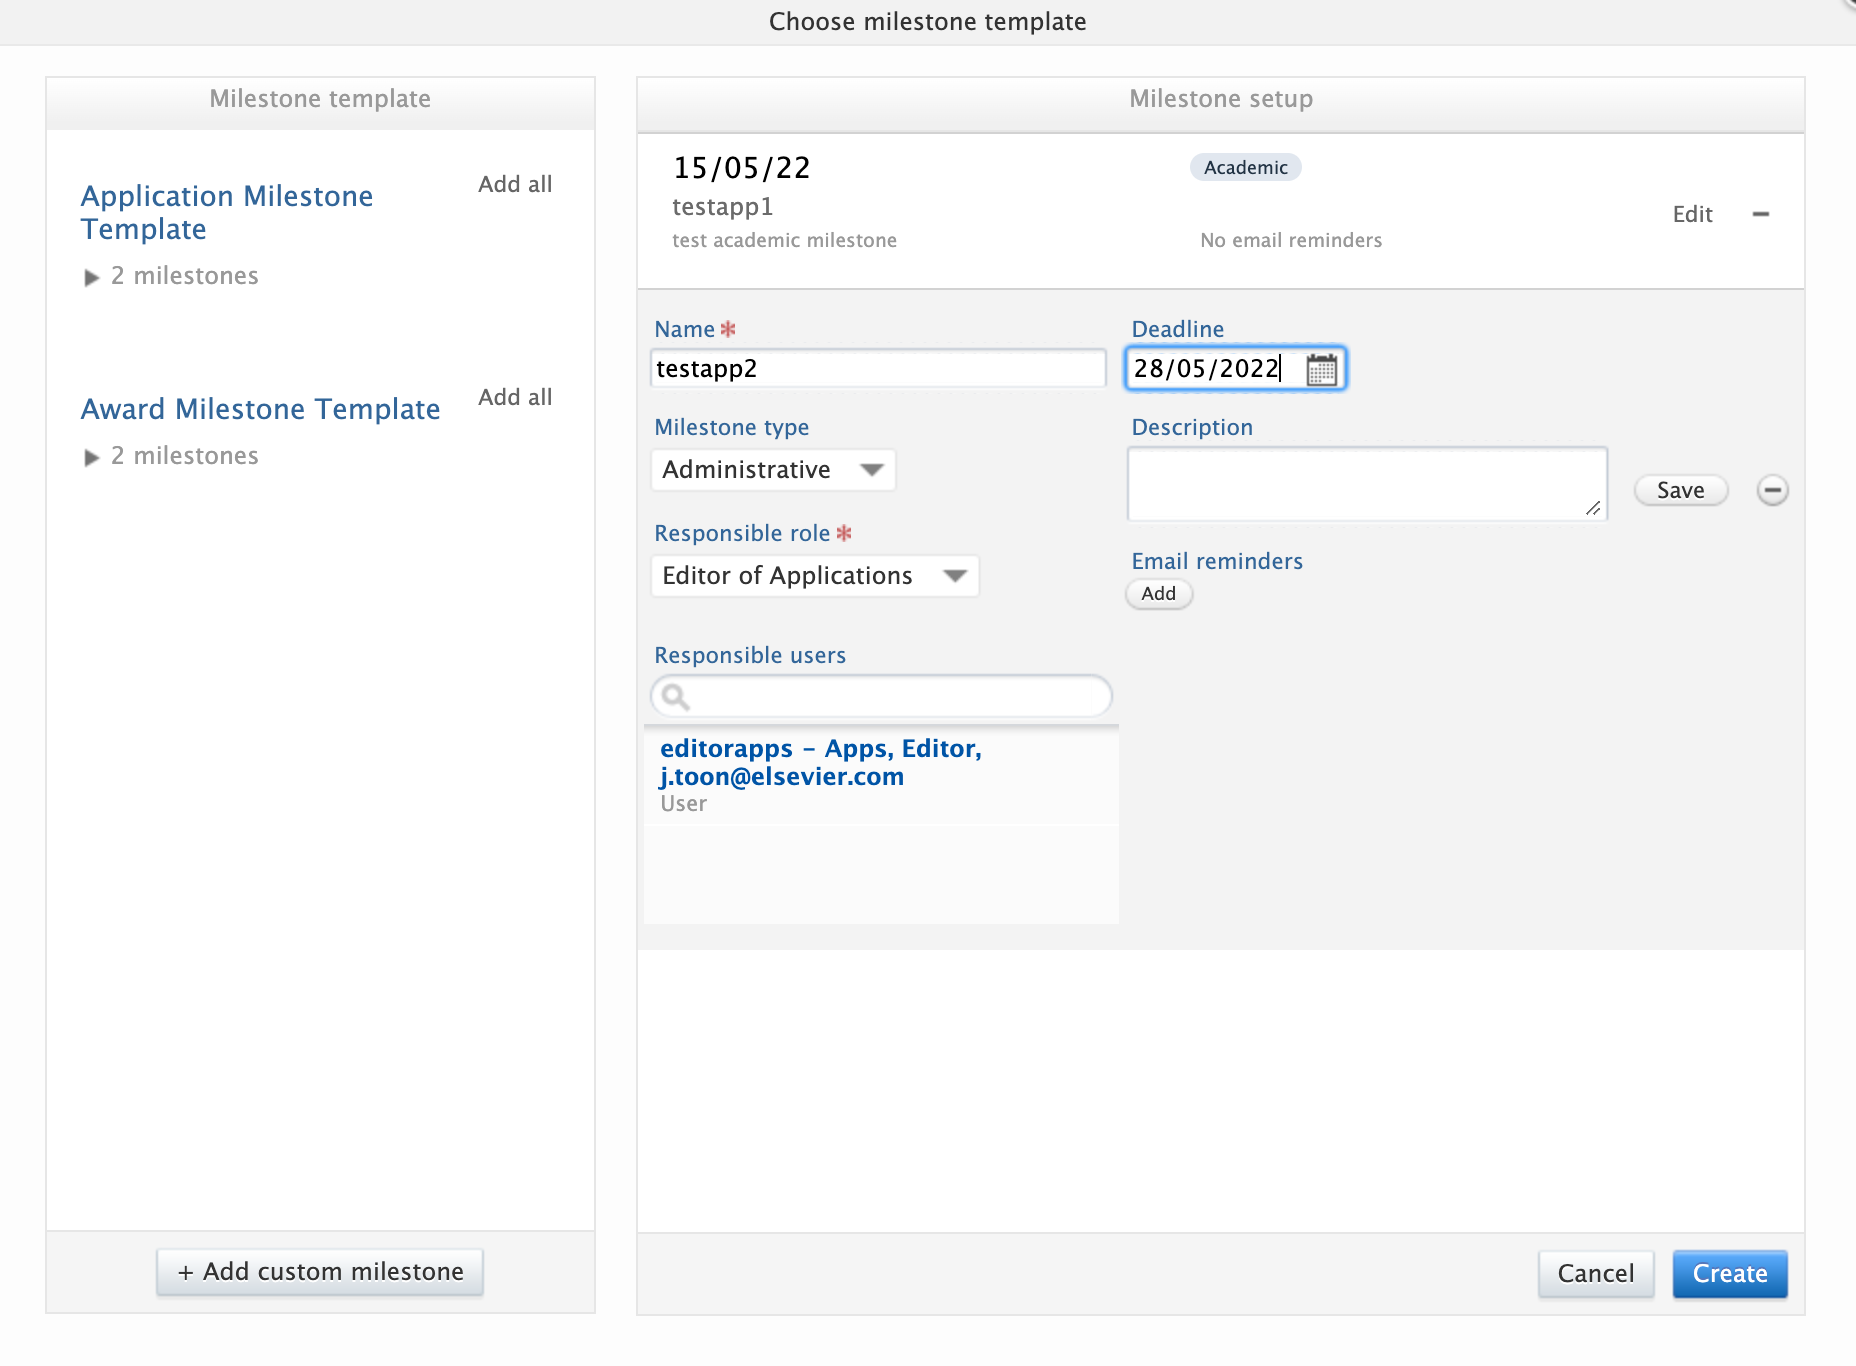
To add Milestones on Applications:
|
|
|
2. Select from the available milestone templates, or choose to add a custom milestone from the editor. User notification options, including task and email settings, are in common with Award Milestones. Note: Academic Milestones cannot be added for Applicants once the related Application has become non-editable. For example, once the Application has moved from the draft proposal to the internal approval phase (and later stages). This is to avoid creating ‘orphan’ Milestones that cannot be completed. |
|
|
Milestone overview screens include an indicator of the content family the Milestones are associated with. You can also search by content family, and/or by content title. |
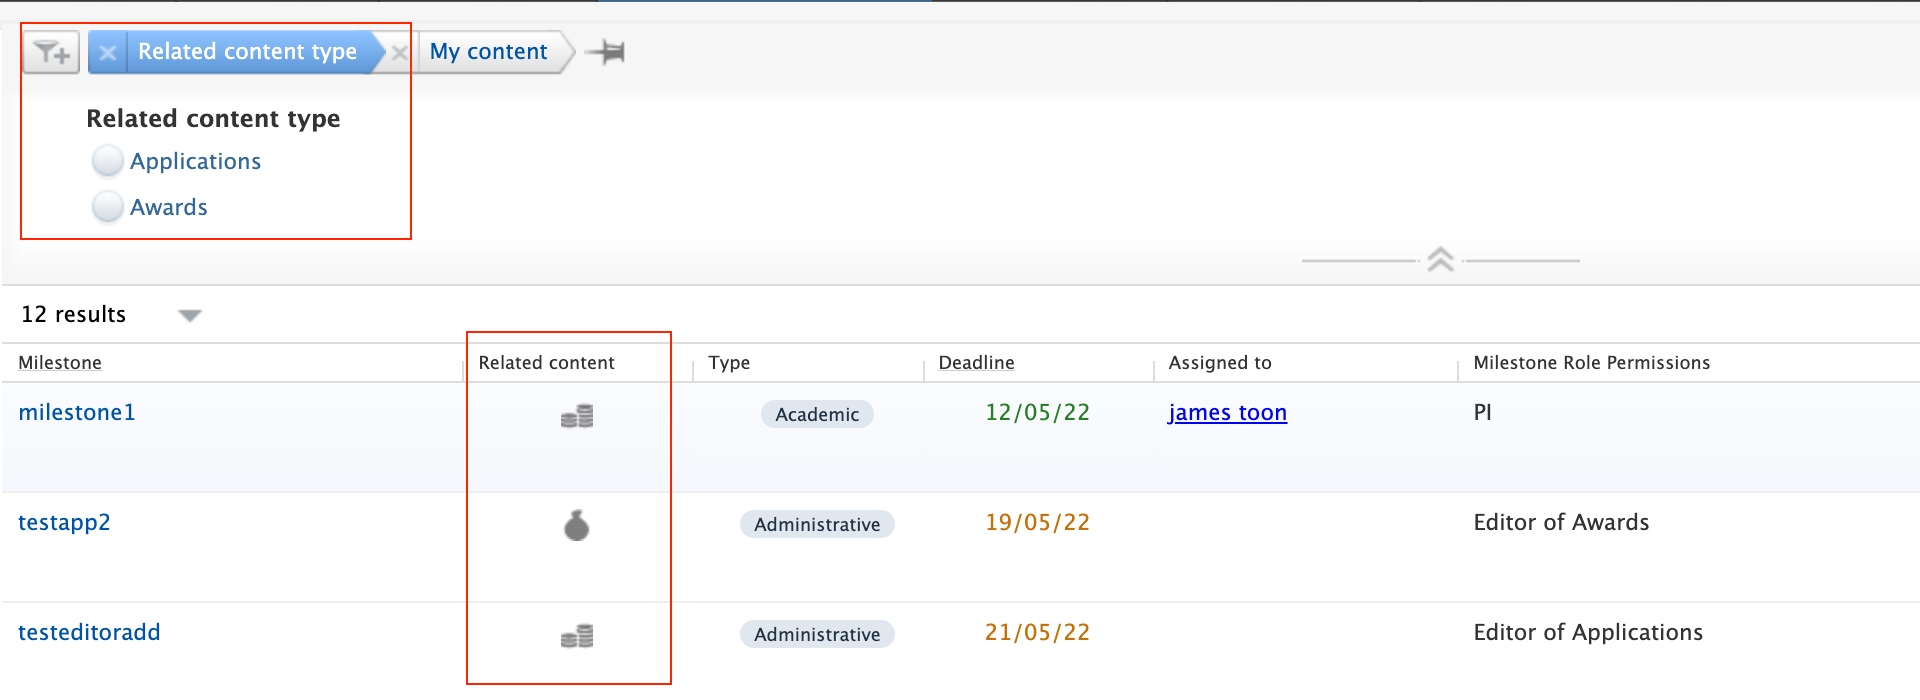 |
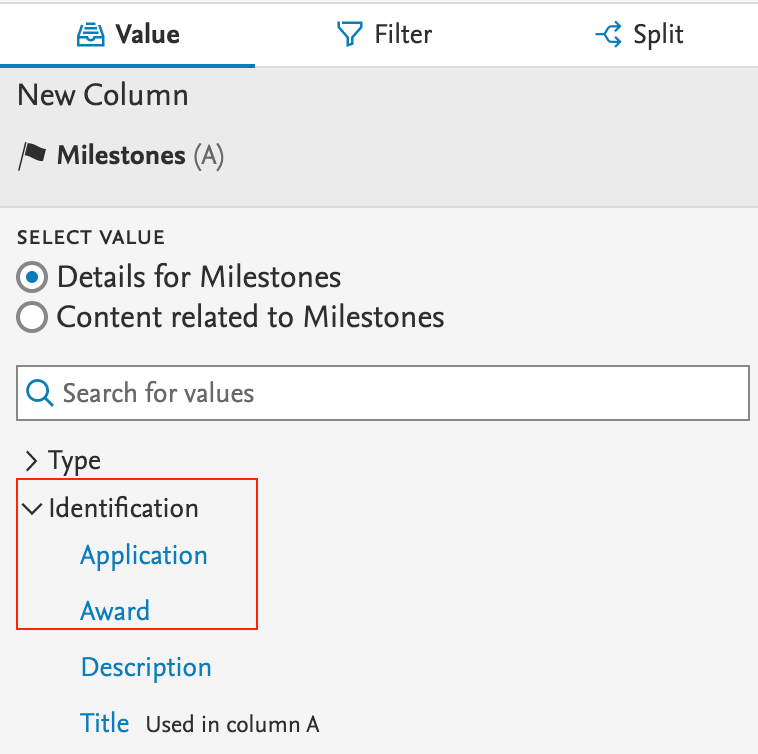
| In Reporting, you can identify Milestones by type. |
|
5. Community module
5.1. Community event dashboard: useful data processing insights
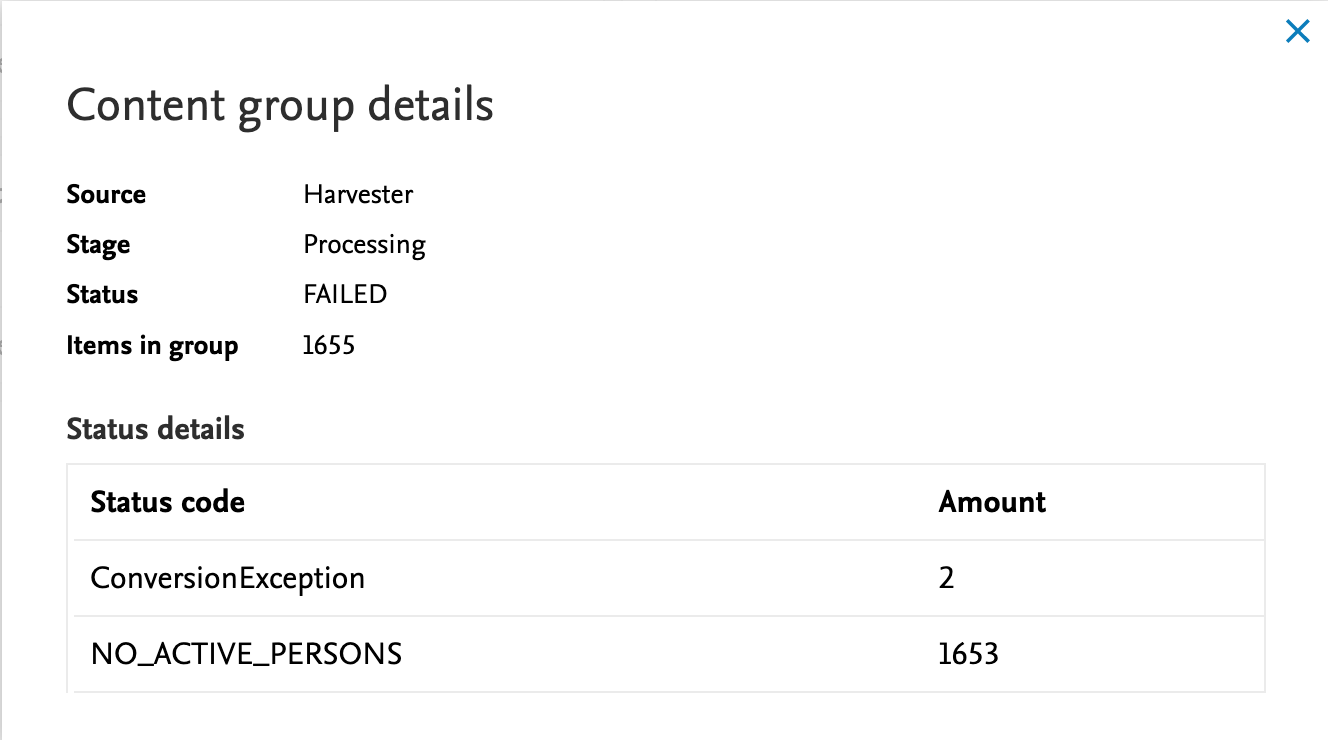
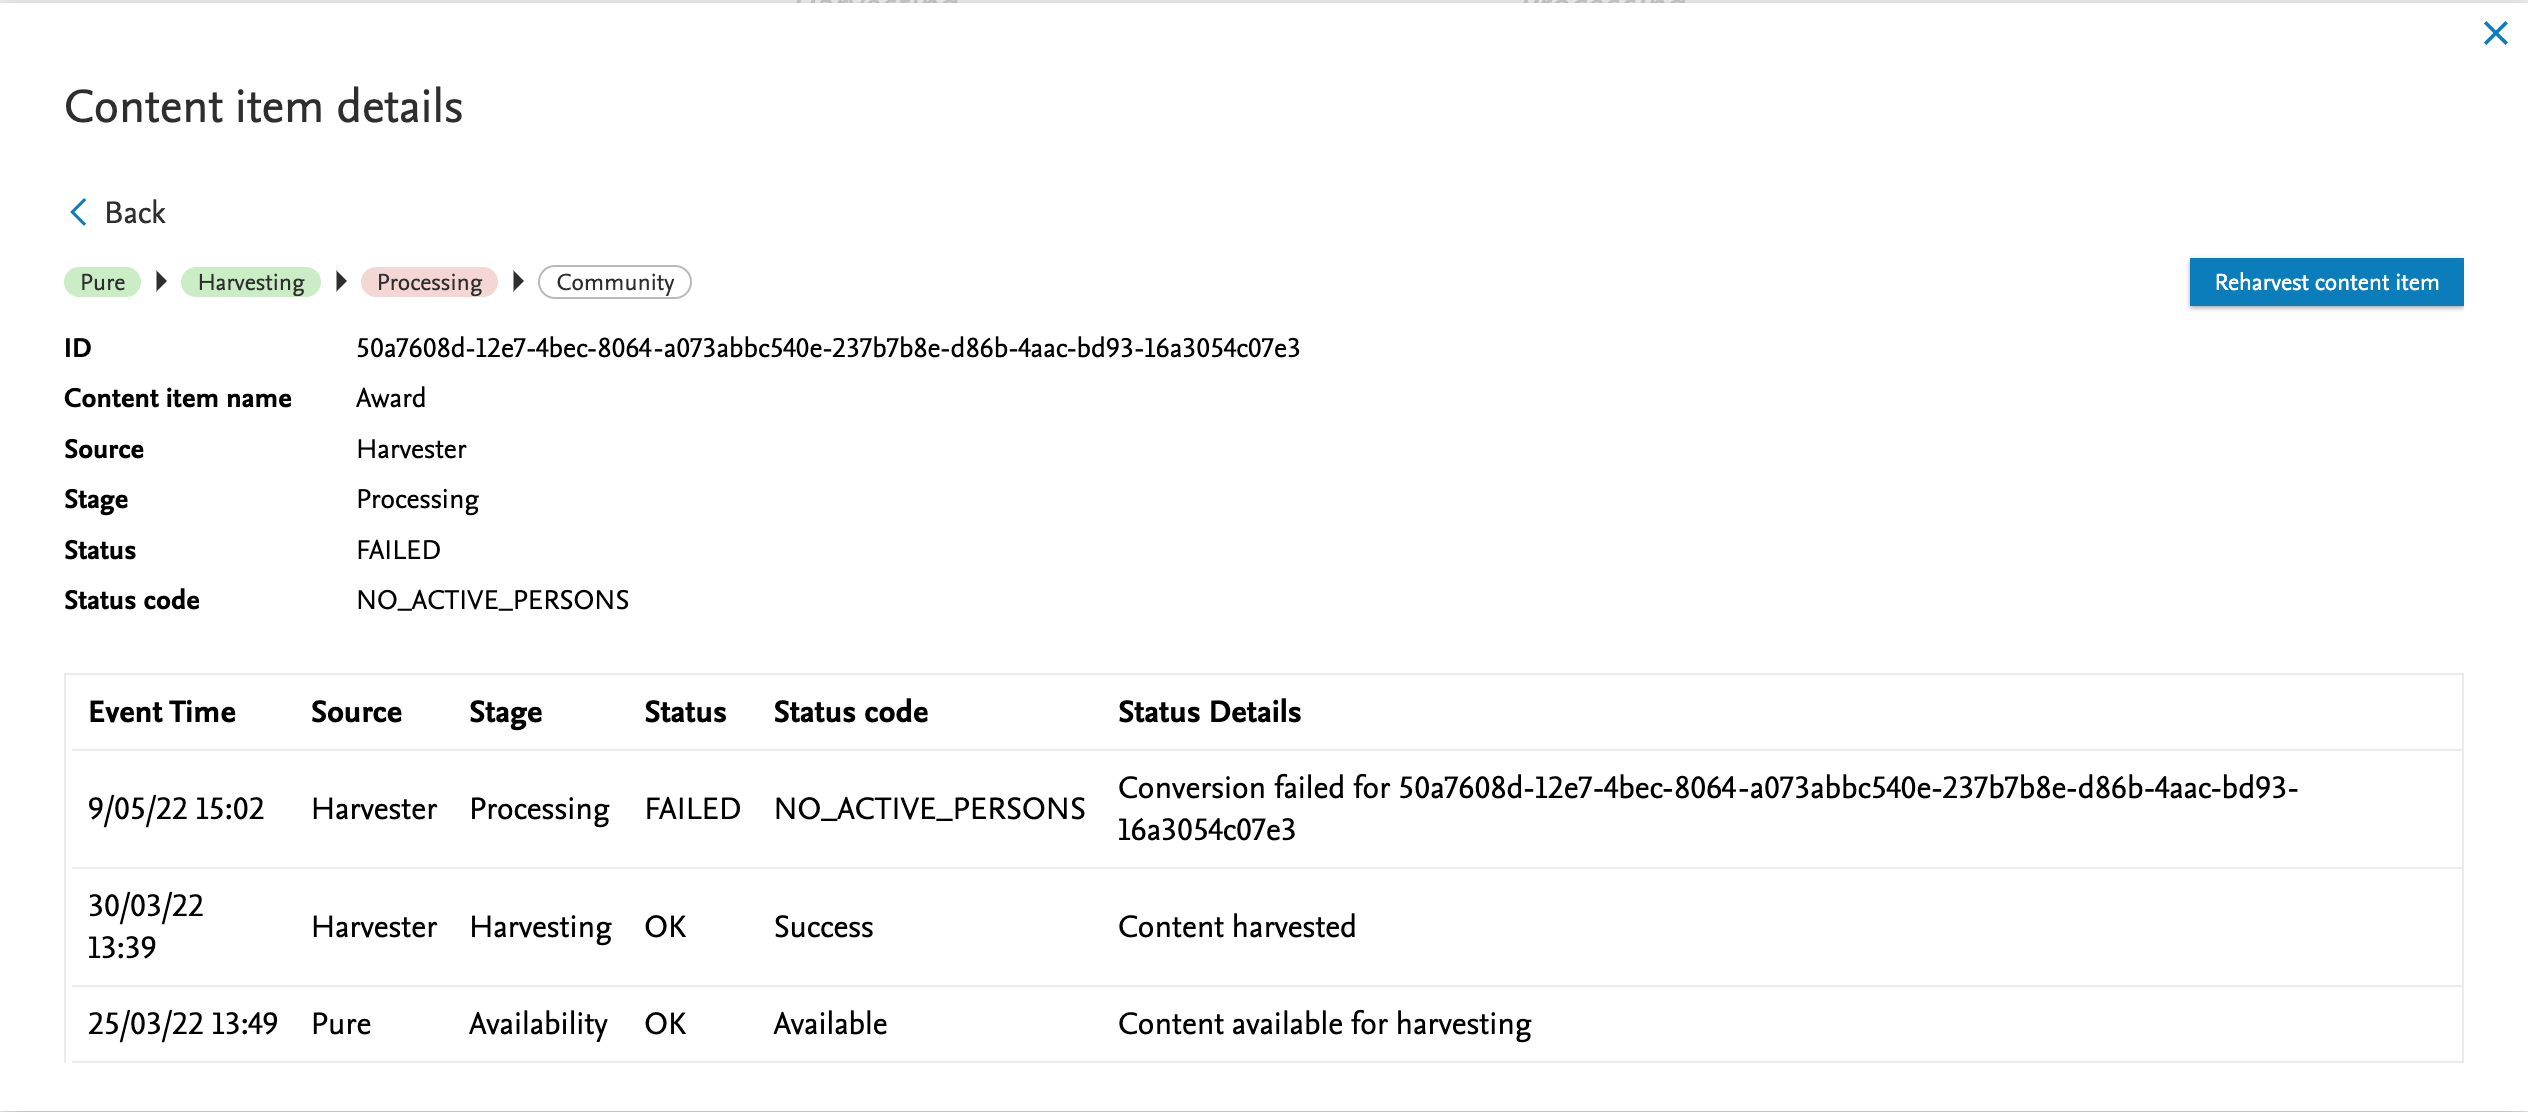
Administrators of Community systems now have the ability to see events triggered across the Community in a single dashboard view, and can easily and quickly identify the source of failures or current position of individual content items.
The dashboard is only available to Administrators of the Community Modules. We will reach out to individual community instance customers to arrange a comprehensive walk-though of the functionality.
Available documentation
Pure Manual >Community Module > Data in the Community Module > Handling your Community data
Click here for more details…
Background
Keeping track of data across all parts of the data transfer process has been a challenge for Community customers, with logging data accessible for some, but not all parts of the Community data transfer process. With this challenge in mind, we have designed the event/messaging framework to improve visibility of how information is processed as it moves from Pure clients through the harvesting service, and is then synchronized with the Community module. The goal of this new service is to increase transparency in data processing and will allow us to work together with customers on how to simplify diagnostic issues if and when they occur. We will continue to work with customers to review the data made available and to further develop the event dashboard.
Feature details
Instructions |
Screenshot |
|---|---|
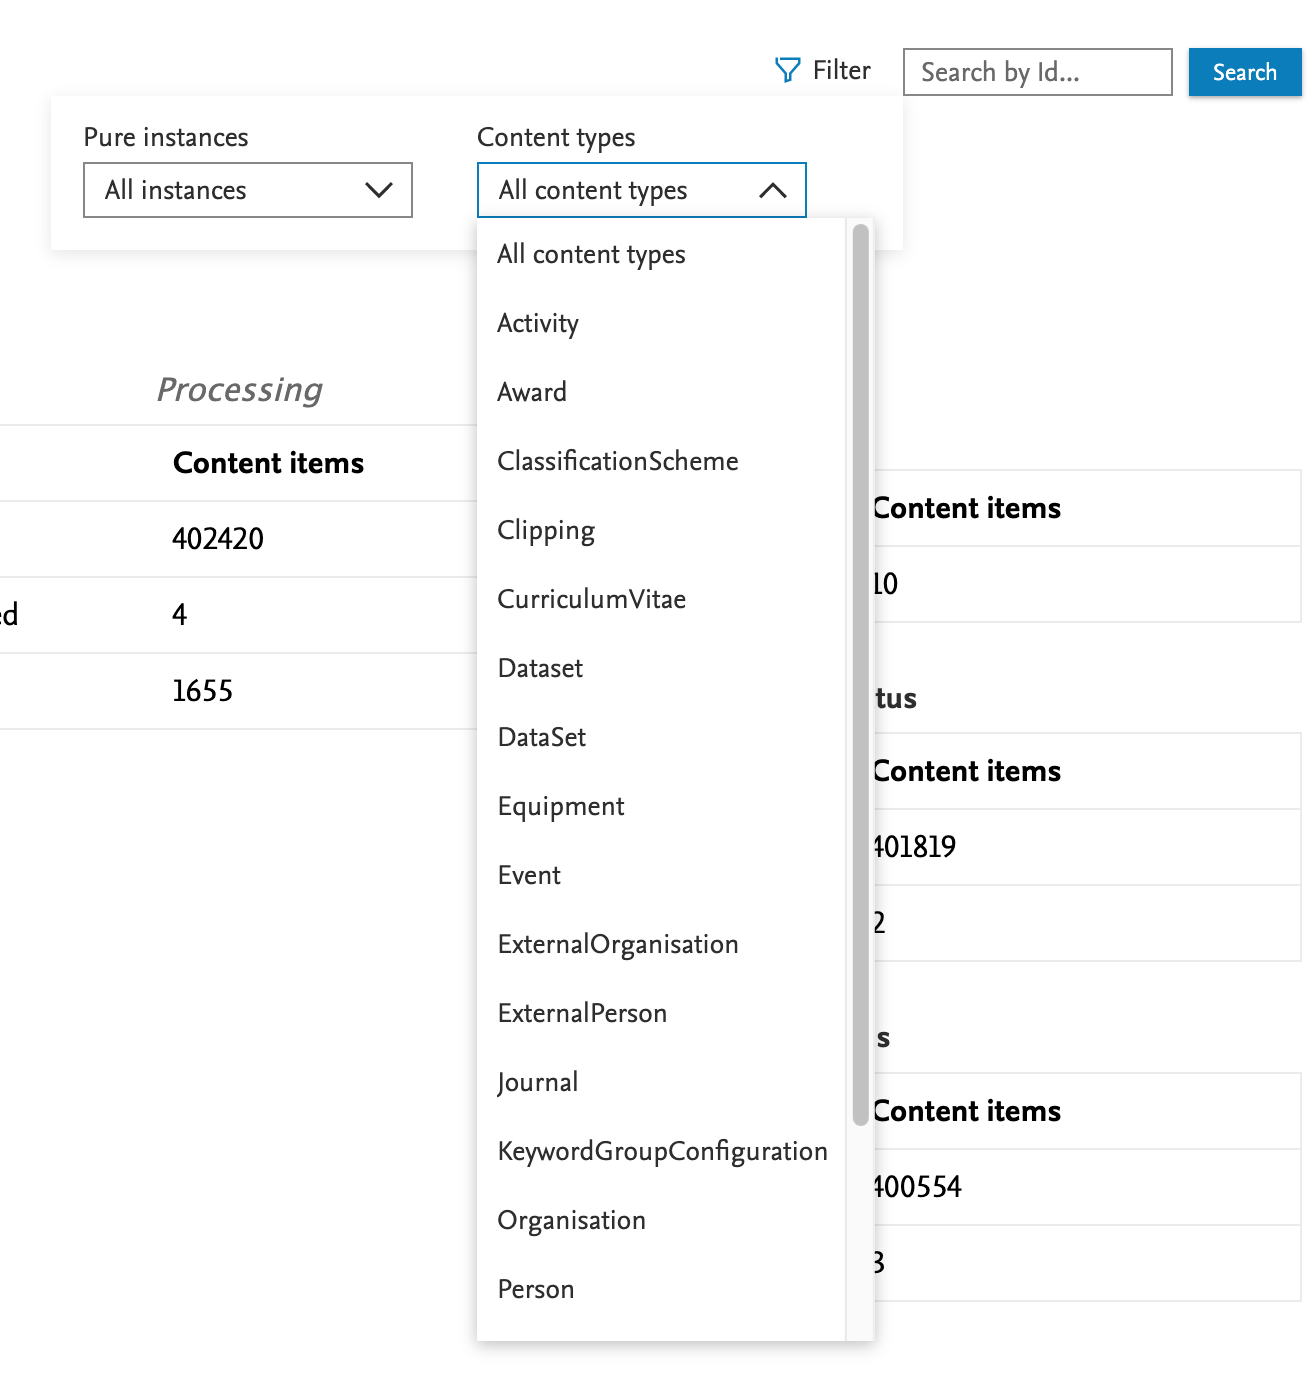
| Content can be filtered or searched through based on UUID or by content type/community instance. |
|
| Issues can be easily identified for remediation if/when they occur. |
|
| More details on individual cases are available on further inspection. |
|
6. Pure Portal
6.1. h5- and h10-index supported on Researcher profiles
It is now possible to display h-indices for a range of time periods: including 5 years, 10 years or all years.
Administrators can choose to display the h-index related to just one of these periods, or all of them. The h-index displayed on the portal are based on the h-index metric configuration as described in H-index source and time range expansion.
As before, the individual researcher can choose to not show citations and h-index, which is still respected, regardless of Administrator-enabled h-index settings.
Click here for more details...
Instructions |
Screenshots |
|---|---|
|
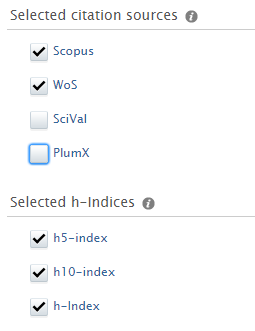
Configuration To configure time ranges and sources:
Note: The citations and metrics displayed on the Portal are calculated as described in the h-index settings: this means that the selected sources and h-indices must be equal or a subset of those selected under metrics. |
|
|
Portal visibility The enabled h-indices will be shown, unless:
If multiple citation sources are enabled, the used source will be determined per h-index. The source resulting in the highest h-index will be displayed on the Portal. The corresponding total citations will be from the same source provider. |
|

Migration of the existing metrics setup
Prior to 5.24, it was possible to mix citation sources and h-index. Now, you need to select which sources to include citations from in the Portal and what type of h-indices will be displayed separately. This means that some previously allowed setups are no longer possible, and so cannot be migrated.
Example scenarios
Scenario 1. If you previously enabled citations from WoS and h-index from WoS and Scopus, now only WoS will be enabled as a citation source, and h-index will be enabled.
In this case, you need to explicitly select Scopus as a citation source in order for the h-index from Scopus to be shown.
Scenario 2. If you previously enabled citations from WoS and Scopus, and h-index from WoS and Scopus, both WoS and Scopus will be enabled as citation sources.
In this case, you should not see any changes in what is shown on your Portal.
If your Portal settings were consistent for citation sources and h-indices, you should not see any change. Otherwise, we recommend you to double-check and adjust your settings if necessary.
Note: As PlumX was not available as a citation source before, it will be disabled by default. Similarly h5-index and h10-index will also be disabled.
6.2. Fingerprinting to use the unified OmniScience thesaurus
Elsevier Fingerprint Engine as used by Pure is changing: the new unified OmniScience thesaurus will now be used to generate the fingerprints.
While the fingerprinted content and the way the fingerprints are displayed in Pure and on the Pure Portal remains the same, the fingerprint concepts have gone through a significant overhaul.
To benefit from the new Fingerprint Engine, update your Pure to the 5.24 version and enable it under Administrator > Fingerprint.
The old Fingerprint Engine will be discontinued towards the end of 2022. If you stay on Pure version 5.23 or older after the old fingerprint engine is discontinued, the newly added content will not be fingerprinted.
Available documentation
You can find out more about the Fingerprint Engine and the latest changes in Client Space > Fingerprinting. For an overview of the functionality, see Pure Manual for Technical Administrators > Fingerprint.
Click here for more details…
What is changing?
The thesaurus that drives the fingerprint concept generation is going through a significant overhaul, resulting in:
- More succinct fingerprint, clearer terminology
- Unified approach to the breadth and depth of the terms used
- Ability to address customer feedback faster (the new thesaurus is fully controlled by Elsevier)
Note: While we are moving away from the third party thesauri used previously, the overall areas of science covered remain the same. You will still be able to see the general scientific area(s), as well as the specific fingerprint concepts related to it as a result of the fingerprinting. There will also be a more granular split by scientific discipline.
The way the fingerprints are displayed will not change with the 5.24 release.
- There will be no changes in the way the fingerprint is displayed in Pure or on the Pure Portal.
- There will be no changes in what content gets fingerprinted and the aggregation logic.
How is the change implemented?
- To benefit from the new Fingerprint Engine, update your Pure to the 5.24 version.
- The switch to the new Fingerprint Engine is enabled under Administrator > Fingerprint

For self hosted customers, they might need their own basic key (see screenshot above), to get this, please reach out to support. If no "Insert basic key value" field is available, you can just upgrade rigth away.
Note: Updating to the new 5.24 version will lead to creation of a new fingerprint for all of the fingerprinted content. This is done to ensure the consistency of the fingerprint concepts used, as well as to preserve the fingerprint search functionality. This migration starts when clicking the "Update to the new Fingerprint Enginge (OmniScience)" button, and typically takes 1-2 days to complete.
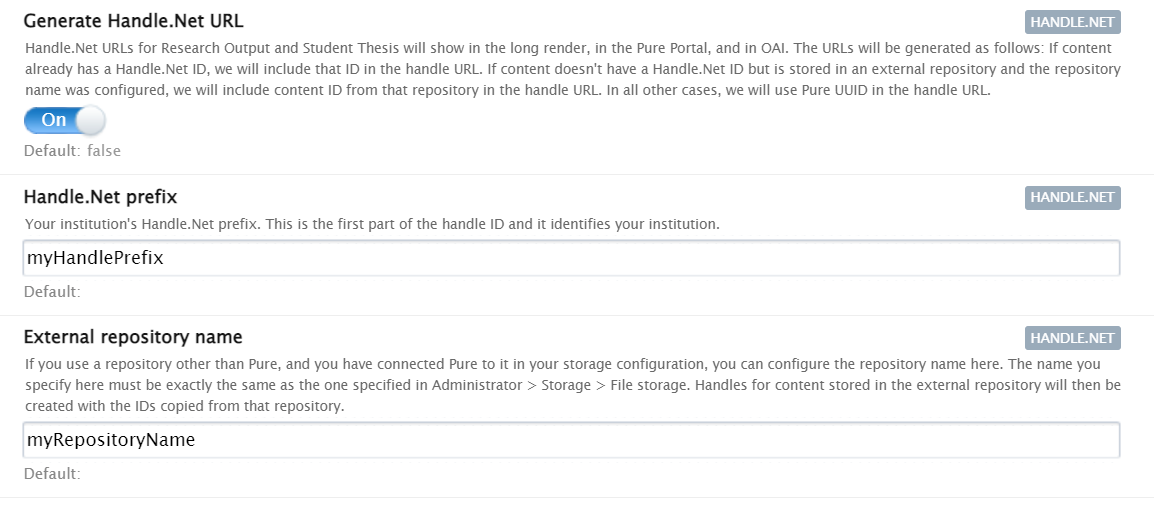
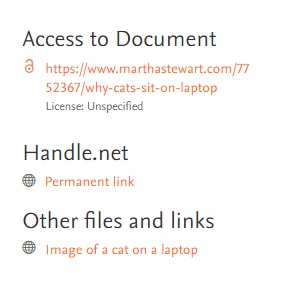
6.3. Handle.Net links can be added to content pages
Thanks to the extension of the Handle.Net integration available in Pure, it is now possible to show the persistent Handle.Net link on the Research Output and Student Thesis details pages of the Pure Portal.
It is also added as a meta tag in the HTML head of the page for better machine readability.
If your Handle.Net integration is already active, you need to disable it, save your settings, enable it, and save your settings again for the handles to show on the Portal.
Available documentation
Pure Client Space > Technical User Guides > Pure Installation and Upgrade Guide > Configuring Pure > Handle.net
Click here for more details…
Instructions |
Screenshots |
|---|---|
|
To enable the integration, go to Handle.Net in Administrator > System settings > Handle.Net
Note: If you set up an external repository to be your Handle.Net destination, the generated URLs will resolve to your repository for the research outputs stored there. |
|
|
Once the integration is (re)activated and the data is republished, Portal visitors will see the Handle.Net URLs on the Research Output and Student Thesis pages of your Pure Portal.
|
|
6.4. Additional filtering options: more granular control over content shown on Portal
We have added new configuration options to help you manage what data is exposed on your Portal. You can now choose to show/hide Persons based on organization association and employment type, and show/hide Research outputs based on workflow step and author organization association type.
The above options can only be configured by Elsevier Support. Please contact pure-support@elsevier.com if you wish to enable this feature.
Tip: Some additional filtering options for organizations were also introduced in Pure 5.22.0.
Click here for more details…
You can now:
- Only include Persons with a given organization association type
- Only include Persons with a certain employment type
- Limit Portal visibility based on workflow step and include external research outputs.
- Only include editorial content, for example research outputs, if a visible Person is associated.
Instructions |
Screenshots |
|---|---|
|
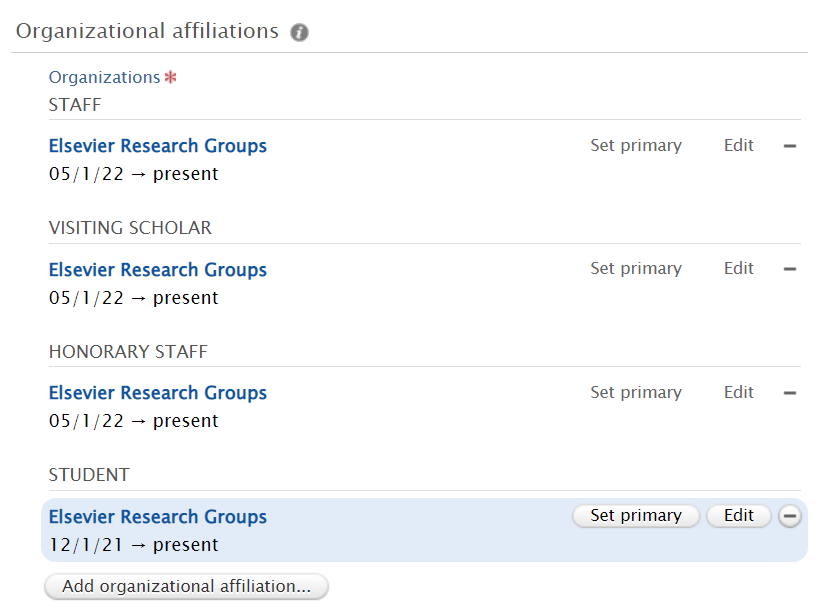
Only include Persons with a given organization association type It is possible to have 4 different organization association types:
You can now limit Portal visibility of your Persons by type to, for example, only show your students or academic staff. |
|
|
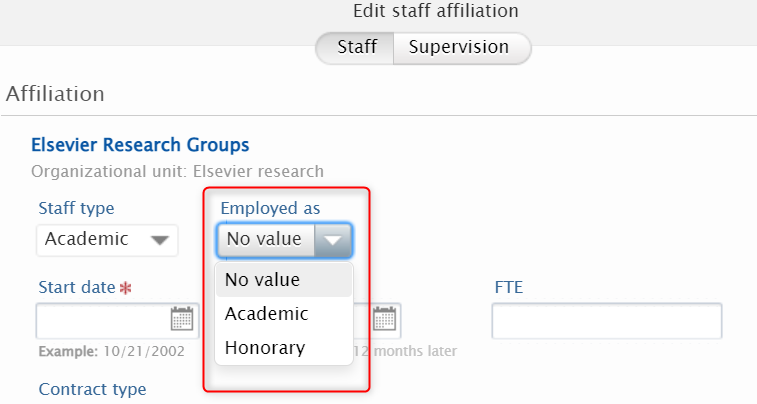
Only include Persons with a certain employment type You may want to further limit the Persons shown on the Portal to those with a certain employment type. This could be to, for example, show only academic staff. The screenshots show example fields that contain association information.
|
|
|
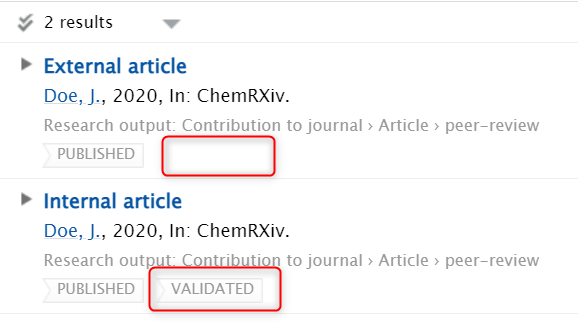
Limit based on workflow and include external research outputs. It is now possible to show external research outputs on the Portal even if some workflow-related limitations are applied to the visibility of internal research outputs. This way, you can ensure your researchers have a full portfolio on the Portal, while limiting the visibility of research output items that still need to be validated by your Editors. In the example, internal articles show on the Portal are limited to 'Validated' only, but you can still see an external article in the list.
|
|
|
Only include editorial content (research outputs, etc.) if a visible Person is associated. You can limit the content you want to showcase on your Portal to items created by researchers currently working at your institution. If you combine the above with the organization association type filter, you can further limit the visibility of research outputs to, for example, exclude those authored by students. |
|

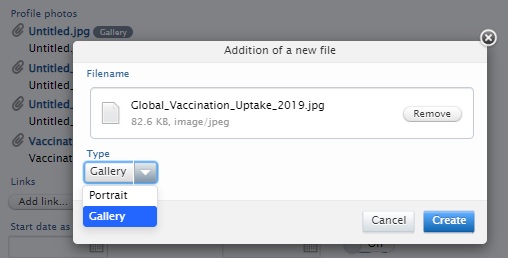
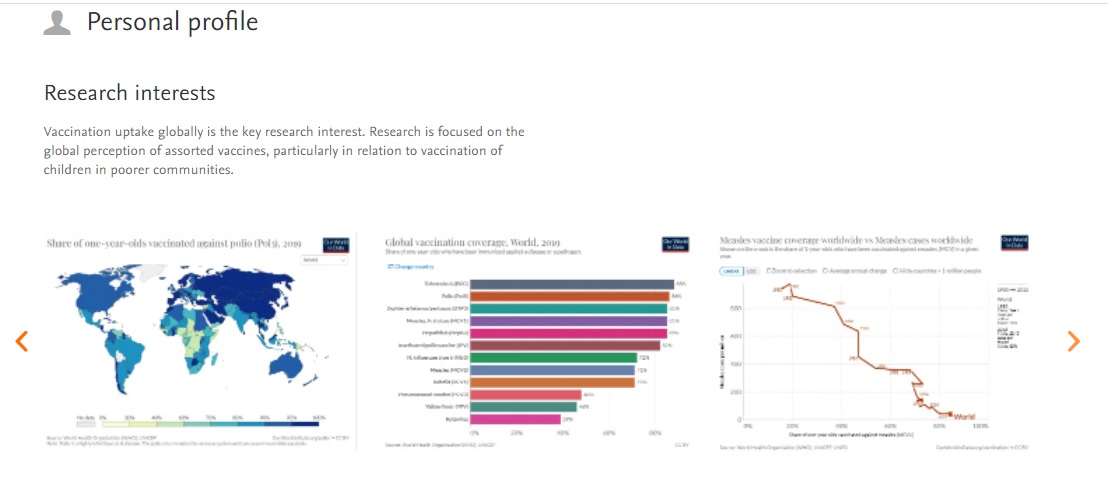
6.5. 'My gallery': image carousel available on Researcher profiles
Following customer feedback, we have introduced an image gallery on the Researcher profiles. Images saved on the Researcher profile and marked as 'Gallery' will appear in a carousel underneath the description text.
Click here for more details…
Instructions |
Screenshots |
|---|---|
|
Personal users can add/remove images available on the researcher profile page from their Personal user overview > Edit profile > Personal identification > Profile photos. To create 'My gallery':
All the images marked as 'Gallery' will be visible in a carousel under the 'Research interests' section of the Researcher profile. |
|
|
Visitors to the Researcher profile can:
|
|
6.6. Google Maps: thumbnail replaced with a direct link to map
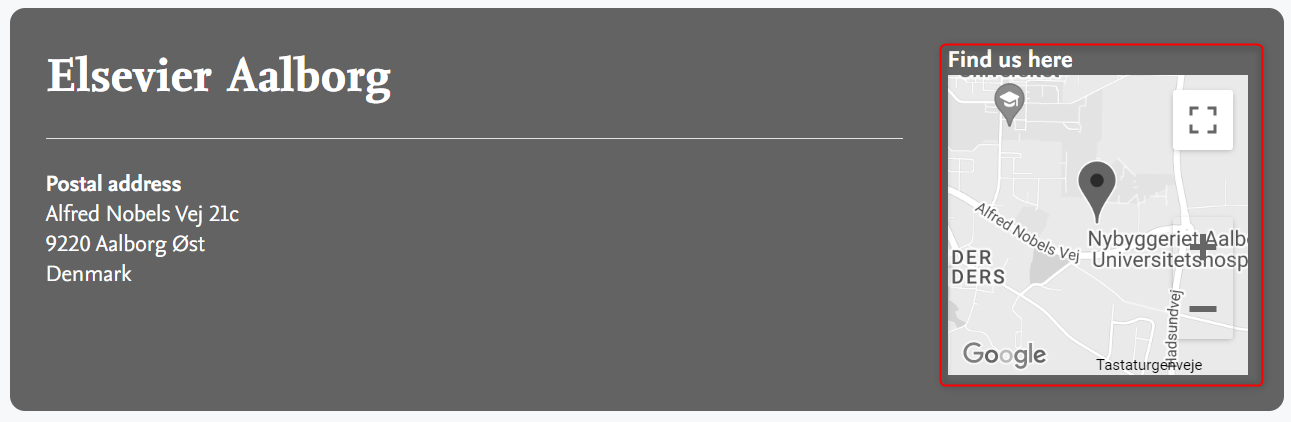
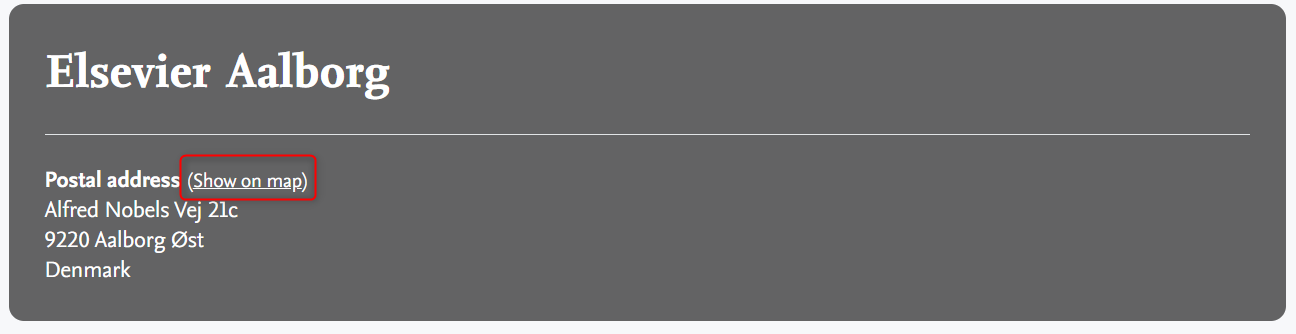
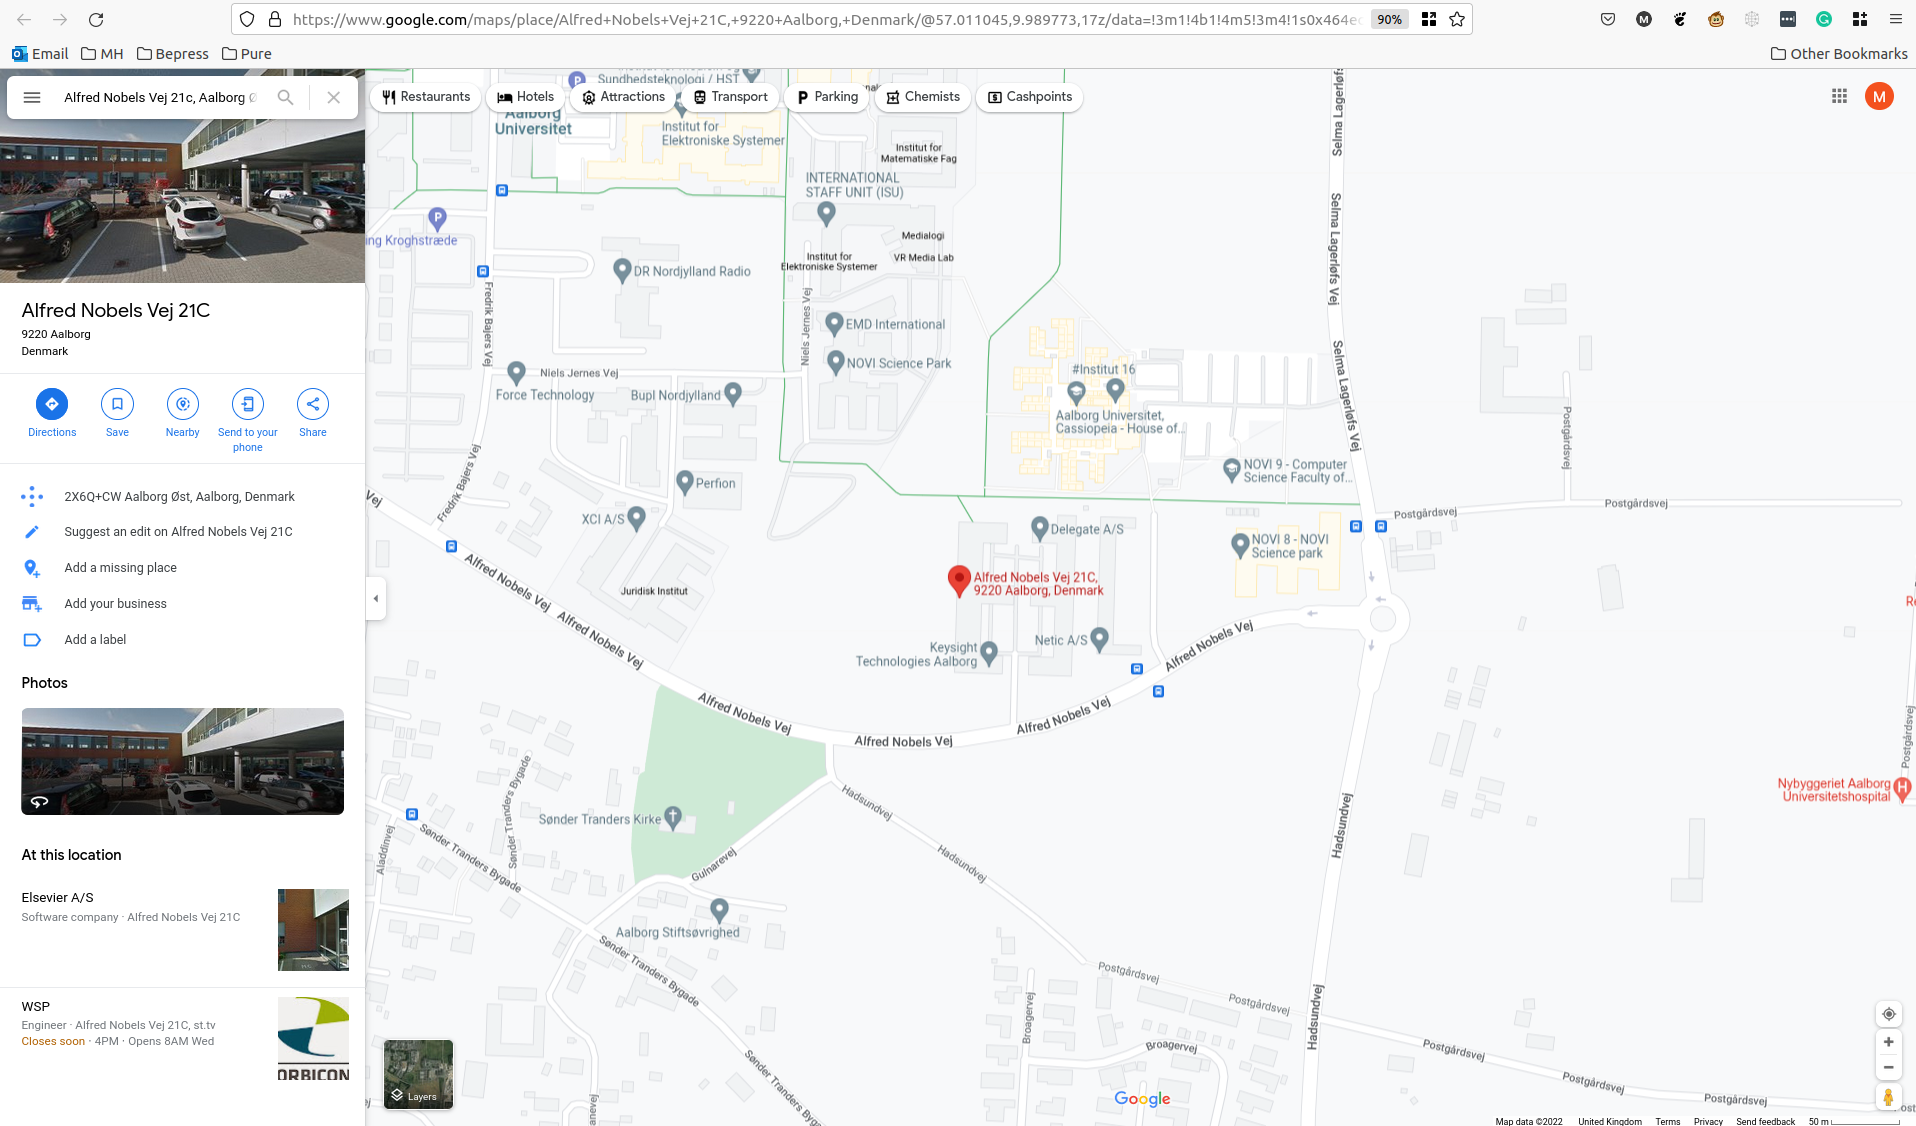
We are introducing a more practical map format on pages that support maps (Organization unit, Activity, Equipment/Facility, Prizes, Datasets): now, instead of simply viewing a thumbnail showing a zoomed-in location, the visitors will be able to select 'Show on map' and view the location directly on Google Maps. There, they can access additional information about the location and explore route options.
The map information is shown on the Portal only for supported content types and only if location information is provided in the Metadata > Geolocation section, and the visibility settings allow display on Portal.
This change does not in any way affect Collaboration Maps.
Click here for more details...
Before |
After |
|---|---|
| Details page for organizations as example | |
|
|
| Clicking on the map | Clicking on "show on map" |
|
|

7. Reporting
7.1. Data table: column expand replaces global expand
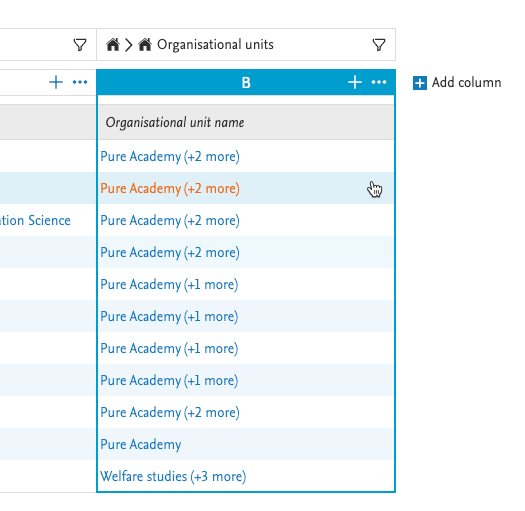
The column expand option allows you to expanded specific columns rather than the whole table in order to create a neater, more focused overview of your data.
Available documentation
Pure Manual > Reporting Module (Beta) > Data tables > Expand and split
Click here for more details…
Background
For some time now, Reporting supported the option to expand the view for cells that contained multiple values in order to expose more detailed information, such as all authors of a publication. The global expand, however, considerably increased the table length as it expanded all possible lists in the data table. The introduction of the more exact column expand offers you more granular control over the data you want to present.
Any saved workspace that used the global expand mode will retain that setting. It is possible to change those saved workspaced be disabling the global expand, it option will then disappear, and then apply expand on the columns that should be expanded.
Feature details
Instructions |
Screenshot |
|---|---|
| Default view: a non-expanded column, listing first item and indication of additional items in the cell. |
|
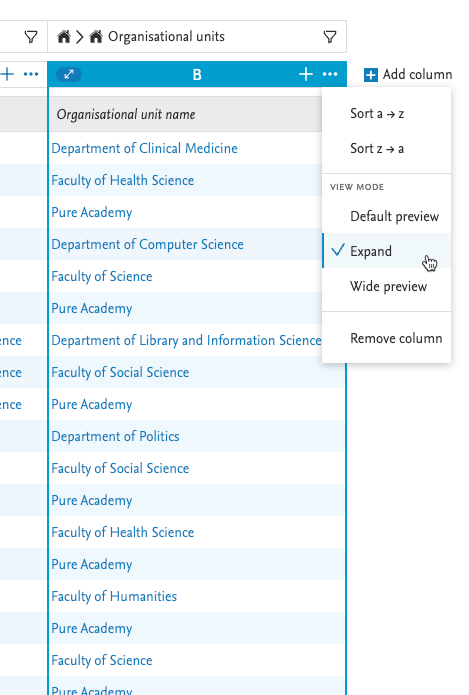
| Expanded view: To expand a column click on the menu (...) in the header of the column that should be expanded, and select the 'Expand' option. |
|
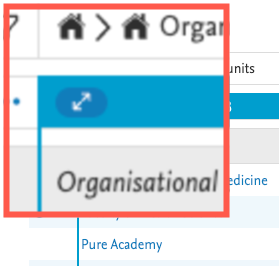
| Once the column is expanded, a small icon appears to the left of the column name. |
|
7.2. Data story: new 'List' widget
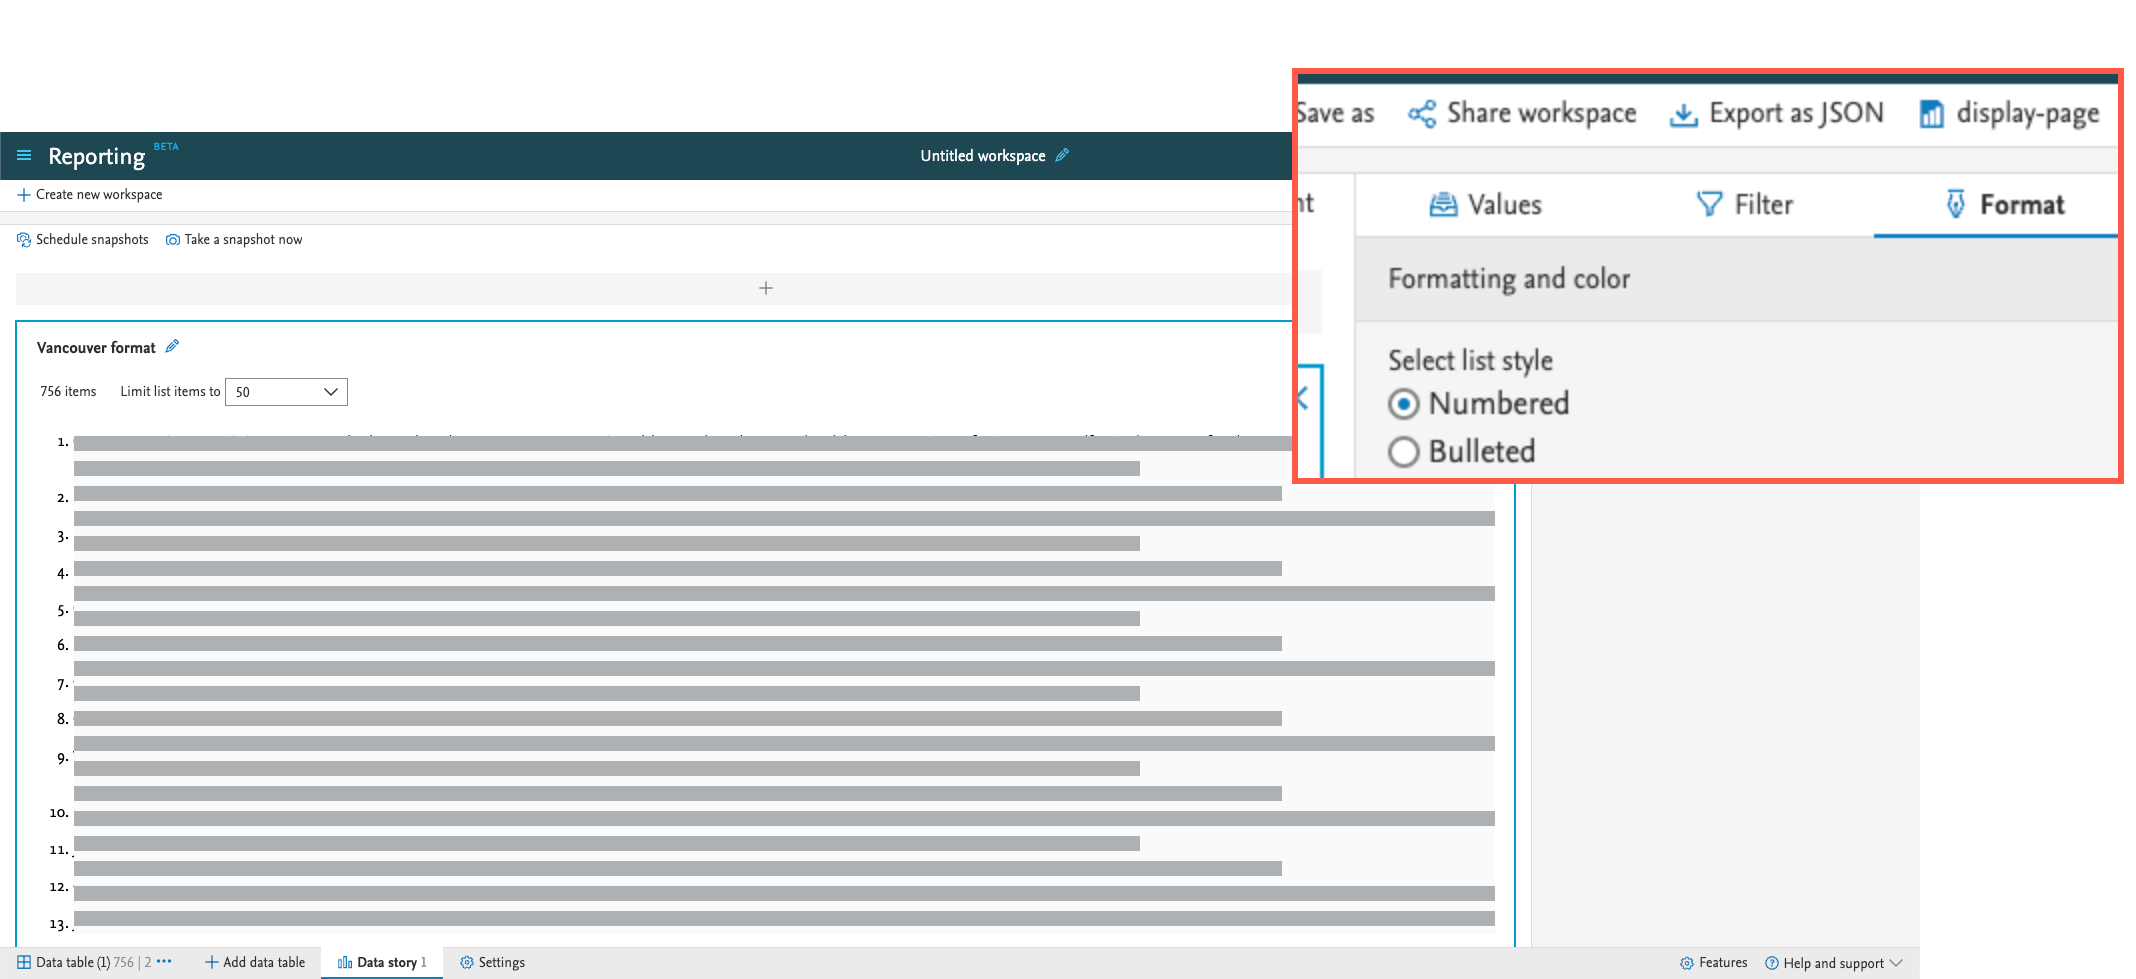
The 'List' widget lets you create either a bullet list, or a numbered list, and with that further enrich the narrative of your data story. The order of the items on the list will follow the order in which the information is listed in its source data table.
Tip: The 'List' widget can be used to, for example, give a clear overview of an author's publications especially if this is combined with your favorite citation format.
Available documentation
Pure Manual > Reporting Module (Beta) > Data story
Click here for more details…
Instructions |
Screenshot |
|---|---|
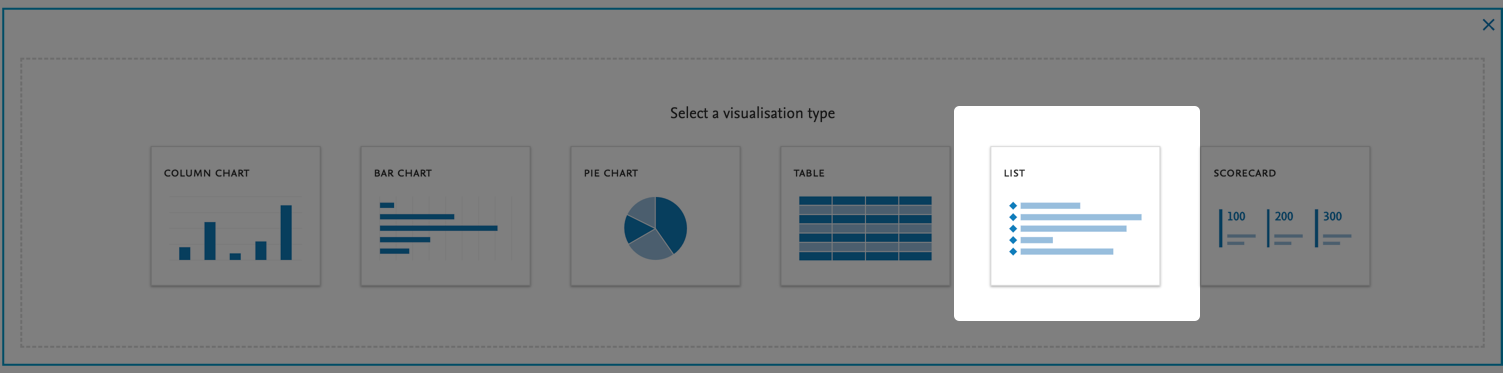
| In the Data story tab of your workspace, select 'List' from the available visualizations. |
|
|
In the 'Format' tab in the right-hand panel, you can choose between two different types of lists:
|
|
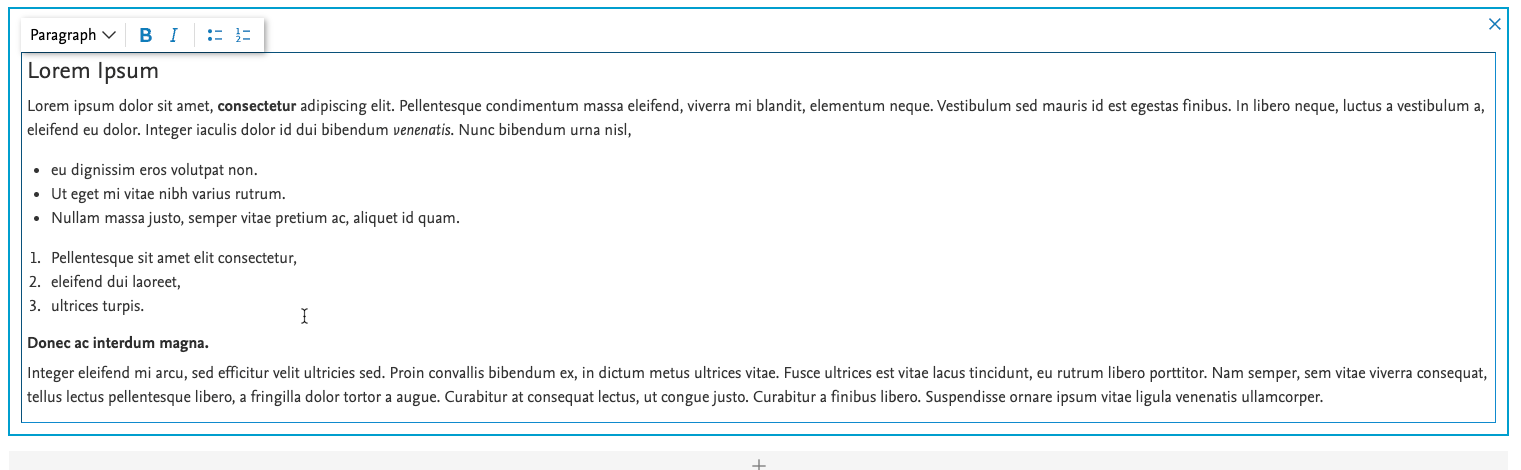
7.3. Data story: Rich text support added to 'Text' widget
The 'Text' widget now supports Markdown, making it really easy and fast to create a well-formatted and clean text.
Tip: The 'Text' widget can be used, for example, in an introduction to the data story, to give readers the background and set their expectations for your data story.
Click here for more details…
We currently support:
- two levels of headers
- bold
- italic
- numbered lists
- bullet lists
You can apply the formats by either:
- selecting formatting options from the visual menu
- using Markdown directly in the widget
Instructions |
Screenshot |
|
|---|---|---|
| Creating a rich text widget using the new text widget. |
|
|
| Example of Markdown that can be written directly in the text widget. All the supported elements will be rendered in desired formatting. |
|
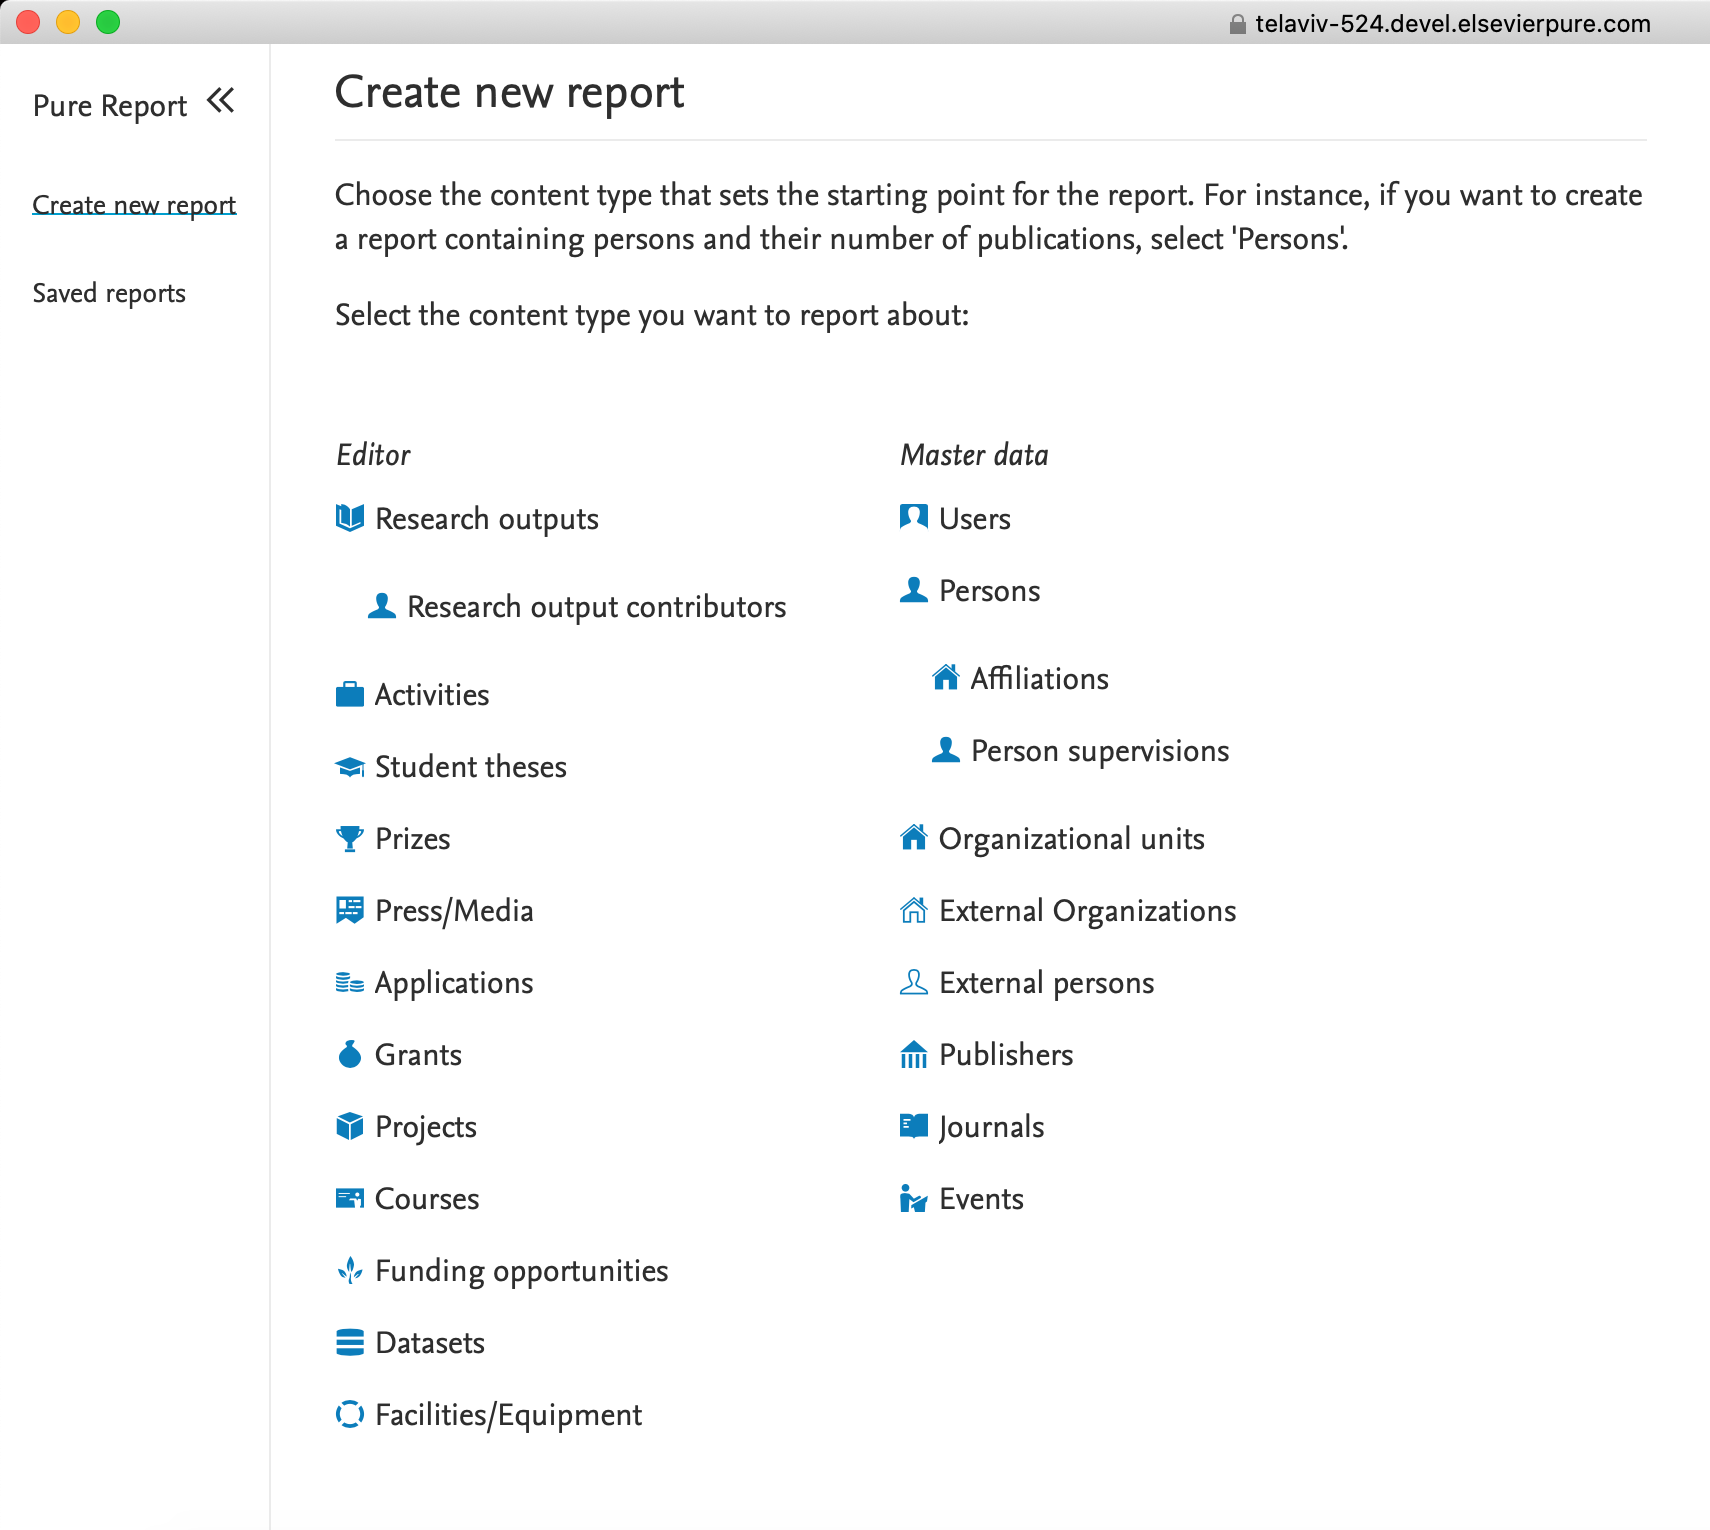
7.4. Reporting on Research output contributors
To make reporting on relations between content easier, we are introducing a new reportable type: 'Research output contributors', which can be used either as the driver content type for your report, or added as content related other content, such as Research outputs, or Persons.
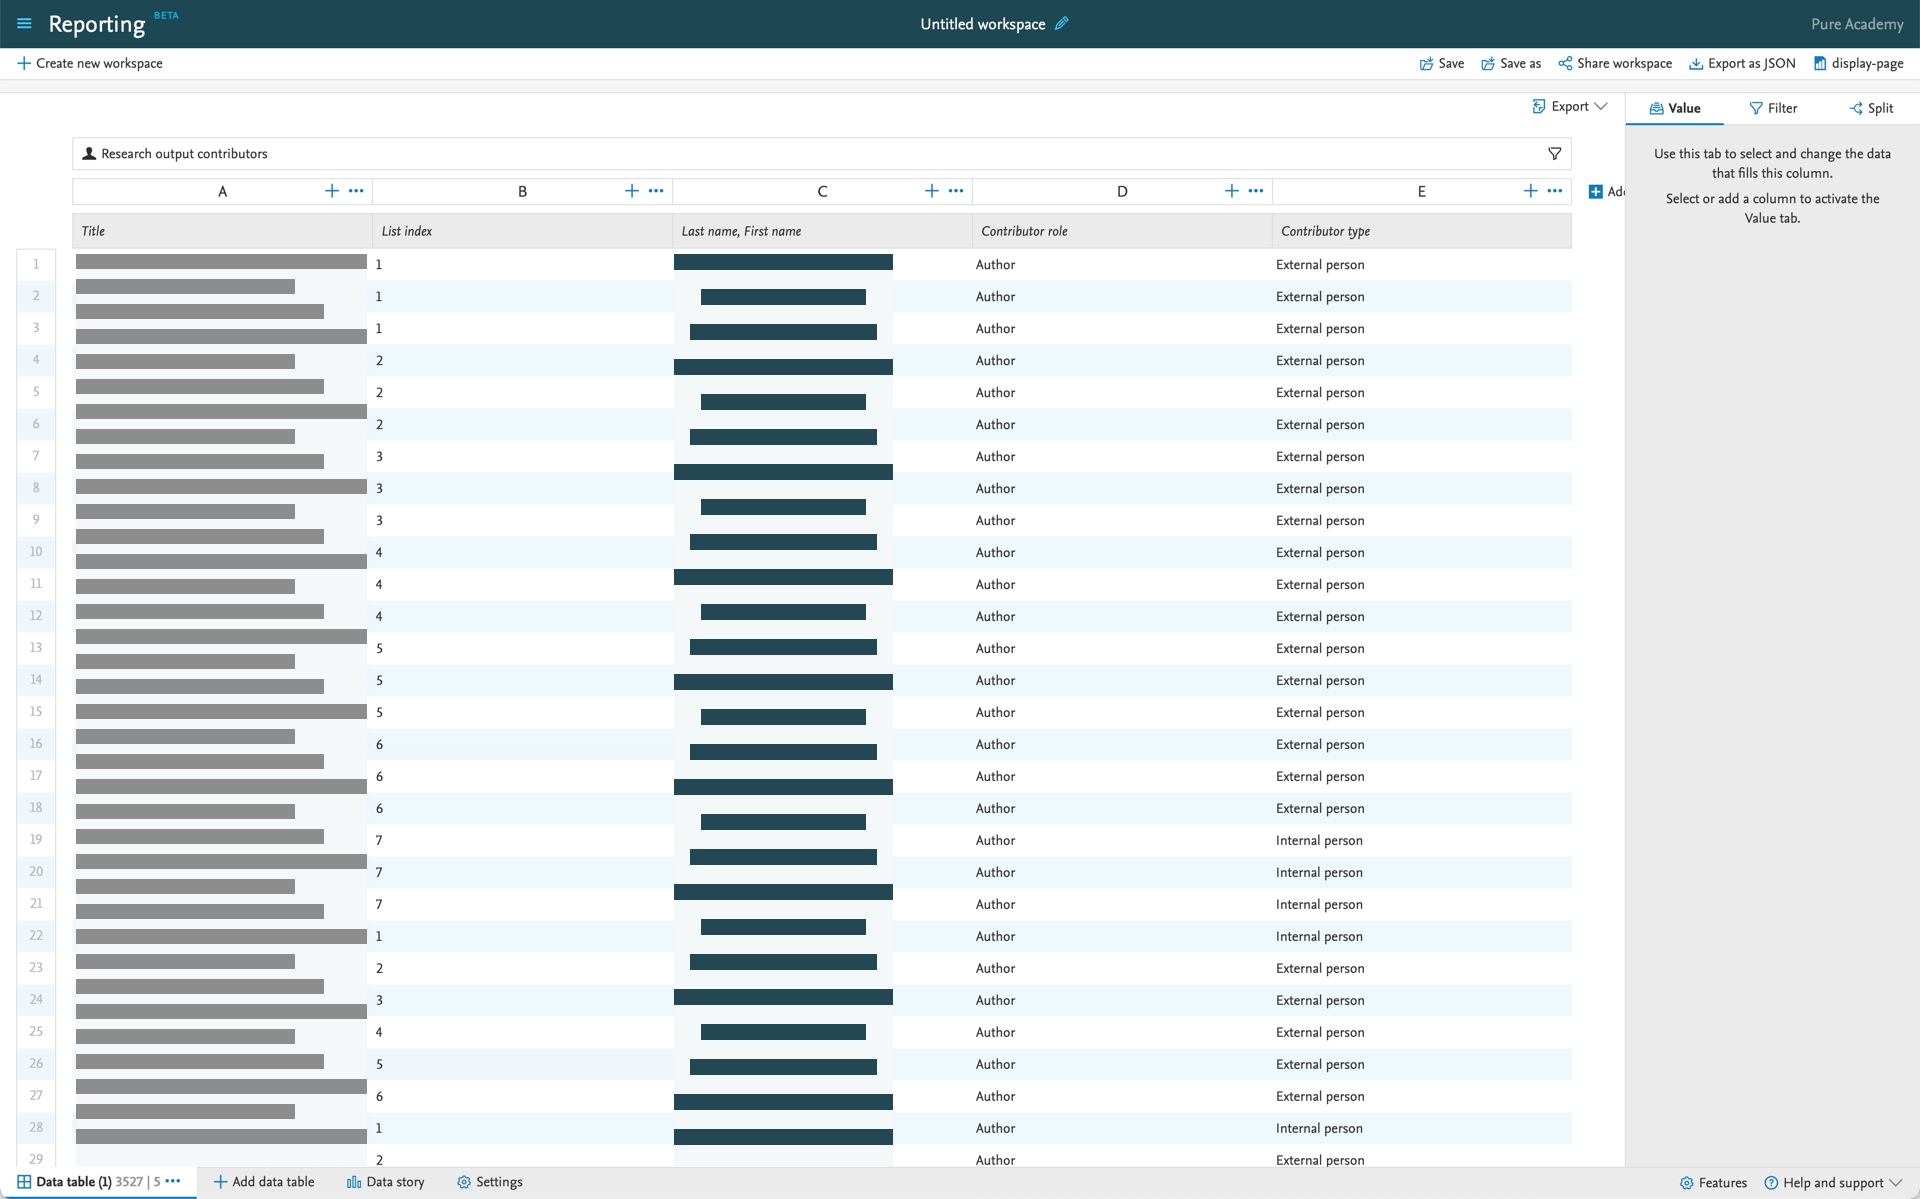
When you select 'Research output contributors', Pure will add a number of relevant columns with Person's names, roles, organizational units, and more, the number of columns depends on whether the type is selected as a driver content type, or as a relation to other content.
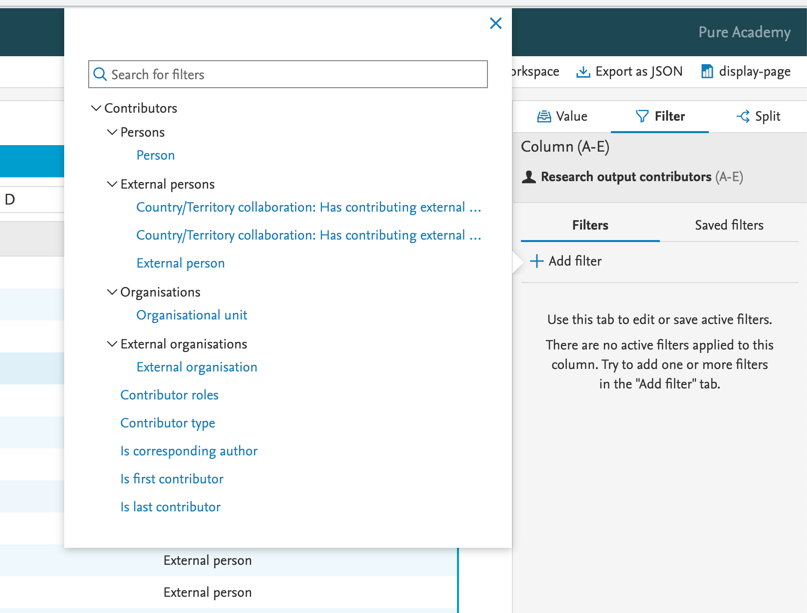
You can apply various filters to the column group to get to the exact data you need for your report.
Tip: One of the sought-after details provided as part of the 'Research output contributors' reporting type is List index. By combining the new 'Column expand' function with List index and Contributor type filters, you can easily narrow down your Authors to first contributors only.
Click here for more details...
Background
Pure holds a lot of valuable information about relations between content: for example, between Persons and Research outputs, or between Research outputs and Publishers. In the context of reporting, these relations can pose a challenge: sometimes we may not be sure if the details we want to include are stored within the Person, or the Research output record. By introducing the 'Research output contributors' reportable type, we are bringing together the relevant details that might be stored deeper in, or are simply just related to, Research outputs and Persons.
Feature details
Instructions |
Screenshot |
|---|---|
| It is possible to select the new 'Research output contributors' type as your driver content type. |
|
| If 'Research output contributors' is added as the driver content type, Pure will automatically add a number of columns with related data. You can remove the columns you don't need. |
|
|
There are a lot of different filters available for Research output contributor reporting. Using filters is really powerful in this context: for example filtering on the Contributor type makes it possible to list all of the internal or external contributors. |
|
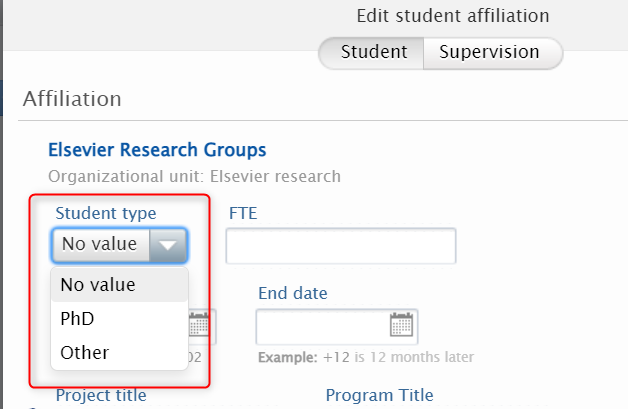
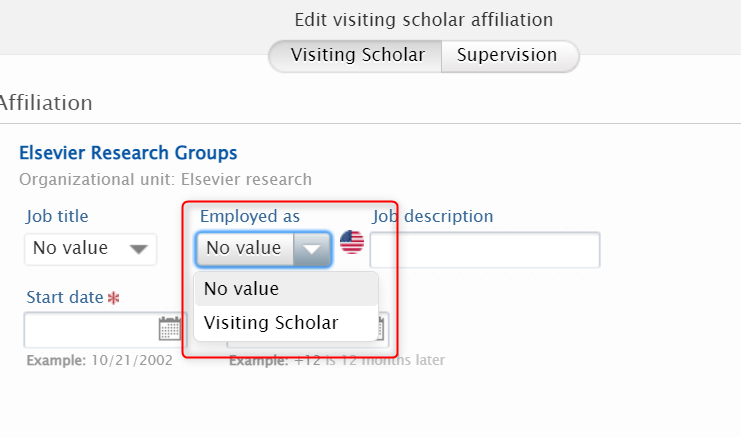
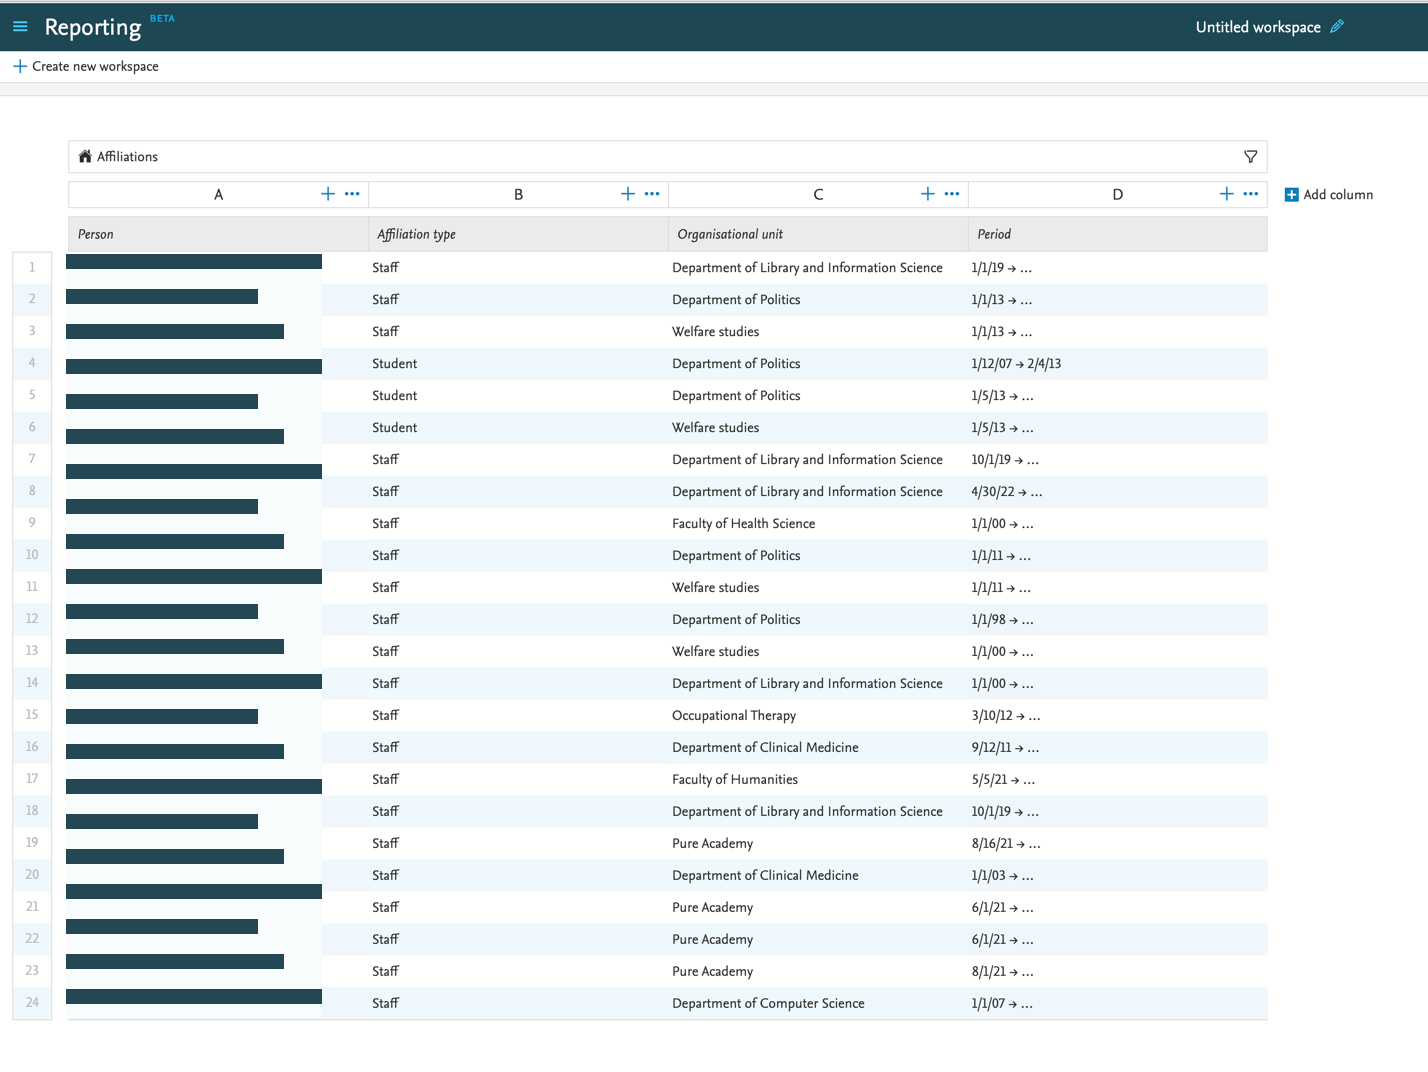
7.5. Reporting on Affiliations
Another new reporting type now available is Affiliations: it allows you to easily create reports on specific staff/student affiliations, for example on all current staff that belongs to a specific organization unit.
When you add 'Affiliations' to your report, Pure will add a number of relevant columns, which you can later choose to remove. The columns may contain, for example, attendance status, award date, or start year in the case of students.
Click here for more details…
Instructions |
Screenshot |
|---|---|
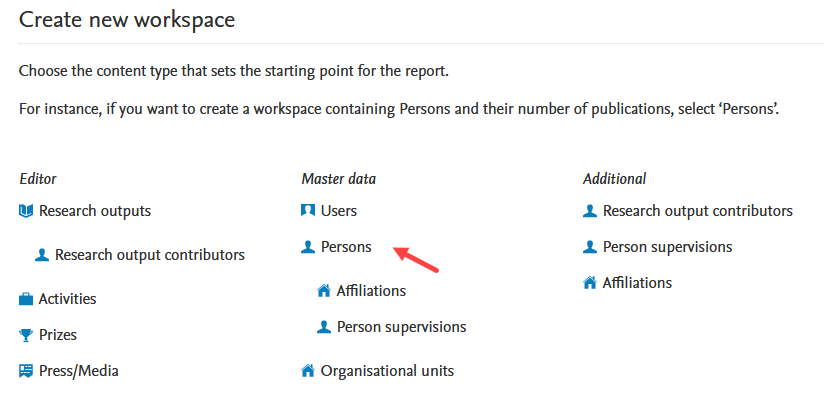
| You can select the Affiliation type as your driver content type. |
|
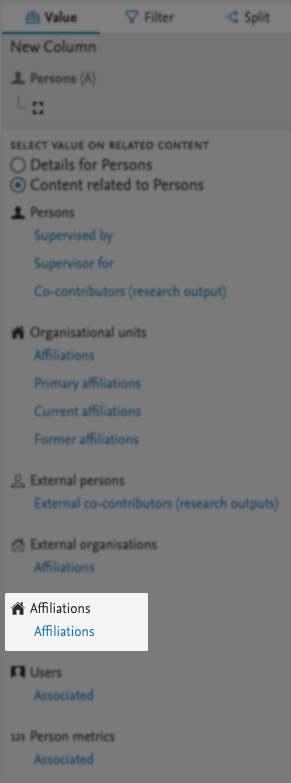
| It is also possible to select it when adding relations to Persons. |
|
When you add 'Affiliations' to your report, Pure will add a number of relevant columns, which you can later choose to remove. |
|
|
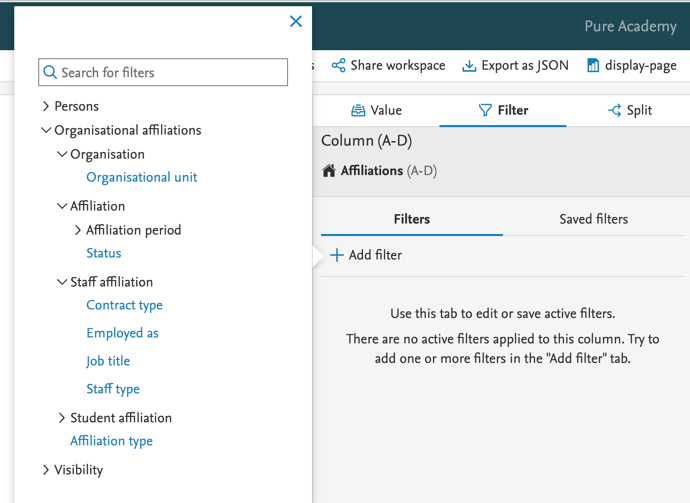
There are a lot of different filters available for Affiliation reporting. Using filters is really powerful in this context: for example filtering on the Staff type makes it possible to list all staff of a particular type. Combined with an Organizational unit filter, it will produce a list of all staff of a particular type, affiliated with a particular organizational unit. |
|

7.6. Improved reporting on metrics: expanded h-index
We have introduced a new way of reporting on metrics, starting with the expanded options for h-indices (also introduced in this release - see h-index metrics release notes section). The goal of this new approach, which will be implemented for all metrics in Pure over the coming releases, is to ensure that the wide variety of metrics supported in Pure will always be easy to report on, and your system's performance will not be negatively affected.
Click here for more details...
With h-index enabled (see h-index metrics release notes section for instructions), users with appropriate rights can now report on the h-index by time period and source.
The h-index is a Person-level metric and the instructions below provide an overview from this perspective.
Instructions |
Screenshot |
|---|---|
|
Creating a new report on Persons and h-index Create a new workspace and select Person content type as your driver content type. |
|
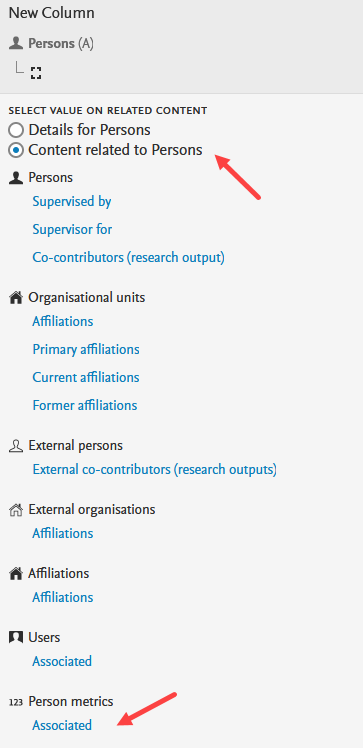
|
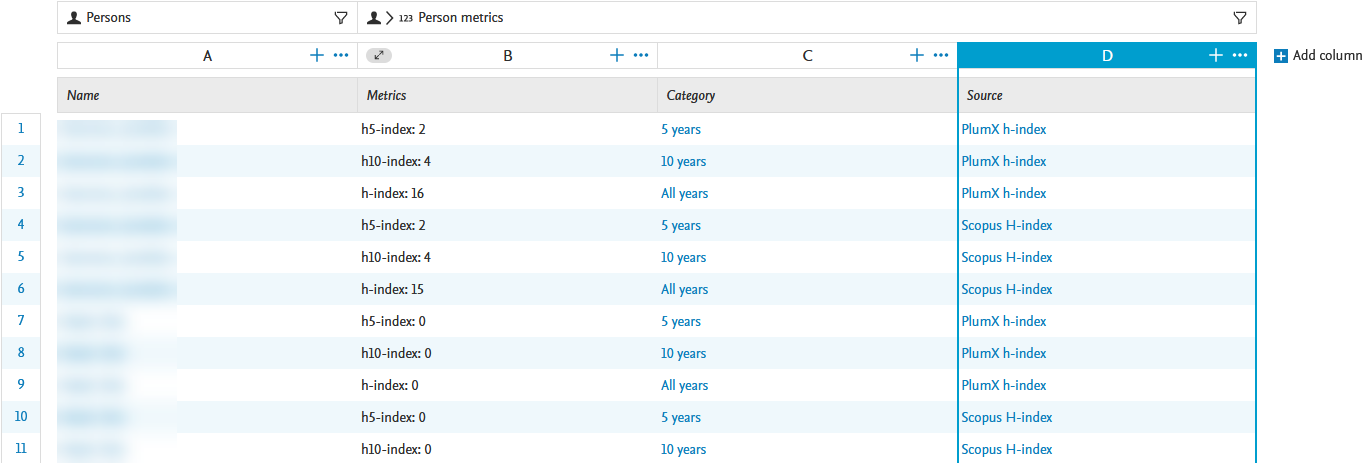
Add h-index as a relation to the Person: Select the Content related to Persons option, and add Persons metrics > Associated from the dropdown menu. |
|
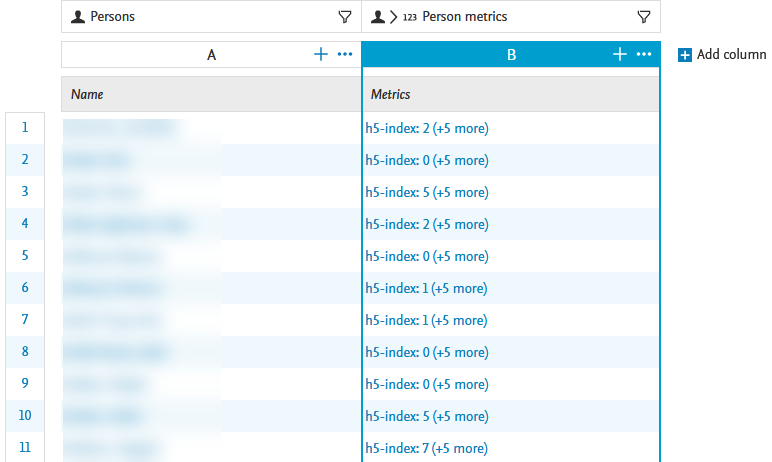
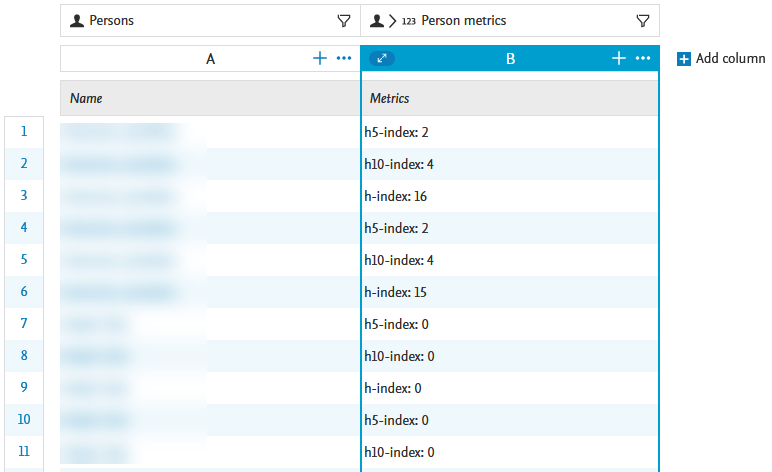
The h-index of each source and time range specified in the h-index configuration is shown for each Person. Apply column expand (see column expand feature release notes section) to show all h-index values. |
|
|
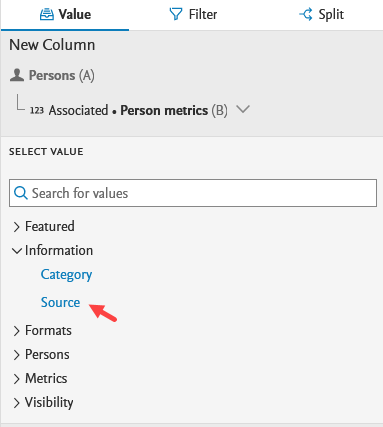
To show the individual citation sources for each h-index:
|
|
|
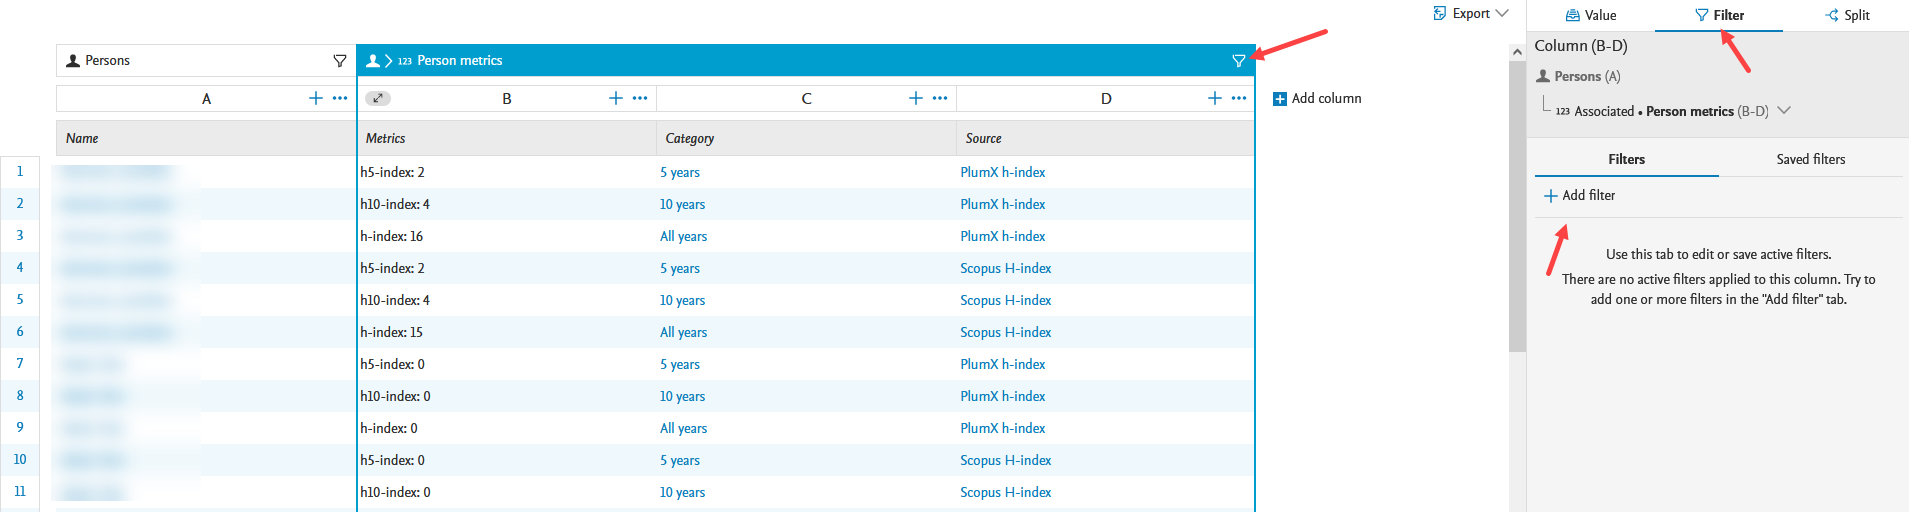
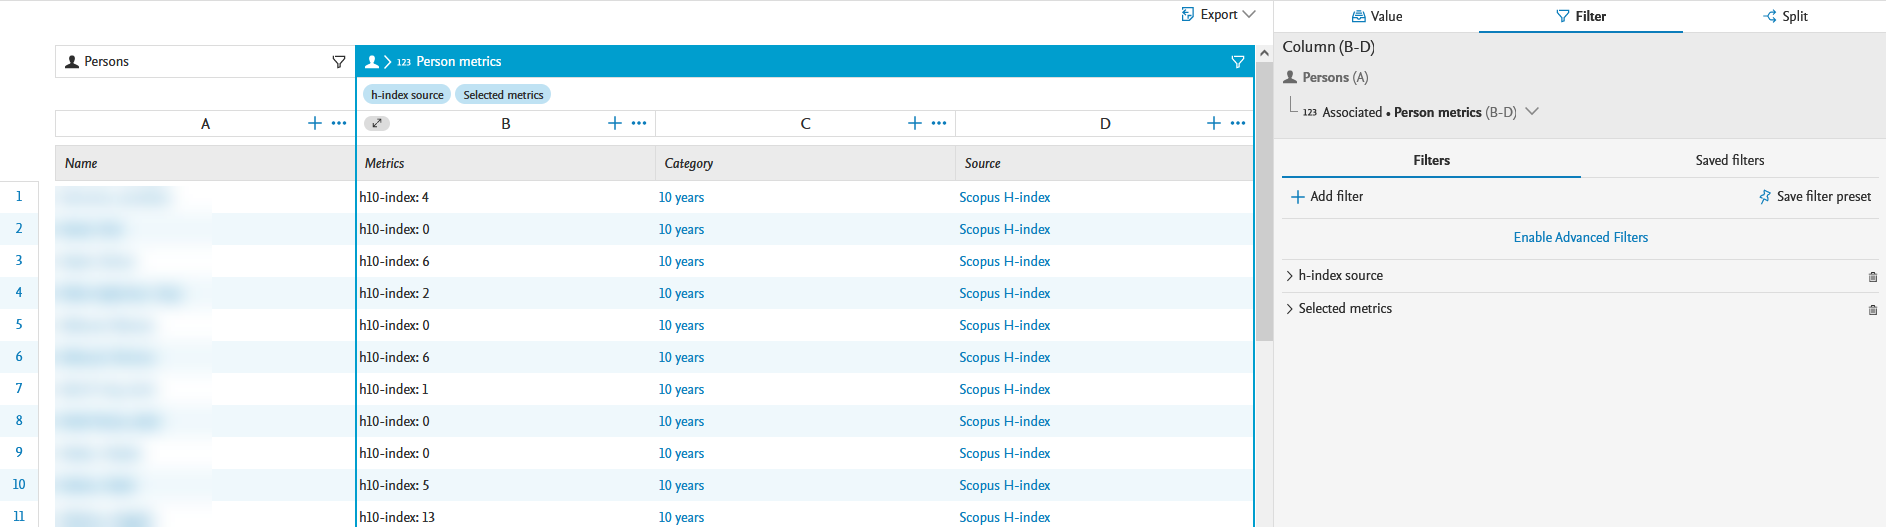
Filtering on h-index sources and time ranges You can also filter data in the metrics-related columns selecting the Filter option in the sidebar, or the Filter icon above the column(s). Clicking Add filter brings up the available filter options for the columns. |
|
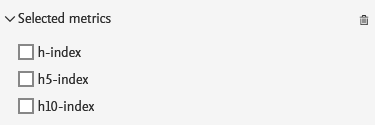
| For metric name/time ranges, select the Selected metrics option from the Featured category dropdown. |
|
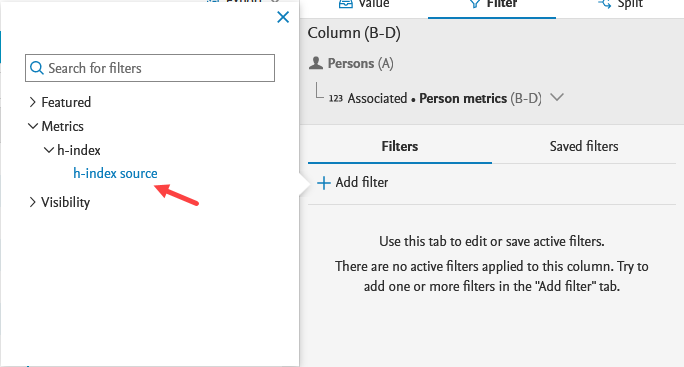
| For metric source, select h-index source option from the Metrics > h-index category dropdown. |
|
| In the scenario provided in the screenshot, the time range has been limited to 10 years (via the Selected metrics filter) and to Scopus as a citation source (via the h-index source filter). |
|

7.7. Template-level reporting
This update was released as part of 5.23.2
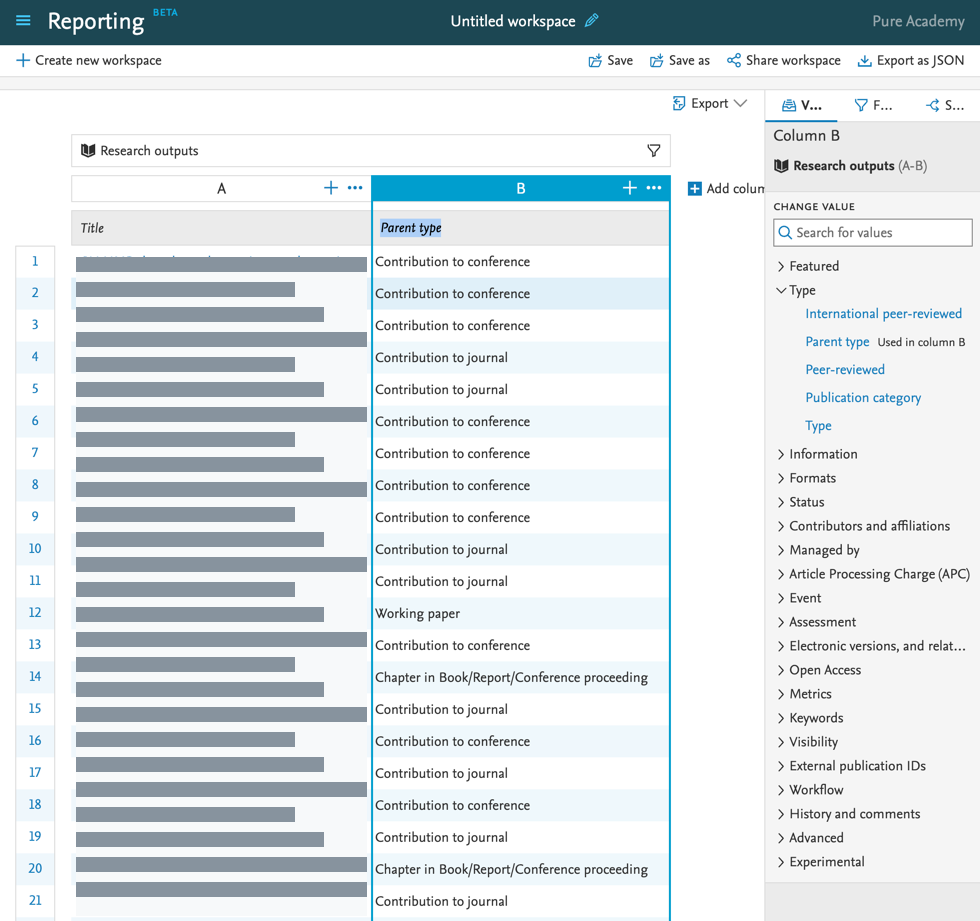
You can now use the 'Parent type' values in reporting. This allows you to easily add information about the parent template of a particular content item to your data table. 'Parent type' can be used as values, as a filter, in splits, and in the data story.
Click here for more details…
Instructions |
Screenshots |
|---|---|
You can select the parent type in the date table to create the workspaces that you need to get information on this level. |
|
You can also use the parent type in splits, to easily create workspaces that provide an overview, for instance, on the organizational level. |
|
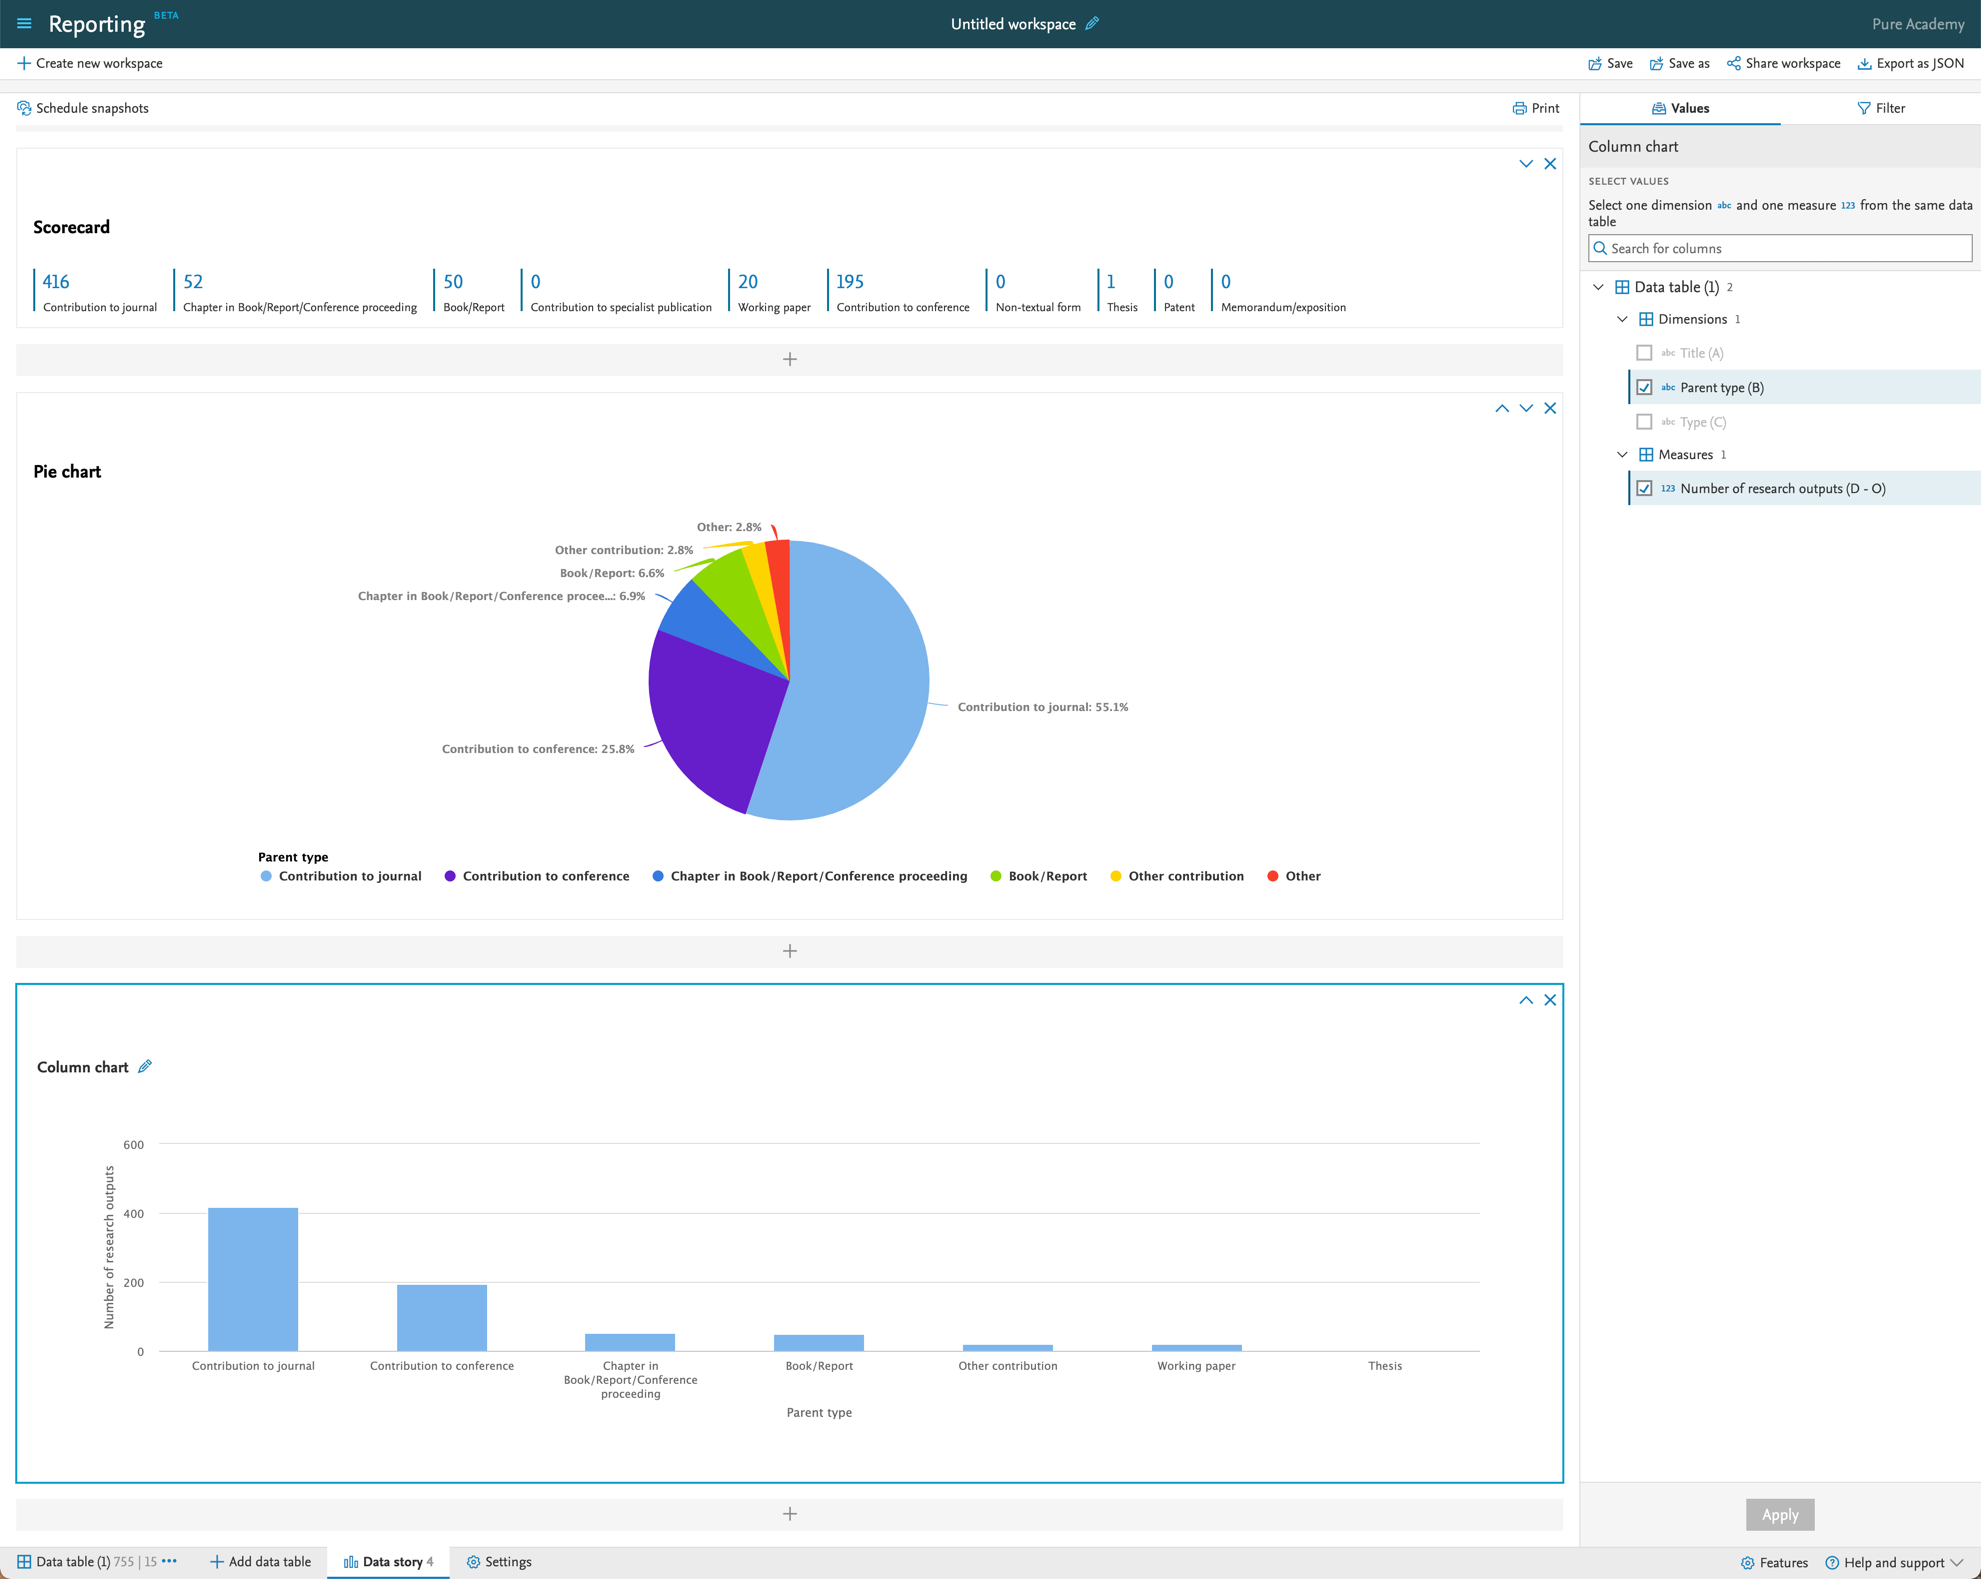
| You can combine the parent type in the data story with split option to create the narrative you need based on the template level. |
|

7.8. Performance improvements
We are continuously improving the performance of the Reporting module. In this release, we introduced data cache for data story, which means we do not need to fetch data every time you switch between the different modes of work on the data story (printing, editing, etc.).
8. Country-specific features
8.1. Belgium: Datasets and Equipment added to FRIS sync log
In this release we have added support for Datasets and Equipment logs in the FRIS synchronization.
Click here for more details…
Instructions |
Screenshot |
|---|---|
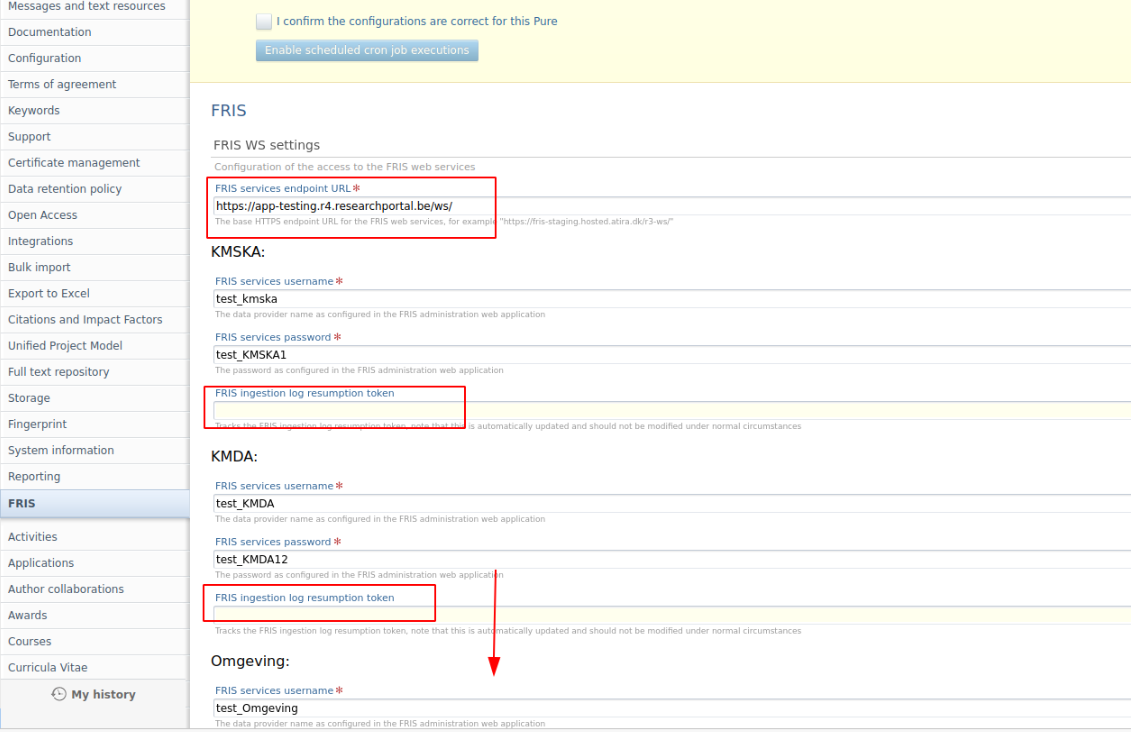
|
To enable the logs for Datasets and Equipment go to Administrator > FRIS and:
|
|
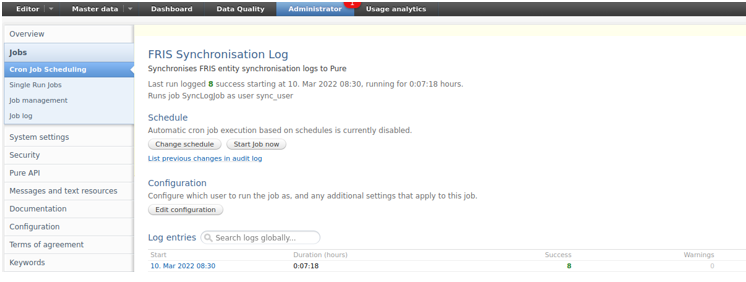
| Go to Administrator > Jobs to run the 'FRIS Synchronization Log' job. |
|
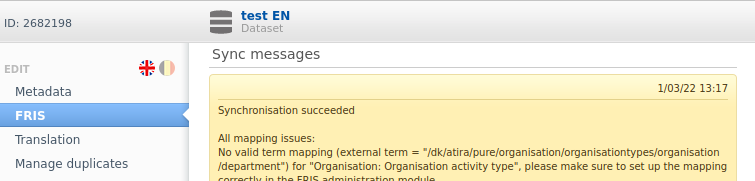
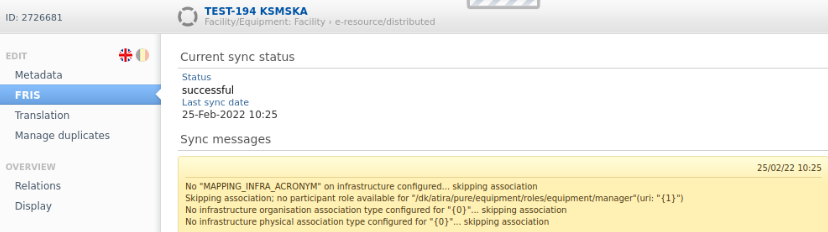
| Once the job has run, the FRIS tab and sync messages will be visible on Datasets and Equipment |
|
Published at August 20, 2024